
Related Manuals for Swann alpha Series


Summary of Contents for Swann alpha Series
- Page 1 Powered by Swann Combination Product Name: Home Assistance Button and Movement Sensor Kit HomeSafe Alert Kit Instruction Manual Manual de instrucciones...
-
Page 2: How Does It Work
The Indoor Alarm Receiver has 4 separate channels — each with customizable alert sounds and the capability to support continuous monitoring of up to 15 devices per channel. Have Questions? We are here to help! Visit us at http://support.swann.com. You can also email us at any time via: tech@swann.com... - Page 3 GETTING TO KNOW THE DEVICES Indoor Alarm Receiver Overview(Model:SWALPH-CHM2) Doorbell Channel Sensor Channel 2 LED Indicator LED Indicator Sensor Channel 3 Sensor Channel 1 LED Indicator LED Indicator Doorbell Channel Volume Button Button Melody Select Button Sensor Channel 1, 2, 3 Buttons Speaker Keyhole Mounting Slots Battery Compartment...
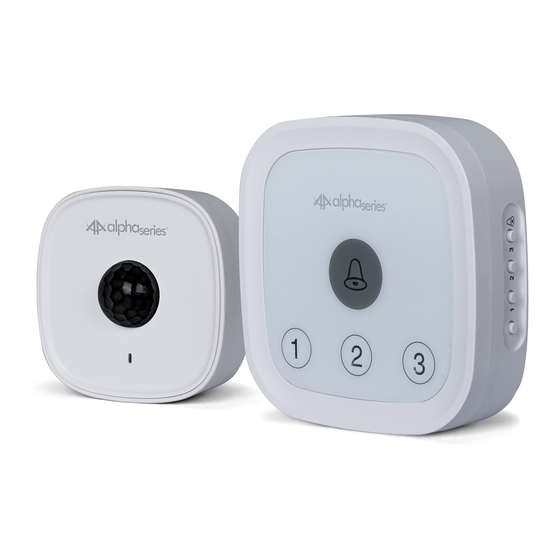
- Page 4 GETTING TO KNOW THE DEVICES Alert Sensor Overview(Model:SWALPH-ALSEN2) Mounting Bracket Slot Passive Infrared Motion Detector Battery Compartment Locking Screw CODE Button LED Indicator (inside battery Single Blink - Motion Detected compartment) Continuous Blinking - Low Battery Doorbell Overview(Model:SWALPH-BUTTON) Mounting Bracket Slot Battery Doorbell Button / Compartment...
-
Page 5: Battery Installation
BATTERY INSTALLATION Indoor Alarm Receiver The Indoor Alarm Receiver requires 3 AA batteries (not supplied) to operate. For reliable, long-lasting performance, use only high quality alkaline batteries. To install batteries: Push the release tab and lift off the battery compartment cover. Insert 3 new AA batteries, matching the polarity markings (+ and -) shown inside the battery compartment. -
Page 6: Operating Basics
OPERATING BASICS Pairing the Alert Sensor with the Indoor Alarm Receiver Place the Alert Sensor faced down to avoid triggering it. Decide which Sensor Channel (1, 2 or 3) you want to assign to the Alert Sensor, then press and hold the desired Sensor Channel Number button on the side of the Indoor Alarm Receiver until the corresponding Sensor Channel LED indicator lights up and a beep is heard. - Page 7 OPERATING BASICS Changing the Channel Melody You can set a different melody sound for each Sensor/Doorbell Channel. Press the Melody Select button on the side of the Indoor Alarm Receiver. The next melody is played. Keep pressing the Melody Select button until you hear a melody you like.
-
Page 8: Mounting The Devices
MOUNTING THE DEVICES Indoor Alarm Receiver • The Indoor Alarm Receiver can be completely freestanding or mounted. The operating distance between the Indoor Alarm Receiver and the Alert Sensor/ Doorbell is up to 100ft/30m but the range may vary depending on local conditions. •... - Page 9 MOUNTING THE DEVICES To mount the Alert Sensor: • Wall mounting using screws Attach the mounting bracket to the Slide the Alert Sensor down onto the wall using two screws (supplied). mounting bracket until it is secured You may need to use wall anchors in place.
-
Page 10: Troubleshooting
TROUBLESHOOTING I keep getting false alerts from the Alert Sensor • The Alert Sensor uses passive infrared to detect changes in temperature so check that there are no shifting heat sources in the view of the sensor. This includes the obvious things, such as moving pets or people, but also things such as a moving shadow on a hot day or bushes which can absorb a lot of heat and trigger motion alerts as they sway in the wind. -
Page 11: Descripción General
DESCRIPCIÓN GENERAL ¿Cómo funciona? En pocas palabras, el sistema de asistencia para el hogar y sensor de movimiento incluye tres componentes. El receptor de alarma interior funciona como timbre de alarma y como timbre de puerta. Controla las señales provenientes de los sensores de movimiento y del timbre, y reproduce sonidos de alerta en respuesta a esa señal. - Page 12 CONOCIENDO LOS DISPOSITIVOS Descripción general del receptor de alarma interior Indicador LED del canal del Indicador LED del timbre canal 2 del sensor Indicador LED del Indicador LED del canal 3 del sensor canal 1 del sensor Botón del canal Botón de del timbre volumen...
- Page 13 CONOCIENDO LOS DISPOSITIVOS Descripción general del sensor de movimiento Ranura del soporte de montaje Detector de movimiento infrarrojo pasivo Compartimiento de la batería Tornillo de fijación Indicador LED Un solo parpadeo: Movimiento detectado Parpadeo continuo: Batería baja Descripción general del timbre Ranura del soporte de montaje Compartimiento...
-
Page 14: Instalación De La Batería
INSTALACIÓN DE LA BATERÍA Receptor de alarma interior El receptor de alarma interior requiere 3 baterías “AA” (no incluidas) para funcionar. Para un rendimiento fiable y duradero, solamente use baterías de alcalinas de alta calidad. Para instalar las baterías: Presione la lengüeta de seguridad y levante la cubierta del compartimento de las baterías. - Page 15 PRINCIPIOS BÁSICOS DE FUNCIONAMIENTO Vincular el sensor de movimiento con el receptor de alarma interior Coloque el sensor de movimiento hacia abajo para evitar que se active. Decida qué canal del sensor (1, 2 o 3) desea asignarle al sensor de movimiento y, a continuación, presione y mantenga presionado el botón del número del canal del sensor que haya elegido en el costado del receptor de alarma interior hasta que el indicador LED correspondiente al canal se encienda y se escuche un pitido.
- Page 16 PRINCIPIOS BÁSICOS DE FUNCIONAMIENTO Cambiar la melodía del canal El receptor de alarma interior ofrece una selección de 36 sonidos de melodías diferentes. Puede establecer un sonido diferente para cada canal de timbre/sensor. Presione el botón de selección de melodía en el receptor de alarma interior. Se reproduce la siguiente melodía.
- Page 17 MONTAJE DE LOS DISPOSITIVOS Receptor de alarma interior • El receptor de alarma interior puede ser completamente independiente o estar montado. La distancia de funcionamiento entre el receptor de alarma interior y el timbre/sensor de movimiento es de hasta 100 pies/30 m, pero el alcance puede variar en función de las condiciones locales.
- Page 18 MONTAJE DE LOS DISPOSITIVOS Para montar el sensor de movimiento: • Montaje en pared con tornillos Fije el soporte de montaje en la pared con Deslice el sensor de movimiento en el dos tornillos (provistos). En función de la soporte de montaje hasta que quede superficie, es posible que deba utilizar asegurado en su lugar.
-
Page 19: Solución De Problemas
Es posible que las baterías se estén agotando, lo que puede hacer que el receptor de alarma interior se comporte de manera errática. Intente instalar baterías nuevas. ¿Tiene preguntas? ¡Estamos para ayudarlo! Visítenos en http://support.swann.com. Además, puede enviarnos un correo electrónico en cualquier momento a: tech@swann.com... - Page 20 You must present your receipt as proof of date of purchase for warranty validation. Any unit which proves defective during the stated period will be repaired without charge for parts or labour or replaced at the sole discretion of Swann. The end user is responsible for all freight charges incurred to send the product to Swann’s repair centres.
- Page 21 Please take attention that changes or modification not expressly approved by the party responsible for compliance could void the user’s authority to operate the equipment. This device complies with Part 15 of the FCC Rules. Operation is subject to the following two conditions: This device may not cause harmful interference, and This device must accept any interference received, including interference that may cause undesired operation.