Advertisement
Quick Links
SOME NOTIONS ON
HUMIDITY
Air always contains a certain amount of water in
the form of vapour. This determines the level of
humidity in an atmosphere.
The capacity of the air to hold water vapour
increases with temperature.
This is why in our homes, as soon as the tempe-
rature decreases, the vapour contained in the air
condenses, as is evident on the colder surfaces
in the room, such as the windows, walls etc.
The purpose of a dehumidifier is to remove the
excess moisture from the air, avoiding the dama-
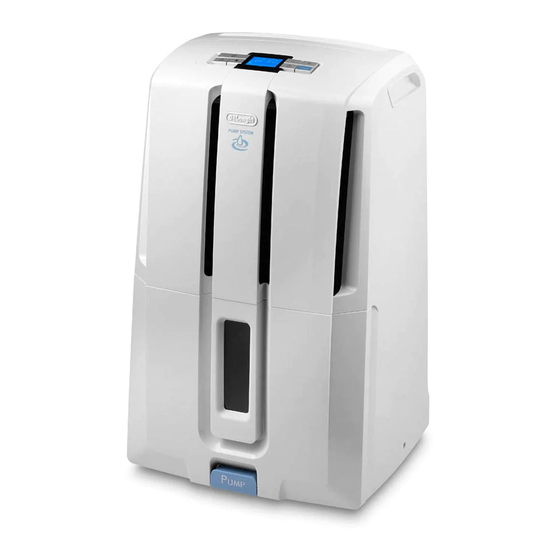
DESCRIPTION/ACCESSORIES
1. Control panel
2. Water level viewing window
3. Condensate collection tank
4. Lifting handles
5. Air intake grille
6. Air filter
4
6
5
3
11
ge caused by condensation.
Experts have established that the optimum envi-
ronmental conditions for our well being and for
the home are obtained between 40% and 60%
relative humidity.
With very low temperatures, you are recommen-
ded to heat the room even minimally.
This considerably increases the dehumidifying
power of the appliance.
With heating, the condensation formed by the
water vapour on windows and other cold surfa-
ces evaporates into the air to be collected by the
dehumidifier. Air leaving the dehumidifier is
usually warmer than room temperature.
7. Air outlet grille
8. Condensate drain hose to be inserted in the
back of the appliance
9. Pump condensate drain hose to be inserted
in the front of the appliance
10. Pump connector (remove cap before use)
11. Castors
7
4
8
9
2
10
1
8
Advertisement

Related Manuals for DeLonghi AriaDry DD230P


Summary of Contents for DeLonghi AriaDry DD230P
- Page 1 SOME NOTIONS ON ge caused by condensation. Experts have established that the optimum envi- HUMIDITY ronmental conditions for our well being and for the home are obtained between 40% and 60% Air always contains a certain amount of water in relative humidity.
-
Page 2: Installation
INSTALLATION Position the appliance in the room to be dehu- midified. A free space of at least 50 cm must be left at the front of the dehumidifier, so as not to block the air outlet. For efficient ventilation a space of about 5-10 cm fig. -
Page 3: Description Of The Control Panel
CONTROL PANEL Display Increase Decrease ON/Stand-by humidity humidity button button button Room Timer Pump temperatu- button button button re button Description of the control panel Timer button "ON/Standby" button Sets the timer to delay when the machine comes Turns the appliance on and off. on or goes off. -
Page 4: Mode Selection
MODE SELECTION TIMER FUNCTION 1) Plug the appliance into a mains socket. How to programme delay ON 2) " -- -- " is displayed to indicate that the applian- 1) With the appliance in stand-by, press the ce is in standby and therefore ready for ope- button. -
Page 5: Cleaning And Maintenance
CLEANING AND If the appliance is not used for long periods MAINTENANCE • After unplugging the appliance from the Always unplug the appliance from the power soc- power socket, empty the tank. ket before performing any cleaning or maintenan- • Clean and reposition the filter. -
Page 6: Troubleshooting
TROUBLESHOOTING Check the following points before calling your local authorised Service Centre. PROBLEMS CAUSE SOLUTION The filter is blocked. Clean the filter The appliance is operating in dehumidifying mode, but the The temperature or humidity In certain conditions, it is nor- humidity does not decrease in the room are too low.