Table of Contents
Advertisement
Quick Links
Advertisement
Table of Contents

Related Manuals for Brookstone BKWIFICAMWL2


Summary of Contents for Brookstone BKWIFICAMWL2
- Page 1 Security WiFi Camera USER MANUAL FCC ID: 2AQ7B-IPC159...
- Page 2 2. This equipment complies with FCC radiation exposure limits set forth for an uncontrolled environment. This equipment should be installed and operated with a minimum distance of 20cm between the radiator and any part of your body. For more products please visit www.brookstone.com...
-
Page 3: Warranty Information
WARRANTY INFORMATION One Year Limited Warranty. Customer Service: 732-994-2301; email: help@smartpointco.com The BROOKSTONE trademark, names and logos are owned by BKST Brand Holdings LLC ©2020. All rights reserved Manufactured, marketed and distributed by Smartpoint LLC, under license Google, Android and Google Play are trademarks of Google LLC. -
Page 4: Specifications
SPECIFICATIONS Model: BKWIFICAMWL2 Resolution: 1920x1080 Alarm: Motion detection Viewing angle: 100° (Lens angle is adjustable) Manually adjustable lens angle Up: 25° Down: 18° Right: 20° Left: 20° Frame rate: Up to 15 fps Sensor: 2.0 Megapixel Audio: Microphone & Speaker built-in Micro SD Card Storage: Up to 32GB Compression: H.264... - Page 5 FEATURES • Wi-Fi remote controlled through App • Adjustable Lens Angle • Cordless, plugs directly into outlet • Motion detection • Sound detection • Two way audio • One-Touch Call Out button • Live video • Video recording • Takes still photos •...
-
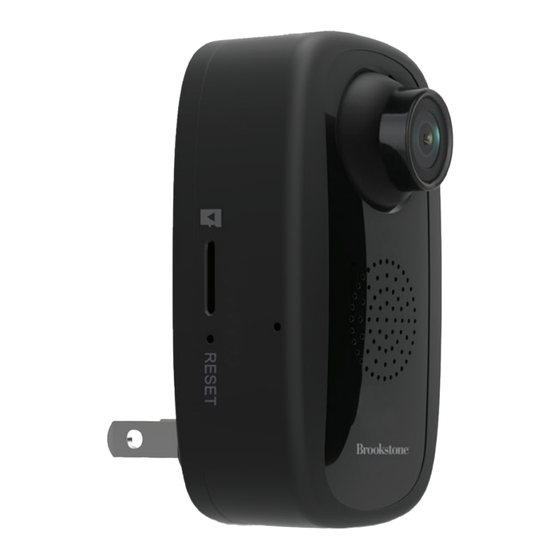
Page 6: Product Configuration
PRODUCT CONFIGURATION 1. Micro SD Card Slot 8. Red LED 2. Reset Hole Working Indicator 3. Power Plug 9. Blue LED 4. Camera Lens Working Indicator 5. Built-in Speaker 6. Built-in Microphone 7. One-Touch Call Out Button... -
Page 7: Download App
DOWNLOAD APP 1. Android: download “Brookstone Smart” app on Google Play. 2. iPhone: download “Brookstone Smart” app from the App Store. Brookstone Smart... -
Page 8: Registration And Login
REGISTRATION AND LOGIN 1. Run the “Brookstone Smart” app from your smart phone. 2. Register and login. * Screenshots may slightly differ from actual app. -
Page 9: Add Device
ADD DEVICE 1. Plug in Wi-Fi Camera into the wall. If the red light is not already blinking, insert the provided pin gently into the reset hole for 3-5 seconds, then release. The light should then start blinking red. Camera is now ready to be set up. 2. - Page 10 4. Press the “next step” button 5. Make sure phone is connected to the Wi-Fi network that the device will be connected to. Enter your password for the Wi-Fi network. 6. Follow the directions in the app and hold the QR code on the screen in front of the view of the camera.
- Page 11 7. Connecting process will begin. Do not turn off Wi-Fi Camera or phone while connecting. Wait for connection process to complete. 8. Once device has been successfully added, name the device what you would like it to be called in the app.
- Page 12 ADJUSTABLE LENS ANGLE The camera is equipped with a lens that can be manually adjusted to your desired direction. Directions can be adjusted to the below angles. Up: 25° Down: 18° Right: 20° Left: 20°...
- Page 13 ONE TOUCH CALL OUT BUTTON When a person in front of the camera wishes to reach the app owner, they can press the call button to send out the request for two-way audio. When the app owner accepts the request, the camera will be activated.
-
Page 14: Push Notifications
PUSH NOTIFICATIONS You can turn on/off notifications for all devices connected to app by clicking on the “Me” button at the bottom right of the screen. 2. Then click on ”Settings” button. From there you can turn on/off all notifications. 3. -
Page 15: Remove A Device
REMOVE A DEVICE From the home screen, click on the device you would like to remove. 2. Then click on the edit symbol on the top right of the screen. 3. From there you would then click the “Remove Device” button at the bottom of the screen. -
Page 16: App Functions
APP FUNCTIONS Live Video To view live video simply click on the device under “All devices” and select the camera you just added. Hit the full screen button in the top left corner to see your live footage at full screen on your phone. To hide the control panel, you can press the top right button. -
Page 17: Video Recording
Video Recording To record video press the “camera” button at the top of the control panel. To end recording, press the “camera” button again. The video will be saved in the APP(iOS) or the photos and video section(Android). To view recordings, press “gallery”... -
Page 18: Installing A Microsd Card
Installing a Micro SD Card To install a Micro SD Card, insert it into the slot on the side of the camera. (Please see images below to make sure you have the correct type of memory card.) Once you correctly insert it all the way it should click into place. -
Page 19: Cloud Storage
Cloud Storage If you don’t have a Micro SD Card in the camera, Cloud Storage can be purchased by pressing the “Cloud” button on the bottom of the main screen. When a Cloud subscription is purchased all motion detection video is saved in the cloud and is kept safe and secure. -
Page 20: Taking A Photo
Taking a Photo To take a photo, press the “camera” button. The photo will be saved in the APP(iOS) or the photos and video section(Android). To view your photos, press the “gallery” button. -
Page 21: Two Way Audio
Two Way Audio To activate two way audio, press the “speak” button. When the button is orange, whatever you say into your phone will come out of the speaker on the camera. You can also hear at the same time any sounds from the live video on the camera. -
Page 22: Motion And Sound Detection
Motion and Sound Detection The camera uses infrared sensors when someone/something appears within its detection area. It also detects sound so you can hear if your dog is barking or if there is a break in while you are away. Push notifications will be sent to your phone once motion or sound is detected. -
Page 23: Theme Color
Theme Color The control panel can be set to “Light Mode” or “Dark Mode”. To change this, press “Theme Color” and a pop up menu will let you select light or dark mode. -
Page 24: Private Mode
Private Mode The camera has a private mode. When the private mode is turned on the camera goes to sleep. You can turn this mode on from the main screen by pressing “Private Mode”... -
Page 25: Anti-Flicker
Anti-Flicker The camera has an “Anti-Flicker” setting if you notice flickering in your footage. Select it from the main screen and choose which frequency works best. - Page 26 Hub controls (sound, video quality, zoom in/out) You can control features from the live video feed. There is a volume button that is used to mute and unmute the live feed. There is also a button for the video quality and it can be used to switch between standard and high definition resolution.
- Page 27 Device”. On the next page press “Add Sharing” at the bottom. After that, enter the email on the person’s Brookstone Smart account that you would like to share the camera with. They will get a notification to accept and after that the other person will have access to view your camera through the Brookstone Smart app on their phone.
- Page 28 If you need to change the WiFi network that your device is connected to, delete the device from the Brookstone Smart App. Then start the set up process again as if you were adding a new device when you are connected to the new WIFI Network that you want to the connect your existing device to.