Table of Contents
Advertisement
Available languages
Available languages
Quick Links
PORTABLE EVAPORATIVE AIR COOLER
EN
USER MANUAL
READ AND SAVE THESE INSTRUCTIONS BEFORE USE
REFROIDISSEUR D'AIR PAR ÉVAPORATION PORTATIF
FR
MODE D'EMPLOI
LIRE CES INSTRUCTIONS AVANT L'UTILISATION ET LES CONSERVER
ENFRIADOR DE AIRE EVAPORATIVO PORTÁTIL
ES
MANUAL DE INSTRUCCIONES
LEA Y GUARDE ESTAS INSTRUCCIONES ANTES DE USAR LA UNIDAD
Customer Support:
Assistance Au Client:
Servicio de atencion a clientes:
Web: www.jmatek.com
USA: 1-800-474-2147 | usinfo@jmatek.com
Model / Modèle / Modelo:
CL202PEU
Advertisement
Table of Contents

Related Manuals for Honeywell CL202PEU


Summary of Contents for Honeywell CL202PEU
- Page 1 LIRE CES INSTRUCTIONS AVANT L'UTILISATION ET LES CONSERVER ENFRIADOR DE AIRE EVAPORATIVO PORTÁTIL MANUAL DE INSTRUCCIONES LEA Y GUARDE ESTAS INSTRUCCIONES ANTES DE USAR LA UNIDAD Model / Modèle / Modelo: CL202PEU Customer Support: Assistance Au Client: Servicio de atencion a clientes: Web: www.jmatek.com...
-
Page 2: Parts Description
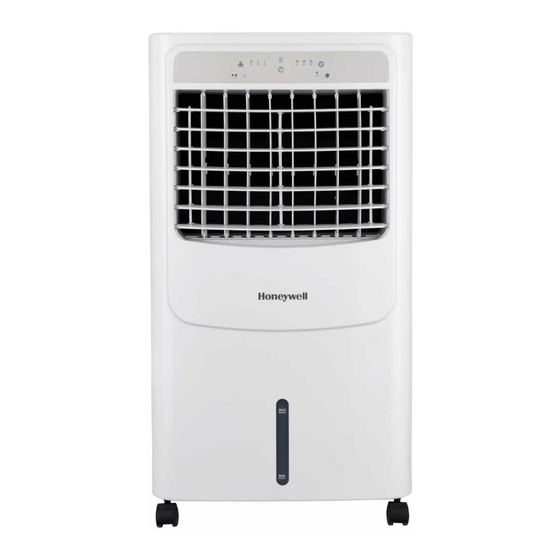
PARTS DESCRIPTION Control Panel Casters Adjustable Louvers Water Level Indicator Power Cord & Plug Rear Grill Water Fill Door & Ice Honeycomb Cooling Media Compartment Lid Handle Drain Plug WARNING -- READ AND SAVE THE AIR COOLER SAFETY & MAINTENANCE GUIDE AND USER MANUAL BEFORE USING THIS PRODUCT. -
Page 3: Use And Operation
USE & OPERATION CONTROL PANEL FUNCTION BUTTONS POWER Press the button to turn the unit on. When power button is pressed, the fan will automatically activate. The cooler will start automatically at medium speed. After a few seconds the speed will switch to low. - Page 4 USE & OPERATION (CONTINUED) FUNCTION BUTTONS (CONTINUED) COOL Press the button until the to activate the Cooling mode, as the water pump will engage and wet the Honeycomb cooling media. Note: When the COOL indicator light is switched OFF, the unit will automatically revert to fan mode only (without evaporative cooling).
- Page 5 USE & OPERATION (CONTINUED) REMOTE CONTROL POWER : ON / OFF SPEED : Low / Medium / High SWING : Controls the horizontal motion of the louvers TIMER : Controls the Timer function for automatic off COOL : Activates Evaporative Cooling NOTE: •...
- Page 6 USE & OPERATION (CONTINUED) COOLER LOCATION Make sure to position the air cooler correctly before you set up and start using the product. Please refer to the COOLER LOCATION section of the separate Safety & Maintenance Guide. WATER & ICE COMPARTMENT CAUTION: Unplug the unit from the electrical power outlet before emptying or refilling the water tank.
- Page 7 USE & OPERATION (CONTINUED) LOW WATER ALARM The unit is equipped with a low water sensor. In Cooling Mode, when water in the tank is below the minimum level, you will hear a beeping sound and the COOL indicator light will flash continuously. The unit will automatically pause evaporative cooling.
- Page 8 USE & OPERATION (CONTINUED) CLEANING THE HONEYCOMB COOLING MEDIA Switch off the master power for the outlet before unplugging the unit from the electrical outlet. Make sure all outlets and plugs are dry before use. • The appliance is supplied with a Honeycomb Cooling Media. •...
-
Page 9: Description Des Pieces
DESCRIPTION DES PIECES Panneau de Contrôle Roulettes Grilles d'Aération Indicateur de Niveau d'Eau Cordon Electrique & Prise Grille Arrière Porte de Remplissage d'Eau et Système de Refroidissement Couvercle du Compartiment Honeycomb de Glaçon Poignée Bouchon de Vidange AVERTISSEMENT -- LIRE ET SAUVEGARDER LE GUIDE DE SECURITE ET D'ENTRETIEN ET LE MANUEL D'UTILISATION DU REFROIDISSEUR D'AIR AVANT D'UTILISER LE PRODUIT. -
Page 10: Utilisation & Fonctionnement
UTILISATION & FONCTIONNEMENT PANNEAU DE CONTROLE BOUTONS DE FONCTION INTERRUPTEUR Appuyez sur le bouton pour allumer l'appareil. Lorsque vous enfoncerez le bouton d'alimentation, le ventilateur sera automatiquement activé. Après quelques seconds, la vitesse basculera à faible. Pour éteindre l'unité, appuyez à nouveau sur le bouton. OSCILLATION Appuyer sur le bouton OSCILLATION jusqu’à... - Page 11 UTILISATION & FONCTIONNEMENT (CONTINUER) UTILISATION & FONCTIONNEMENT (CONTINUER) REFROIDISSEMENT Appuyez sur le bouton jusqu'à ce que le active le mode Refroidissement, car la pompe à eau s'enclenchera et mouillera le système de refroidissement en nid d’abeilles. Remarque : Lorsque le témoin lumineux REFROIDISSEMENT (COOL) est éteint, l'appareil reviendra automatiquement au mode ventilateur uniquement (sans refroidissement par évaporation).
- Page 12 UTILISATION & FONCTIONNEMENT (CONTINUER) TÉLÉCOMMANDE Interrupteur : Allumer / Eteindre Vitesse : Faible / Moyenne / Grande Oscillation : Contrôle le mouvement horizontal des persiennes : Contrôle la fonction de Minuterie pour un Minuteur arrêt automatique Refroidis- : Active le refroidissement par évaporation semen: REMARQUE: •...
- Page 13 UTILISATION & FONCTIONNEMENT (CONTINUER) POSITION DU REFROIDISSEUR D'AIR S'assurer correctement de la position du refroidisseur d'air avant l'installation et l'utilisation du produit. Se référer s'il vous plait à la section POSITION DU REFROIDISSEUR D'AIR dans le guide séparé de Sécurité & Entretien. FILLING WITH WATER ATTENTION: Débrancher l'unité...
- Page 14 UTILISATION & FONCTIONNEMENT (CONTINUER) AVERTISSEUR DE BAS NIVEAU D’EAU L’appareil est muni d’un capteur de bas niveau d’eau. En mode Refroidissement, lorsque l’eau du réservoir n’atteint plus le niveau minimal, un bip se fait entendre et le REFROIDISSEMENT symbole clignote automatiquement. Le refroidissement par évaporation cessera alors automatiquement.
- Page 15 UTILISATION & FONCTIONNEMENT (CONTINUER) NETTOYAGE DU SYSTÈME DE REFROIDISSEMENT HONEYCOMB Coupez l'alimentation principale de la prise avant de débrancher l'appareil de la prise de courant. Assurez-vous que toutes les prises et les fiches sont sèches avant de les utiliser. • L'appareil est fourni avec un système de refroidissement en nid d’abeilles.
-
Page 16: Descripción De Partes
DESCRIPCIÓN DE PARTES Panel de Control Ruedas Indicador de Nivel Rejillas de Agua Cable de Alimentación Rejilla Trasera y Clavija Puerta de Llenado de Aguay Panel de Enfriamiento Tapa de Compartimento Honeycomb para Hielo Manija Tapón de Desagüe ADVERTENCIA -- LEA Y GUARDE LA GUIA DE MANTENIMIENTO Y EL MANUAL DE USUARIO ANTES DE USAR ESTE PRODUCTO. -
Page 17: Uso Y Funcionamiento
USO Y FUNCIONAMIENTO PANEL DE CONTROL BOTONES DE FUNCIONES ENCENDIDO Pulse el botón para encender la unidad. El ventilador se activará automáticamente cuando pulse el botón de encendido. Después de unos segundos la velocidad cambiará a baja. Para apagar la unidad, pulse nuevamente el botón. OSCILACIÓN Pulse el botón OSCILACIÓN hasta que el indicador... - Page 18 USO Y FUNCIONAMIENTO (CONTINUACIÓN) BOTONES DE FUNCIONES (CONTINUACIÓN) FRÍO Pulse el botón hasta seleccionar para activar el modo de refrigeración, de manera que la bomba se ponga en marcha y humedezca el panal enfriador. Nota: cuando la luz indicadora COOL está apagada, la unidad vuelve automáticamente al modo de ventilación solamente (sin enfriamiento evaporativo).
- Page 19 USO Y FUNCIONAMIENTO (CONTINUACIÓN) CONTROL REMOTO Encendido : Encendido / Apagado Velocidad : Baja / Media / Alta Oscilación : Controla el movimiento horizontal de las lamas Tiempo : Control de función de apagado automático Frío : Activa el enfriamiento evaporativo NOTA: •...
- Page 20 USO Y FUNCIONAMIENTO (CONTINUACIÓN) UBICACIÓN DEL ENFRIADOR Asegúrese de colocar el enfriador de aire correctamente antes de configurar y empezar a usar el producto. Por favor, consulte la sección de la Guía de seguridad y de mantenimiento anexa. LLENADO DE TANQUE DE AGUA PRECAUCIÓN: Desenchufe la unidad de la toma de corriente eléctrica antes de vaciar o llenar el tanque de agua.
- Page 21 USO Y FUNCIONAMIENTO (CONTINUACIÓN) ALARMA DE BAJO NIVEL DE AGUA La unidad está equipada con un sensor de bajo nivel de agua. En modo Frío, cuando el tanque de agua está por debajo del nivel mínimo, usted escuchará una alarma y un LED indicador FRÍO parpadeará...
- Page 22 USO Y FUNCIONAMIENTO (CONTINUACIÓN) LIMPIEZA PANEL DE ENFRIAMIENTO HONEYCOMB Corte la corriente de la toma de corriente antes de desenchufar la unidad de la toma. Asegúrese de que todas las tomas de corriente y los enchufes estén secos antes de usarlos. •...
- Page 23 Hecho en China © 2021 JMATEK Limited. Todos los derechos reservados. La marca Honeywell es usada bajo licencia de Honeywell International Inc. Honeywell International Inc. no representa ni garantiza este producto. Este producto es fabricado por Airtek Int'l Corp. Ltd.