Advertisement
Quick Links
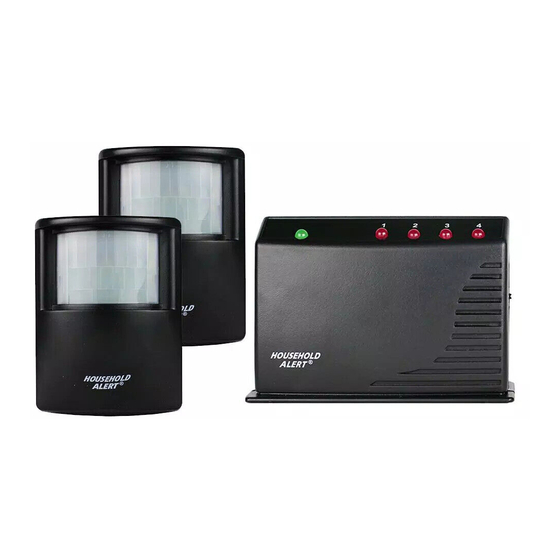
Deluxe Motion Monitoring Kit
1. INTRODUCTION
The Deluxe Motion Monitoring Kit is designed to monitor movement around
your house. The motion sensor can be placed either indoor or outdoor. Once
In this package, you should
Household Alert ® Long Range Receiver, an adapter, two ball-head joint
and screws.
2x Ball-head joint
Adapter
4 pc s 3 x 18 screws
(Included)
Please follow the instructions below to setup your motion sensors and
the receiver.
2. PROGRAMMING
The sensors must be programmed to the Household Alert
Receiver before they can communication. You may program the sensors
to one of the 4 zones. Follow the instructions below:
1. Plug in an AC adapter to the receiver.
2. The green LED will be on indicating it is turned on.
3. Open the back cover and there is a learn button. Press and hold this
learn button for 5 seconds, until both green LED and zone 1 red LED
You may now release the learn button.
4. If you would like to program the sensor to zone 1, activate the
sensor while the zone 1 red LED is
on the back of the sensor to activate it.
5. If you would like to program the sensor to other zones, press the
learn button again, until the red LED
program the sensor to, then activate the sensor.
6. Once the sensor is programmed, the green LED will be steadily on
and none of the red zone LEDs will be on.
Plug in the adapter to the receiver
Learn Button
Note: Each zone can program up to 4 sensors. If you try to program a
sensor into a zone, the
Erasing a sensor
You cannot erase a
sensor. You must erase all sensors from
the receiver, then program the ones you would like to keep. To erase
all the sensors from the receiver:
1. Remove the adapter from the receiver.
2. Open the back cover, press and hold the learn button. Do not
release the learn button until step 4.
3. While holding onto the learn button, plug in the adapter to the receiver.
4. You may release the learn button when the LEDs on the receiver are on.
5. You have erased all sensors from the receiver.
Model HA-300
two Indoor/Outdoor Motion Sensors, a
2 x Indoor/Outdoor
Motion Sensor
®
Household Alert
Long Range Receiver
®
Long Range
Press the SET button
at the zone you want to
SET Button
Insert 9V alkaline battery (option) to the sensor
programmed sensor will be erased.
3. INSTALLATION
MOUNTING
A ball-head joint is necessary to mount the sensor at a desire location.
A height of 7 ft is recommended, depending on your application. Once a
location is selected, mount the ball-head joint to this location by screws
provided. Once the ball-head joint is mounted to the wall, slide the back
of the sensor into the ball-head joint. The mounting angle can be
adjusted. Please refer to "Walk Test" to determine the best mounting
angle.
WALK TEST
After mounting the sensor at the desired location, it is
important to perform a walk test in order to determine
if the sensor is detecting the things you want to detect.
In order to control how far the sensor can "see", this can be done by
adjusting the angle of the sensor. To reduce the detection range, simply
move the sensor downward. To increase the range, move the sensor
up to around 12 degrees. This will give the maximum range. However,
this may not be desired if the sensor is placed outdoors, since a false
trigger may occur if the sensor is set to detect motion in a distance.
You should walk in the area that you would like the sensor to monitor.
Place the slide switch on the side of the receiver to "Alert" position. The
receiver will beep if the sensor detects your movement. If the receiver
does not respond, adjust the mounting angle accordingly. After motion is
detected once, the sensor will not be triggered unless no motion is
detected for 20 seconds. Therefore, wait for at least 20 seconds during
walk testing between 2 activations.
Perform walk test in the undesired area to ensure movement cannot be
detected.
Tips: The sensor should not face towards direct sunlight, placing near
heat or cold producing devices (i.e. A/C or furnance vents, fans, ovens,
heaters etc.) that may cause false triggers.
Move the sensor downward to
reduce the range.
SENSOR SENSITIVITY
The sensitivity of the motion sensor is adjustable. Change the setting by
placing the connector on either the "High" (connector position "1") or
"Low" (connector position "2") position. When the sensitivity is set to
"Low", more movement is required to trigger the sensor. It is recom-
mended to set the sensitivity to "Low" and perform a "Walk Test". If the
walk test result is
the sensitivity does not require to be
adjusted further. If the walk test
result shows the sensitivity is too
low, then you can change the
sensitivity setting to "High". Please
perform the walk test after changing
the sensitivity setting.
Page 1 of 2
Move the sensor up to around
12 º to give maximum range.
1 - High
2 - Low
7 ft
Advertisement

Related Manuals for SkyLink HA-300


Summary of Contents for SkyLink HA-300
- Page 1 Page 1 of 2 Deluxe Motion Monitoring Kit Model HA-300 1. INTRODUCTION 3. INSTALLATION MOUNTING The Deluxe Motion Monitoring Kit is designed to monitor movement around your house. The motion sensor can be placed either indoor or outdoor. Once A ball-head joint is necessary to mount the sensor at a desire location.
- Page 2 When a sensor is triggered for a long period of time, you may stop the buzzer by pressing the mute button. When another signal comes again, If you would like to order Skylink’s products or have di culty getting them to you can disable the buzzer for...