Epson Stylus Photo RX600 Product Information
Epson stylus photo rx600: product information
Hide thumbs
Also See for Stylus Photo RX600:
- User manual (174 pages) ,
- Service manual (106 pages) ,
- Basic operation gude (89 pages)
Table of Contents
Advertisement
Quick Links
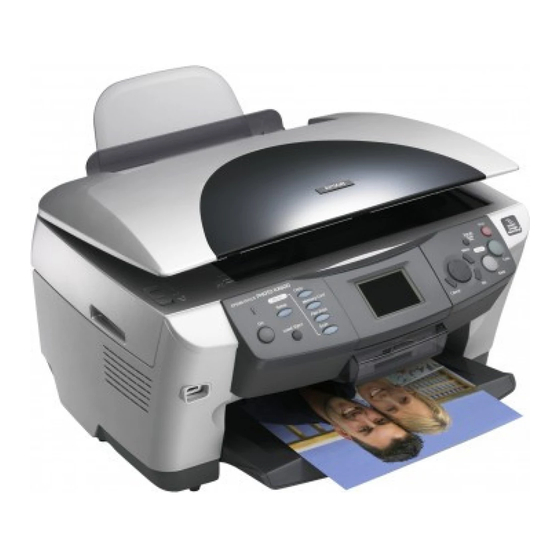
Epson Stylus Photo RX600 Parts
Left edge
paper
guide
Scanner lid
On (power)
button
Scanner transportation lock
USB cable
Paper support
LCD screen
Output tray
Document mat
Scanner glass
Memory card
slot cover
Scanner section
Ink
cartridges
Control panel
Accessories
Ink Cartridges
Cartridge
Black
Cyan
Light Cyan
Magenta
Light Magenta
Yellow
Media
Paper name
Epson Premium Bright
White Paper
Epson Photo Quality Ink
Jet Paper
Epson Photo Quality Ink
Jet Cards
Epson Photo Paper
Epson Glossy Photo
Paper
Epson ColorLife Photo
Paper
Epson Matte Paper
Heavyweight
Epson Double-Sided
Matte Paper
Epson Premium Glossy
Photo Paper
2/04
Epson Stylus Photo RX600
Part number
T048120
T048220
T048520
T048320
T048620
T048420
Size
Part number
Letter (8.5 × 11 inches)
S041586
Letter (8.5 × 11 inches)
S041062
A4 (8.3 × 11.7 inches)
S041061
Legal (8.3 × 14 inches)
S041067
A6 (4.1 × 5.8 inches)
S041054
Panoramic (8.3 × 23 inches)
S041145
Borderless 4 × 6 inches
S041458/
S041809
4 × 6 inches, perforated
S041134/
S041671
Letter (8.5 × 11 inches)
S041141/
S041649/
S041272/
S041271
Letter (8.5 × 11 inches)
S041500
Borderless 8 × 10 inches
S041467
Letter (8.5 × 11 inches)
S041257
Letter (8.5 × 11 inches)
S041568
Letter (8.5 × 11 inches)
S041286/
S041667
Borderless 4 × 6 inches
S041727/
S041808
Borderless 5 × 7 inches
S041464
Borderless 8 × 10 inches
S041465
Epson Stylus Photo RX600
- 1
Advertisement
Table of Contents

Related Manuals for Epson Stylus Photo RX600


Summary of Contents for Epson Stylus Photo RX600
-
Page 1: Ink Cartridges
Epson Stylus Photo RX600 Parts Left edge Paper support paper guide Scanner lid On (power) button Scanner transportation lock Scanner section USB cable LCD screen Accessories Ink Cartridges Cartridge Black Cyan Light Cyan Magenta Light Magenta Output tray Yellow Media... -
Page 2: Specifications
Caution: Part number To ensure good results, use genuine Epson cartridges. Other S041331 products may cause damage to your printer not covered by Epson’s warranty. S041405 Don’t use an ink cartridge if the date on the package has expired. Do not refill the ink cartridge. An IC chip on the cartridge calculates S041106 the amount of remaining ink based on the initial supply. - Page 3 Before printing large jobs using an extended margin setting, print a single sheet to confirm print quality. You can create borderless prints using certain special Epson papers. Scanning Scanner type...
-
Page 4: Loading Paper
Epson Stylus Photo RX600 Interface Standard Based on Universal Serial Bus Specifications Revision 2.0, Universal Serial Bus Device Class Definition for Printing Devices version 1.1; Universal Serial Bus Mass Storage class Bulk-only Transport Revision 1.0 Bit rate 480 Mbps (high speed device) -
Page 5: Loading Special Papers
Load letterhead or preprinted paper top edge first. If you’re using special paper, follow the instructions that came with the paper. Loading Special Papers Follow these capacity guidelines when loading Epson ink jet papers: Paper type Epson Premium Bright White Paper... -
Page 6: Selecting The Correct Media Type
Follow the steps below to copy a photo or document using Glossy Photo Paper just the RX600. (To copy using Epson Smart Panel, see the User’s Guide.) 1. Make sure the RX600 is on, paper is loaded, and the output... -
Page 7: Changing The Copy Layout
Paper Type setting Loaded paper Plain Plain paper Epson Premium Bright White Paper Epson Photo Quality Ink Jet Paper Epson Iron-On Transfer Paper Epson Photo Quality Self Adhesive Sheets Glossy Epson Glossy Photo Paper Epson Photo Paper Epson All-Purpose Glossy Paper Epson Glossy Photo Greeting Cards Prem. -
Page 8: Viewing Photos From A Memory Card
Wallet Photo Prints nine wallet-size copies of the photo on the page * BorderFree is available only on selected Epson photo papers. ** If you notice reduced print quality at the bottom of your copy, try using the Standard setting. -
Page 9: Printing From A Memory Card
7. Press the x photos are automatically printed. Note: To cancel a print job while printing, press the y Stop button. 2/04 Epson Stylus Photo RX600 For these paper types Epson Premium Glossy Photo Paper Epson Premium Semigloss Photo Paper... -
Page 10: Selecting A Range Of Photos
Epson Stylus Photo RX600 Selecting One or More Photos to Print Follow these steps to print a single photo or selected photos on a memory card: 1. Press the button. Memory Card 2. Use the u and d buttons to highlight 3. -
Page 11: Printing From Other Devices
Scans a photo or document and attaches it to an e-mail so that you can send it right away. (Requires a POP3 compliant e-mail program.) Scans a photo and uploads it to Epson’s photo-sharing web site. button in Start > All Programs... -
Page 12: Scanning From A Program
Prefix 5. Select a file format in the box. Type 6. Click . Epson Scan starts and scans your file to the location you specified. Note: Never open the scanner lid while scanning, or your scans may not look right. -
Page 13: Loading 35 Mm Film Strips In The Film Holder
3. Replace the film cover. (It should snap into place.) Epson Stylus Photo RX600 4. Position the film holder so that the 35 mm film strip faces the center of the scanner glass. The positioning posts on the film holder fit in two small holes near the scanner lid, as shown. -
Page 14: Placing 35 Mm Slides On The Film Holder
Epson Stylus Photo RX600 Placing 35 mm Slides on the Film Holder 1. Position the film holder so that the 35 mm slide section faces the center of the scanner glass. The positioning posts fit in two small holes near the scanner lid, as shown. -
Page 15: Replacing Ink Cartridges
, then press Ink Levels (Light Cyan), (Yellow). 2/04 Epson Stylus Photo RX600 button to enter setup mode. Press the u Setup , press Ink Cartridge again. Look at the icon in the upper right corner of the... -
Page 16: Aligning The Print Head
Epson Stylus Photo RX600 3. Open the ink cartridge cover holder by pulling the back up and toward you. Caution: Never attempt to open the cartridge holder’s cover while the print head is moving. Wait until the cartridges have moved to the replacement position. - Page 17 Caution: Be sure to remove the orange print head lock or tape after installing the RX600 in its new location. 2/04 Epson Stylus Photo RX600 locked position. connector. Epson Stylus Photo RX600 - 17...
-
Page 18: Related Documentation
Epson Stylus Photo RX600 10. Close the scanner unit carefully until it clicks back into place. 11. Repack the RX600 and its attachments in the original box using the protective materials that came with them. Caution: Keep the RX600 level as you transport it.