
Related Manuals for Honeywell REFLECTION HUL900 Series


Summary of Contents for Honeywell REFLECTION HUL900 Series
- Page 1 REFLECTION ULTRASONIC ™ COOL MIST HUMIDIFIER Owner’s Manual HUL900 SERIES If you have questions about the operation of this product, please contact us: 800-477-0457 www.HoneywellPluggedIn.com/Contact-Us...
-
Page 2: Important Safety Instructions
Important Safety Instructions READ AND SAVE THESE IMPORTANT SAFETY INSTRUCTIONS BEFORE USING THIS HUMIDIFIER When using electrical appliances, basic precau- 7. The humidifier should ALWAYS be unplugged tions should always be followed to reduce the and emptied when not in operation or while being risk of fire, electrical shock and injury to people, cleaned. -
Page 3: How Your Humidifier Works
How Your Humidifier Works The Honeywell Reflection Cool Mist Humidifier is designed to quietly provide visible cool mist for dry air relief. This filter free humidifier features a nebulizer that quietly vibrates the water at an ultrasonic frequency, breaking the water droplets into an ultra-fine, cool mist that you can see and feel. -
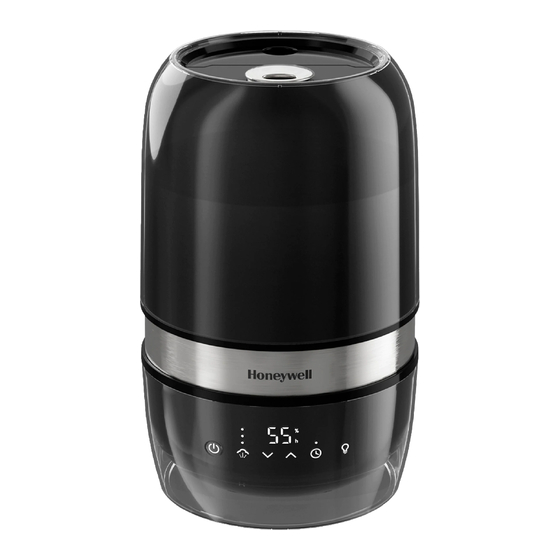
Page 4: Product Description
Product Description Components Mist Outlet Tank Handle Water Tank Chimney Stainless Steel Water Reservoir Base Power Recess Nebulizer Humidity Display Humidity Control Timer Air Filter Oil Tray Tank Light Mist Control Power NOTE: The lights on the control panel will illuminate when you touch the panel. -
Page 5: Setting Up Your Humidifier
Setting Up Your Humidifier 1. Remove packaging materials. 2. Remove twist tie and extend power cord. 3. Place on a firm, level, and water-resistant surface, 12 inche s (30cm ) a minimum of 12 inches (30cm) from any walls. - Page 6 Water Reservoir on the Base. For proper placement, line up the chimney and nozzle to the HONEYWELL logo. NOTE: When taking your Tank to and from the sink, carry the Tank using two hands. Manufacturer will not accept responsibility for property damage caused by water spillage.
-
Page 7: Operating The Humidifier
Operating the Humidifier Power: Plug the humidifier into a polarized 120V Auto Mode: Your humidifier is equipped with an outlet. Press the Power Recess to turn the Auto Mode that allows for effortless humidification. humidifier on. The Power icon will illuminate white When first powered ON, the humidifier will start in the when the device is on. - Page 8 Operating the Humidifier (Cont.) Humidity Level Setting: As an alternative to using The timer is ON when the indicator above the Timer the Auto Mode, you can set your preferred humidity icon is illuminated in white. To turn the timer OFF, level manually.
- Page 9 Essential Oil Tray This humidifier features an Essential Oil Tray that can be used with your favorite essential oil for added enjoyment. This device is not a diffuser – the oil does not come in contact with water and is passively evaporated into the air.
-
Page 10: Care And Cleaning
Care and Cleaning Before Cleaning For best results, use fresh clean water every day. 1. Turn OFF and unplug the humidifier. Remove any When the humidifier is not in use, it is accessories. recommended that you empty the Tank and 2. - Page 11 Care and Cleaning Instructions for Scale Removal 1. Pour 2 cups of undiluted, distilled white vinegar into the Water Reservoir. 2 Cups Undiluted, Distilled 1 Cup White Vinega r 2. Pour 1 cup of undiluted, distilled white vinegar Undiluted, Distilled White Vinega r into the Water Tank, to cover the bottom of the Tank.
- Page 12 Care and Cleaning (Cont.) Instructions for Disinfecting 1 tsp. of Bleac h Before beginning disinfection, follow Steps 1-2 in “Before Cleaning” section (previous page). NOTE: Bleach may stain clothes. It is recommended that you wear rubber gloves during the disinfection process to protect 1 Gallon your hands.
-
Page 13: Air Filter Cleaning
Air Filter Cleaning It is recommended that when you clean your humidifier, you also inspect the Air Filter and clean if needed following these instructions: 1. Turn OFF and unplug the humidifier. 2. Remove the Air Filter door by pushing the locking tab on the right side of the door toward the center of the unit and pull gently outward. -
Page 14: Troubleshooting
Troubleshooting If your humidifier is not working properly, try the following solutions: Problem Possible Cause Solution Power Light remains • Humidifier not plugged in • Plug humidifier in OFF after pressing the • No power at outlet • Check home circuits, fuses; Power Recess test outlet Power is ON and light is... -
Page 15: Year Limited Warranty
2 Year Limited Warranty Read all instructions before attempting to B. At its option, KAZ will repair or replace this use this product. product if it is found to be defective in material or workmanship. A. This 2 year limited warranty applies to repair or C. - Page 16 Compliance and Ratings This device complies with Part 18 Electrical Ratings of the FCC rules. Capacity: 1.2 gallons (4.5 L) Electrical Rating: 120V, 60 Hz. 0.4A. Warning: Changes or modifications to this unit not expressly approved by the party responsible for compliance could void the user’s authority to operate the equipment.
-
Page 17: Contact Information
Helen of Troy Company 400 Donald Lynch Blvd., Suite 300 Marlborough, MA 01752 Honeywell is a trademark of Honeywell International Inc., used under license by Helen of Troy Limited. Honeywell International Inc. makes no representation or warranties with respect to this product.