
Related Manuals for Technics SU-G700M2


Summary of Contents for Technics SU-G700M2
- Page 1 SU-G700M2 Stereo Integrated Amplifier Owner’s Manual Amplificateur intégré stéréo Manuel d’utilisation...
- Page 2 Music is borderless and timeless, touching people’s hearts across cultures and generations. Each day the discovery of a truly emotive experience from an unencountered sound awaits. Let us take you on your journey to rediscover music. Sans frontières, la musique est aussi intemporelle, touchant le coeur des gens en traversant les cultures et les générations.
- Page 3 Delivering the Ultimate Emotive Musical Experience to All At Technics we understand that the listening experience is not purely about technology but the magical and emotional relationship between people and music. We want people to experience music as it was originally intended and enable them to feel the emotional impact that enthuses and delights them.
- Page 4 Thank you for purchasing this product. Please read these instructions carefully before using this product, and save this manual for future use. • About descriptions in this Owner’s Manual - Pages to be referred to are indicated as “ ○○”. - The illustrations shown may differ from your unit.
-
Page 5: Table Of Contents
Table of contents IMPORTANT SAFETY Please carefully read the “IMPORTANT SAFETY INSTRUCTIONS” of this manual before use. INSTRUCTIONS Control reference guide This unit, Remote control Speaker connection, AC power supply cord Connections connection Operations Playing back connected devices Other settings, Using output correction function Settings (LAPC) Others... -
Page 6: Important Safety Instructions
IMPORTANT SAFETY INSTRUCTIONS Read these operating instructions carefully before AC power supply cord using the unit. Follow the safety instructions on the • The power plug is the disconnecting device. unit and the applicable safety instructions listed below. Install this unit so that the power plug can be Keep these operating instructions handy for future unplugged from the socket outlet immediately. - Page 7 REFER SERVICING TO QUALIFIED Supplier’s Declaration of Conformity SERVICE PERSONNEL. Trade Name: Technics Model No.: SU-G700M2 The lightning flash with arrowhead symbol, within an equilateral triangle, Responsible Party: is intended to alert the user to the Panasonic Corporation of North America presence of uninsulated “dangerous...
-
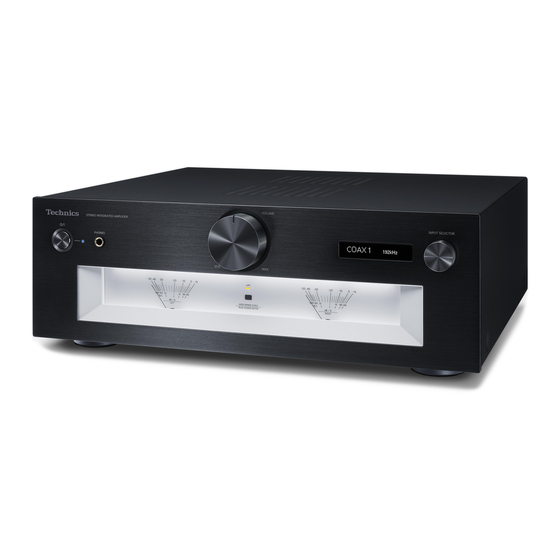
Page 8: Control Reference Guide
Control reference guide This unit 01 Standby/on button ( 06 Input selector knob • Press to switch the unit from on to standby • Turn this knob clockwise or anticlockwise to mode or vice versa. In standby mode, the switch the input source. unit is still consuming a small amount of 07 Peak power meter power. - Page 9 10 USB-B terminal 19 Analog audio input terminals (LINE1) ( 16) • For connecting to a PC, etc. ( 15) 20 Analog audio output terminals 11 Optical digital input terminals (LINE OUT) ( 21) (OPT1/OPT2) ( 14) 21 Analog audio output terminals (PRE OUT) 12 UPDATE terminal (USB-A) (...
- Page 10 Control reference guide Remote control Using the remote control R03/LR03, AAA (Alkaline or manganese batteries) Note • Insert the battery so the terminals ( match those in the remote control. • Point it at the remote control signal sensor on 01 [AMP ]: Standby/on button this unit.
- Page 11 Press and hold [OK] and [2] for at least : Press [AMP] first to operate this unit. (The 4 seconds. remote control may work for other Technics 5 Point the remote control at this unit, devices and may not for this unit when pressing [NWP] or [CD].)
-
Page 12: Connections
Connections Speakers/AC power supply cord • Use only the supplied AC power supply cord. • Insert the plugs of the cables to be connected all the way in. • Do not bend cables at sharp angles. • This unit can measure the output signal of the amplifier and correct its output to make the optimum adjustment of speaker output. - Page 13 To a household AC outlet Insert the AC power supply cord up to a point just before the round hole. AC power supply cord (supplied) Speaker cable (not supplied) AC power supply cord connection Speaker output correction (LAPC) Connect only after all other connections are You can make the optimum adjustment completed.
-
Page 14: Operations
Operations Using digital audio output device You can connect the CD player, etc. with coaxial digital cable (not supplied)/optical digital audio cable (not supplied) to this unit and play back music. Optical digital audio cable (not supplied) CD player, etc. Coaxial digital cable (not supplied) Using coaxial digital cable... - Page 15 • When connecting an audio device with USB- Download and install the dedicated app DAC output terminal such as ST-G30, etc., refer “Technics Audio Player” (free of charge) on to the operating instructions of the connected your PC. device.
- Page 16 Operations Using analog audio output device (PHONO/LINE1/LINE2) You can connect the turntable with PHONO cable (not supplied) or the Blu-ray Disc player, etc. with analog audio cable (not supplied) to this unit and play back music. PHONO EARTH Turntable PHONO earth lead (not supplied) PHONO cable (not supplied) Using PHONO cable/...
- Page 17 Do not input the audio signal from PRE OUT/LINE OUT terminals to the analog audio input terminals of this unit. Doing so may cause malfunction. Blu-ray Disc player, etc. Analog audio cable (not supplied) Reducing low frequency noise When connecting to “LINE2” Reduces the low frequency noise caused by the Analog audio input terminals (LINE2/MAIN IN) warpage of record.
- Page 18 Operations Using this unit as power amplifier You can connect the AV receiver, control amplifier, etc. with analog audio cable (not supplied) to this unit and use this unit as power amplifier. AV receiver, control amplifier, etc. Analog audio cable (not supplied) Set the volume of the AV receiver, Using analog audio cable...
- Page 19 10 Confirm the displayed message and Minimizing sound distortion press [OK]. 11 Press [ ], [ ] to select “Yes” and then press [OK]. If sound distortion occurs, setting the attenuator to “On” may improve the sound quality. 12 Start playback on the connected •...
- Page 20 Operations Connecting a power amplifier, subwoofer, etc. You can connect the power amplifier, subwoofer, etc. with analog audio cable (not supplied) to output the analog audio signals. Power amplifier, Subwoofer, etc. Analog audio cable (not supplied) 2 Press [SETUP]. Do not input the audio signal from PRE 3 Press [ ], [ ] repeatedly to select OUT/LINE OUT terminals to the analog audio input terminals of this unit.
- Page 21 Using analog audio input device You can connect the CD recorder, etc. with analog audio cable (not supplied) to output analog audio signals from this unit (LINE1/LINE2/PHONO). CD recorder, etc. Analog audio cable (not supplied) Do not input the audio signal from PRE Using analog audio cable OUT/LINE OUT terminals to the analog audio input terminals of this unit.
-
Page 22: Settings
Set to “On (-20dB)” for the attenuator to ease • “TONE” is displayed after setting. the volume adjustment at a low volume. • While connecting Technics device supporting • The factory default is “Off”. system control function (Network Audio • ”ATT” is displayed and the volume level displays Player, etc.) to this unit, sound setting on the... - Page 23 Auto off function Displaying the volume status “Auto Off” “VOLUME Display” This unit is designed to conserve its power The volume status is displayed when adjusting consumption and save energy. The unit has been the volume. left unused for about 20 minutes and will enter •...
- Page 24 Settings Using output correction function (LAPC) You can make the optimum adjustment according to your own speakers. Measuring the output signal of the amplifier and correcting its output (LAPC) ■ ■ Turning on/off the output correction Preparation function • Disconnect the headphones. Press [LAPC] to select “On”/“Off”.
- Page 25 • For the update information, refer to the the standby/on button on this unit, following website. disconnect the AC power supply cord www.technics.com/support/firmware/ and USB flash memory. 7 Reconnect the AC power supply cord Downloading takes approx. 5 minutes. after 3 minutes.
- Page 26 Settings System control connection You can operate this unit and Technics devices supporting system control function (Network Audio Player, Compact Disc Player, etc.) simultaneously with ease on the remote control. For details, refer to the operating instructions of each device.
- Page 27 Switching this unit and the Switching this unit’s input source connected device automatically • If you point the remote control at this unit When you perform an operation such as and press [AMP ] when this unit and the playback on the connected device, the input connected device are in standby mode, this unit source of this unit will be automatically switched and the device will be turned on simultaneously.
-
Page 28: Others
Others Troubleshooting Before requesting service, make the following checks. If you are uncertain about some of the check points, or if the solutions indicated in the following guide do not resolve the issue, then consult your dealer for instructions. Heat buildup of this unit General This unit becomes warm while in use. - Page 29 Before disposing of or transferring this unit, set with “System Control”. ( 26) perform the following to delete the data, • Connect Technics device supporting system including personal or secret information. control function (Network Audio Player, • “To restore all settings to the factory defaults”...
- Page 30 Others Troubleshooting (Continued) PHONES Connected Messages • The headphones are connected. • Sound is not output from headphones jack and speaker output terminals when the headphones ATTENTION : MAX Output Setting are connected and this unit is used as main •...
- Page 31 Specifications ■ ■ GENERAL TERMINALS SECTION Stereo, 6.3 mm ( Power supply AC 120 V, 60 Hz ”) Headphones Jack 0.75 mW, 32 Power 95 W consumption REAR USB Type B Connector Power consumption in Approx. 0.5 W LINE IN ×2 (Pin Jack) standby mode Analog input PHONO (MM/MC),...
- Page 32 Others Limited Warranty (ONLY FOR U.S.A.) Technics Products – Limited Warranty Limited Warranty Coverage THERE ARE NO EXPRESS WARRANTIES EXCEPT AS LISTED UNDER “LIMITED WARRANTY COVERAGE”. If your product does not work properly because of a defect in materials or workmanship, Panasonic Corporation of North THE WARRANTOR IS NOT LIABLE FOR INCIDENTAL OR America (referred to as “the warrantor”) will, for the length...
- Page 33 3 (three) years parts and labour This warranty is given only to the original purchaser, or the person for whom it was purchased as a gift, of a Technics brand product mentioned above sold by an authorized Panasonic dealer in Canada and purchased and used in Canada, which product was not sold “as is”, and which product was delivered to you in new condition in the original packaging.
- Page 34 Nous vous remercions d’avoir arrêté votre choix sur cet appareil. Avant d’utiliser l’appareil, il est recommandé de lire attentivement ce manuel et de le conserver pour consultation ultérieure. • À propos des illustrations dans le présent manuel - Les pages à consulter sont indiquées par “ ○○”. - Les illustrations peuvent être différentes de l’apparence réelle de l’appareil.
- Page 35 Table des matières Veuillez lire attentivement les “IMPORTANTES IMPORTANTES MISES EN GARDE MISES EN GARDE” de ce manuel avant utilisation. Guide de référence Unité principale, télécommande Connexion des enceintes, connexion du Connexions cordon d’alimentation Fonctionnement Lecture à partir des appareils connectés Autres paramètres, utilisation de la fonction Paramètres de correction de sortie (LAPC)
-
Page 36: Importantes Mises En Garde
IMPORTANTES MISES EN GARDE Avant d’utiliser l’appareil, lire attentivement AVERTISSEMENT les instructions qui suivent. Se conformer tout particulièrement aux avertissements inscrits sur Appareil l’appareil et aux consignes de sécurité indiquées • Pour réduire les risques d’incendie, de choc électrique ci-dessous. Conserver le présent manuel pour ou de dommages à... - Page 37 Pile AVIS • Il y a un danger d’explosion si la pile n’est pas correctement remplacée. Remplacez uniquement par RISQUE DE CHOC ÉLECTRIQUE le type recommandé par le fabricant. NE PAS OUVRIR • Une manipulation incorrecte des piles peut causer une fuite d’électrolyte ainsi qu’un incendie.
-
Page 38: Guide De Référence
Guide de référence Unité principale 01 Interrupteur d’attente/marche ( 04 Molette du volume • Appuyez sur cet interrupteur pour commuter • -- dB (min), -88,0 dB à 0 dB (max.) l’appareil du mode d’attente au mode de 05 Afficheur marche et vice versa. En mode d’attente, •... - Page 39 10 Borne USB-B 18 Bornes d’entrée audio analogique (LIGNE2/MAIN IN) • Pour brancher à un PC, etc. ( 15) • Les entrées audio analogiques sont 11 Bornes d’entrée optique numérique combinées sur les bornes LIGNE2 et (OPT1/OPT2) ( 14) MAIN IN. Commutez la fonction selon l’équipement connecté.
- Page 40 Guide de référence Télécommande Fonctionnement de la télécommande R03/LR03, AAA (Utilisez des piles alcalines ou au manganèse) Nota • Placez les piles de manière à respecter la polarité ( 01 Interrupteur d’attente/marche [AMP • Orientez vers le capteur de signal de la •...
- Page 41 : Appuyez d’abord sur [AMP] pour utiliser cet moins 4 secondes. appareil. (La télécommande peut fonctionner 5 Pointez la télécommande vers cette pour d’autres appareils Technics et pas pour unité et maintenez enfoncée [OK] cette unité lorsque vous appuyez sur [NWP] ou sur [CD].) pendant au moins 4 secondes.
-
Page 42: Connexions
Connexions Enceintes/Cordon d’alimentation • N’utilisez que le cordon d’alimentation fourni. • Insérez à fond les fiches des câbles à brancher. • Ne tordez pas les câbles. • Cet appareil peut mesurer le signal de sortie de l’amplificateur et corriger sa puissance pour effectuer l’ajustement optimal de la sortie d’enceinte. - Page 43 À une prise secteur murale Insérez le cordon d’alimentation au point situé juste avant le trou rond. Cordon d’alimentation (fourni) Câble d’enceinte (non fourni) Correction de sortie d’enceinte Connexion du cordon d’alimentation (LAPC) Branchez le cordon d’alimentation après Vous pouvez effectuer un réglage optimal en que tous les autres raccordements sont fonction de vos enceintes.
-
Page 44: Fonctionnement
Fonctionnement Utilisation d’un périphérique à sortie audio numérique Vous pouvez raccorder le lecteur de CD, etc., avec un câble numérique coaxial (non fourni)/un câble audio numérique optique (non fourni) à cette unité et écouter de la musique. Câble audio numérique optique (non fourni) Lecteur CD, etc. - Page 45 Internet ci-dessous. Nota www.technics.com/support/ • Lorsque vous connectez un périphérique audio Téléchargez et installez l’appli dédiée “Technics avec une borne de sortie USB-DAC tel qu’un Audio Player” (sans frais) sur votre PC. ST-G30, etc., consultez les instructions • Téléchargez et installez l’appli dédiée à partir d’utilisation du périphérique.
- Page 46 Fonctionnement Utilisation d’un périphérique à sortie audio analogique (PHONO/LIGNE1/LIGNE2) Vous pouvez raccorder la platine tourne-disque avec un câble PHONO (non fourni) ou le lecteur de disque Blu- ray, etc. avec un câble audio analogique (non fourni) à cette unité et écouter de la musique. PHONO EARTH Platine tourne-disque...
- Page 47 Ne raccordez pas le signal audio provenant des bornes PRE OUT/LINE OUT aux bornes d’entrée audio analogique de cette unité. Cela pourrait provoquer un dysfonctionnement. Lecteur de disque Blu-ray, etc. Câble audio analogique (non fourni) Réduction du bruit à basse Lors d’une connexion à...
- Page 48 Fonctionnement Utilisation de cette unité comme amplificateur de puissance Vous pouvez connecter le récepteur AV, l’amplificateur de commande, etc. avec un câble audio analogique (non fourni) à cette unité et utiliser cette unité comme amplificateur de puissance. Récepteur audiovisuel, amplificateur de commande, etc.
- Page 49 9 Appuyez sur [ ], [ ] pour Réduction de la distorsion sonore sélectionner “ENTRÉE PRINCIPALE” puis appuyez sur [OK]. Si une distorsion sonore se produit, réglez 10 Confirmez le message affiché et l’atténuateur à “Activé” pour apporter une appuyez sur [OK]. amélioration.
- Page 50 Fonctionnement Raccordement d’un amplificateur de puissance, d’une enceinte d’extrêmes-graves avec amplificateur, etc. Vous pouvez raccorder un amplificateur de puissance, une enceinte d’extrêmes-graves avec amplificateur, etc., avec un câble audio analogique (non fourni) pour écouter des signaux audio analogiques. Amplificateur de puissance, enceinte d’extrêmes-graves avec amplificateur, etc.
- Page 51 Utilisation d’un périphérique à entrée audio analogique Vous pouvez raccorder un graveur de CD, etc., avec un câble audio analogique (non fourni) pour diffuser des signaux audio analogiques à partir cette unité (LIGNE1/ LIGNE2/PHONO). Graveur de CD, etc. Câble audio analogique (non fourni) Utilisation d’un câble audio Ne raccordez pas le signal audio provenant des bornes PRE OUT/LINE OUT aux...
-
Page 52: Paramètres
• “TON.” est affiché après les réglages. • Le mode d’usine par défaut est “Désactivé”. • Lorsque vous raccordez un appareil Technics • “ATT.” s’affiche et le niveau de volume est de prenant en charge la fonction du contrôle de –20 dB après le réglage. - Page 53 Affichage de l’état du volume Fonction de mise hors marche “Affichage VOLUME” automatique “H/M auto” L’état du volume s’affiche lors du réglage du volume. Cet appareil est conçu pour minimiser sa • Le mode d’usine par défaut est “Activé”. consommation en électricité et ainsi économiser •...
- Page 54 Paramètres Utilisation de la fonction de correction de sortie (LAPC) Vous pouvez effectuer un réglage optimal en fonction de vos enceintes. Mesure du signal de sortie de l’amplificateur et correction de sa puissance (LAPC) ■ ■ Activation/désactivation de la fonction de Préparatifs correction de sortie •...
-
Page 55: Cordon D'alimentation
• Pour des renseignements sur la mise à jour, • Une fois la mise à jour faite, “Réussite” consultez le site Internet suivant. s’affiche. www.technics.com/support/firmware/ 6 Après l’affichage de “Réussite”, appuyez sur la touche de mise Le téléchargement nécessite environ 5 minutes. - Page 56 Paramètres Branchement du contrôle de système Vous pouvez commander cet appareil et des périphériques Technics prenant en charge la fonction du contrôle de système (lecteur réseau audio, lecteur de disque compact, etc.) simultanément avec facilité en utilisant la télécommande. Pour plus de détails, consultez le manuel d’utilisation de chaque périphérique.
- Page 57 Commutation de cette unité et du Commutation automatique de la périphérique connecté source d’entrée de cette unité • Si vous pointez la télécommande vers cette Lorsque vous effectuez une action comme la unité et appuyez sur [AMP ] quand cette unité lecture sur le périphérique connecté, la source et le périphérique connecté...
- Page 58 Autres Guide de dépannage Avant de demander de l’aide, procédez aux vérifications suivantes. Si vous n’êtes pas sûr de certains points de vérification, ou si les solutions indiquées dans ce guide ne résolvent pas le problème, consultez votre revendeur. Accumulation de chaleur de cet Généralités appareil Cet appareil chauffe en cours d’utilisation.
-
Page 59: Télécommande
“Contrôle système”. ( 26) • “Rétablissement de tous les paramètres par • Raccordez un périphérique Technics prenant en charge la fonction du contrôle de système défaut” ( 28) (lecteur réseau audio, lecteur de disque compact, etc.) à... -
Page 60: De Correction De Sortie (Lapc)
Autres Guide de dépannage (suite) Non mesuré Messages • La mesure du signal de sortie pour la fonction de correction de sortie (LAPC) n’a pas encore été effectuée. ATTENTION : Réglage sortie MAX. • Mesurez le signal de sortie. ( 24) •... - Page 61 Spécifications ■ ■ DONNÉES GÉNÉRALES SECTION PRISES Stéréo, 6,3 mm ( Alimentation 120 V c.a./60 Hz Prise écouteurs/ 0,75 mW, 32 casque Consommation 95 W USB arrière Consommation Connecteur de type B électrique en Environ 0,5 W attente LINE IN ×2 (Prise jack) Entrée analogique PHONO (MM/MC), Dimensions...
- Page 62 Trois (3) ans, pièces et main-d’oeuvre La présente garantie n’est fournie qu’à l’acheteur original d’un des produits de marque Technics indiqués plus haut, ou à la personne l’ayant reçu en cadeau, vendu par un détaillant Panasonic agréé au Canada et utilisé au Canada. Le produit ne doit pas avoir été...
- Page 63 Autres (63)
- Page 64 Panasonic Corporation of North America Panasonic Canada Inc. Two Riverfront Plaza, Newark, NJ 07102-5490 5770 Ambler Drive, http://www.panasonic.com Mississauga, Ontario, L4W 2T3 www.panasonic.com En Cf © Panasonic Corporation 2021 TQBM0781 Printed in Malaysia M0821YY0 Imprimé en Malaisie...