Table of Contents
Advertisement
Quick Links
Advertisement
Table of Contents

Related Manuals for Abit A-N68SV Series


Summary of Contents for Abit A-N68SV Series
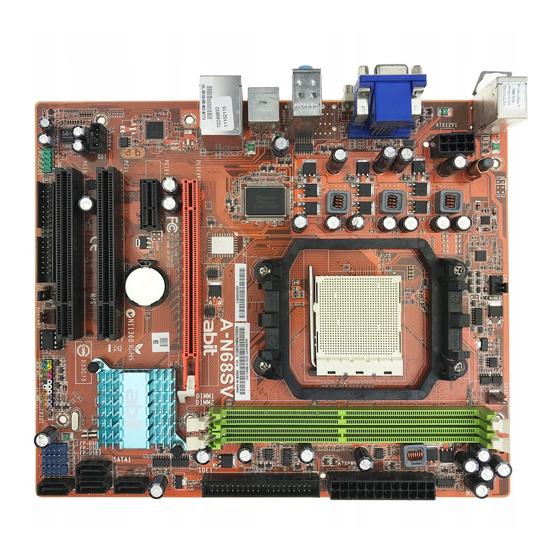
- Page 1 A-N68SV Series Motherboard AMD Socket AM2 Installation Guide...
- Page 2 For more detailed information about recycling of this product, please contact your local city office, your household waste disposal service or the shop where you purchased the product. Best Management Practices for Perchlorate Materials: “Perchlorate Material – special handling may apply. See www.dtsc.ca.gov/hazardouswaste/perchlorate/.” A-N68SV Series...
- Page 3 ○: 表 示 该 有 毒 有 害 物 质 在 该 部 件 所 有 均 质 材 料 中 的 含 量 均 在 SJ/T11363-2006 标准规定的限量要求以下。 ×: 表示该有毒有害物质至少在该部件的某一均质材料中的含量超出 SJ/T11363-2006 标准规定的限量要求。 This information is applicable for People's Republic of China only. A-N68SV Series...
-
Page 4: Table Of Contents
1.7.1 Floppy and IDE Disk Drive Connectors....8 1.7.2 Serial ATA Connectors ........9 1.7.3 Additional USB 2.0 Port Headers ......9 1.7.4 Internal Audio Connectors ........10 1.7.5 Front Panel Audio Connection Header ....10 1.8 PCI and PCI Express X16, X1 Slots......11 1.9 Onboard Indicators...........11 A-N68SV Series... -
Page 5: Hardware Setup
• Dual Head Display Controller • 1x RJ-45 LAN connector abit Engineered (Also reserved for other version of • Onboard 10/100M LAN ™ • abit Softmenu Technology 10/100/1000M specification.) RoHS Audio • 100% Lead-free process and RoHS compliant (Also reserved for other •... -
Page 6: Choosing A Computer Chassis
If the holes line up and there are only slots, you can only attach with spacers. Take the tip of the spacers and insert them into the slots. After doing this to all the slots, you can slide the board into position aligned A-N68SV Series... -
Page 7: Checking Jumper Settings
This header uses a jumper cap to clear the CMOS memory and have it source. Nevertheless, this backup battery exhausts after some five reconfigured to the default values stored in BIOS. A-N68SV Series... -
Page 8: Connecting Chassis Components
Plugged from a Plugged from an recommended to connect battery manufacturer. 4-pin ATX12V 8-pin EPS12V the 8-pin EPS12V power power. power. Dispose of used batteries according to the battery manufacturer’s ※ source to meet the instructions. 240VA protection limits. A-N68SV Series... -
Page 9: Front Panel Switches And Indicators Headers
Connects to the System Speaker cable of chassis. • SLED (Pin 2, 4): Connects to the Suspend LED cable (if there is one) of chassis front panel. • PWR (Pin 6, 8): Connects to the Power Switch cable of chassis front panel. A-N68SV Series... -
Page 10: Installing Hardware
Hook the down into the socket. spring clip to the mounting-lug. Be careful to insert the CPU into the socket. The CPU only fits in one orientation with the socket. DO NOT force the CPU into the socket. A-N68SV Series... -
Page 11: Memory Slots
A higher fan speed will be helpful for better airflow and ※ heat-dissipation. Nevertheless, stay alert to not touch any heatsink since a high temperature generated by the working system is still possible. A-N68SV Series... -
Page 12: Connecting Peripheral Devices
Make sure to configure the “Master” ※ and “Slave” relation before connecting two drives by one single ribbon cable. The red line on the ribbon cable must be aligned with pin-1 on both the IDE port and the hard-drive connector. A-N68SV Series... -
Page 13: Serial Ata Connectors
Make sure the connecting cable bears the same pin assignment. ※ The motherboard in this photo is served for DEMO only, and may not ※ be the same type or model as the one described in this manual. A-N68SV Series... -
Page 14: Internal Audio Connectors
MIC Power AVCC FRO-R Line Out (R) MIC2_JD F_IO_SEN FRO-L Line Out (L) LINE2_JD Please do not connect the “Ground” cable or “USB VCC” cable from ※ the front panel module to the Pin 4 “AVCC” of this header. A-N68SV Series... -
Page 15: Pci And Pci Express X16, X1 Slots
5VSB: This LED lights up when the power supply is connected with power source. Install PCI Express X1 card into slot “PCIE1”. • VCC: This LED lights up when the system power is on. Install PCI cards into slots “PCI1”, and/or “PCI2”. A-N68SV Series... -
Page 16: Connecting Rear Panel I/O Devices
Mouse: Connects to PS/2 mouse. • Keyboard: Connects to PS/2 keyboard. • VGA1/DVI1: Connects to monitor input. (Available for 5.1- or 7.1-Channel, depending on • AUDIO1: version.) Cen./Sub. (Center / Subwoofer): Connects to the center and subwoofer channel. A-N68SV Series... -
Page 17: Bios Setup
Do not change the BIOS parameters unless you fully understand its ※ function. A-N68SV Series... -
Page 18: Driver & Utility
[Manual]: Click this button to enter the user’s manual menu. • [Utility]: Click this button to enter the utilities installation menu. • [abit Utility]: Click to enter the installation menu of utilities exclusively developed by ABIT. • [Browse CD]: Click this button to browse the contents of this “Driver &... -
Page 19: Appendix
• 4 個 USB 2.0 接頭 • 支援 DirectX 9.0、Shader Model 3.0 以及 nView • 1 個 RJ-45 網路接頭 • 雙接頭顯示控制器 abit Engineered 網路 ™ • abit SoftMenu 技術 (也有 10/100/1000M 的規格保留給其它版本) • 內建 10/100M LAN RoHS 音效 • 100%無鉛製程符合 RoHS 規範... -
Page 20: 规格(简体中文
• 4 个 USB 2.0 接头 • 双接头显示控制器 • 1 个 RJ-45 网络接头 网络 abit Engineered (也有 10/100/1000M 的规格保留给其它 • 主板内建 10/100M 网络 ™ • abit SoftMenu 技术 版本) RoHS 音效 • 100%无铅工艺,符合 RoHS 规范 • 主板内建 5.1 声道 HD 音效 (也有 7.1 声道的规格保留给其它版本) 其它... -
Page 21: Troubleshooting (How To Get Technical Support?)
Step 3. The same procedure as Step 2, but while discharging the CMOS data, pull out Example: Intel 650 3.4GHz (OC FSB=220MHz) the ATX power connectors from motherboard and remove the button battery during CMOS discharge. A-N68SV Series... -
Page 22: Technical Support Form
Is the motherboard dead? Do I need to return it to where I bought from or go through an RMA process? Problem description: After you have gone through the troubleshooting procedures, yet the problem still exists, or you find an evident damage on the motherboard, please contact our RMA center. (http://www2.abit.com.tw/page/en/contact/index.php?pFUN_KEY=18000&pTITLE_IMG) A-N68SV Series... -
Page 23: Contact Information
Taiwan Head Office Germany and Benelux (Belgium, Turkey Netherlands, Luxembourg), France, Italy, Universal ABIT Co., Ltd. Universal ABIT Turkey (Rep. office) Spain, Portugal, Greece, Denmark, 6F, No. 323, Yang Guang St., Neihu, Tel: 90 532 211 6860 Norway, Sweden, Finland, Switzerland Taipei, 114, Taiwan Universal ABIT NL B.V. - Page 24 A-N68SV Series P/N: 4310-0001-04 Rev. 1.00...