Eden WP100 Navigator Operation Manual
World tour bass guitar pre-amplifier
Hide thumbs
Also See for WP100 Navigator:
- Brochure (11 pages) ,
- Operation manual (15 pages) ,
- Quick start manual (68 pages)

Related Manuals for Eden WP100 Navigator


Summary of Contents for Eden WP100 Navigator
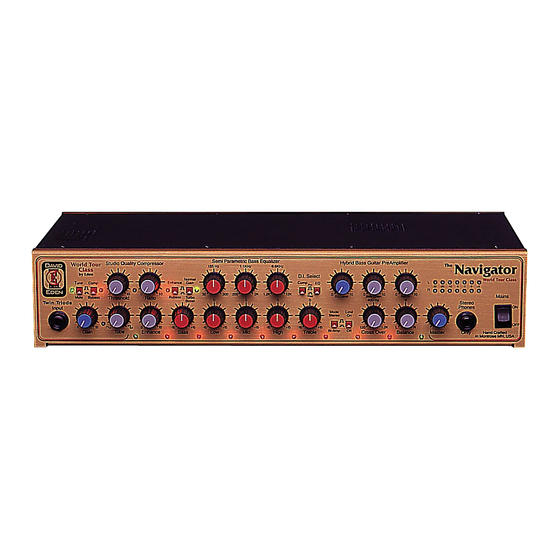
- Page 1 THE LEADER IN BASS AMPLIFICATION. World Tour Bass Guitar Pre-amplifier Covering Model WP100 Navigator Never Compromise™ ©02-01-2006 by U.S. Music Corp.
-
Page 2: Operation Manual
To be blunt, if you can’t do it with a Navigator, you probably shouldn’t be doing it any way. The Eden World Tour products group is the result of our quest for ultimate bass tone and maximum reliability. Your amplifier was designed, engineered and manufactured equivalent to aircraft vibration standards and housed in a one-piece aluminum case with steel top to ensure maximum reliability. - Page 3 If you experience any discomfort or ringing in the ears or suspect hearing loss, you should consult an audiologist. Thank you for your purchase of an Eden bass guitar product. This unit has been designed and constructed to give you years of trouble-free service.
-
Page 4: Front Panel Features
FRONT PANEL FEATURES Input Jack – Designed to accept a standard 1/4-inch mono phone plug. For best results use a high quality shielded cable to connect your instrument to the amplifier. The input is buffered and will handle standard passive, high level active, and piezo input signals. - Page 5 Enhance Bypass Switch – disengages the Enhance control for a quick change in tone. The indicator to the left of this control will be lit when the Enhance circuit is bypassed. This switch is duplicated on the footswitch. Turbo Boost Switch – Engages the +6dB Turbo Boost for instant volume change.
- Page 6 Navigator. For lowest noise, you should set your output as high as possible without overdriving, and adjust overall system volume using the level controls on your amplifier. (You are using an Eden amp, right?) Master Level Control – Adjusts overall system output and stage loudness.
-
Page 7: Rear Panel Features
IMPORTANT NOTE: DO NOT use this jack for a Mono Signal Send! It may be possible to damage the mono headphones inserted into this jack, as well as your Navigator. USE ONLY STEREO HEADPHONES! Don’t say you weren’t warned, because you were! Mains On/Off Switch –... - Page 8 230/240 only and must be adapted by a service tech for any voltage change. Fuse Requirements: USA @ 120 Volts /60 HZ – 1 Amp, 5 x 20 mm GMC/T/slow blow Europe @ 240 Volts/50 Hz – 0.5 Amp, 5 x 20 mm GMC/T/slow blow IMPORTANT NOTE: Always use slow blow or time delay type fuses.
- Page 9 Main D.I. Outputs – These fully balanced stereo XLR outputs provide +16dBm maximum. They can be used to send a stereo signal to a mixing board or recording console, or to connect to a power amplifier. Please note, however, that the signal from these outputs is not as hot as that from the Main Outputs.
- Page 10 Stereo Post-EQ Effects Send/Return – These standard 1/4-inch jacks allow you to send and receive your signal to and from external devices. This effects loop is positioned post (behind) the tone section. This loop is at line level; do not use instrument level effects in this loop as they tend to be overloaded by the higher signal level which can cause distortion.
-
Page 11: Initial Setup
GETTING A GREAT TONE As bassists, each of us has in our head a concept of our perfect sound. Eden amplifiers are designed to help you easily achieve the sound you hear inside you. However, it’s a multi-step process as explained below. - Page 12 Once you’ve established that your unit is set to the correct voltage, set the Master Volume control to minimum (fully counter-clockwise). Set the tone controls to the center position (12:00 or 0). Turn the Enhance control to the minimum position. Set the Input Gain control to the minimum (fully counter-clockwise).
- Page 13 The ratio is variable from very soft compression (fully counter-clockwise) to hard limiting (fully clockwise). The Compressor light will blink when your gain goes above the compression threshold. This will generally show up more on the lower notes, or when you employ Slapping. (A properly compressed Slap sound is very cool, indeed.) A good general setting for overall compressor operation is to match the Compressor LED (located between the Ratio and Threshold controls) to go...
- Page 14 Slowly bring the Enhance control up while playing. If you turn it up close to 12:00 on the dial and still don’t have your sound, stop there. Return the Enhance to OFF or leave it at no more than 12:00 and work with the EQ section.
- Page 15 If you find yourself running out of amplifier headroom, cut a little in the lower frequencies, which require the most power from your amp. You’ll know this is happening if you see the Limit light flashing. As long as the light is just blinking, you’re fine.
-
Page 16: Other Considerations
There you have it: a quick and easy process to help you get the perfect tone from your Eden amplifier. As previously mentioned, it make take a few extra minutes the first few times you go through this, especially if you take the time to experiment with all the knobs and switches, which we highly recommend. -
Page 17: Maintenance
2 Ohms per channel without worry. In Bridge Mono Mode, the total impedance should never be less than 4 Ohms. This translates to a 2 Ohm load for each amplifier. (You are using an Eden power amplifier with your Navigator, right? If not, reduce your Cool Factor by 27 points.) - Page 18 Learn More – If you’d like to learn more about your Navigator (or about our company and its activities), we invite you to visit our website – www.eden-electronics.com. There you’ll find articles to help you better understand our products and the technical stuff some people find so interesting.
-
Page 19: My Favorite Settings
My Favorite Settings Setting 1____________________________________________________ Setting 2____________________________________________________ Setting 3____________________________________________________ Setting 4____________________________________________________... - Page 20 My Favorite Settings Setting 5____________________________________________________ Setting 6____________________________________________________ Setting 7____________________________________________________ Setting 8____________________________________________________...