Table of Contents

Related Manuals for Pioneer MVH-210EX


Summary of Contents for Pioneer MVH-210EX
- Page 1 MVH-210EX RDS AV RECEIVER Operation Manual Important (Serial number) The serial number is located on the bottom of this unit. For your own security and convenience, be sure to record this number on the enclosed warranty card.
-
Page 2: Table Of Contents
Contents ■ Favorite menu....38 Thank you for buying this Pioneer ■ product. Other functions ....38 Please read through these instructions ■ Appendix ......40 so you will know how to operate your model properly. After you have finished... -
Page 3: Precaution
Precaution Information to user –MODEL NO.: MVH-210EX FCC ID: AJDK071 IC: 775E-K071 –This device complies with Part 15 of FCC Rules and Innovation, Science, and Economic Development Canada Licence-exempt RRSs. Operation is subject to the following two conditions: (1) this device may not cause interference, and (2) this device must accept any interference, including interference that may cause undesired operation of this device. - Page 4 • If you notice smoke, a strange noise or odor from this product, or any other abnormal signs on the LCD screen, turn off the power immediately and consult your dealer or the nearest authorized Pioneer Service Station. Using this product in this condition may result in permanent damage to the system.
- Page 5 If your vehicle has a compliant backup camera that displays the backup view through the factory receiver, do not use the Pioneer receiver unless it is connected to and displays the same view as the factory backup camera. Connection to the factory backup camera will require an adaptor, sold separately.
- Page 6 the parking brake is set and when the vehicle is moving. If you attempt to use the functions described above while driving, they will become disabled until you stop the vehicle in a safe place, and (1) apply the parking brake, (2) release the parking brake, and then (3) apply the parking brake again.
- Page 7 • To prevent data loss and damage to the storage device, never remove it from this product while data is being transferred. • Pioneer cannot guarantee compatibility with all USB mass storage devices and assumes no responsibility for any loss of data on media players, iPhone®, smartphone, or other devices while using this product.
- Page 8 Register your product. Receive updates on the latest products and technologies. Download owner’s manuals, order product catalogs, research new products, and much more. Receive notices of software upgrades and software updates. Protecting the LCD panel and screen • Do not expose the LCD screen to direct sunlight when this product is not used. This may result in LCD screen malfunction due to the resulting high temperatures.
-
Page 9: Parts And Controls
Parts and controls Main unit VOL (+/ MUTE Press to display the top menu screen. Press and hold to power off. To power back on, press any button. NOTE icon appears when the power is on. DISP Press to turn the display on or off. Performs manual seek tuning, fast forwards, reverse and track search controls. - Page 10 – If this product fails to operate properly. – If there appears to be problems with the operation of the system. Turn the ignition switch OFF. Press RESET with a pen tip or other pointed tools. Settings and recorded contents are reset to the factory settings. Starting up the unit Start the engine to boot up the system.
- Page 11 Text When all characters are not displayed, the rests are automatically scrolled on information the display. The characters are displayed by touching the text information. NOTE This function is available only when you stop your vehicle in a safe place and apply the parking brake.
-
Page 12: Bluetooth
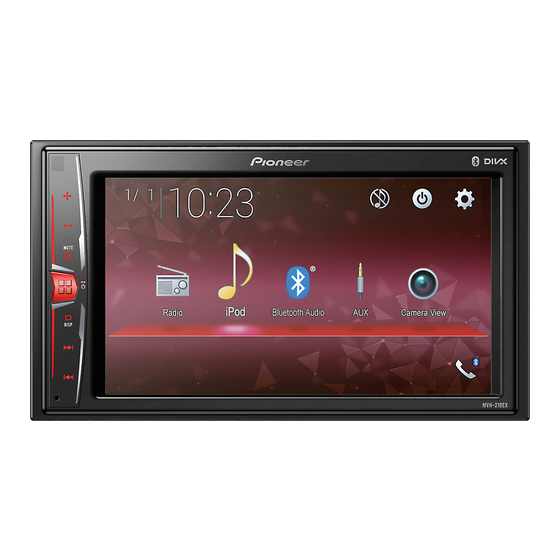
Top menu screen 6/10 Camera View Radio BluetoothAudio Source icons Setting the time and date (page 38) Settings (page 29) and Favorite menu (page 38) Hands-free phoning (page 15) AV source off If you select , you can turn off almost all functions. The unit turns on by operating following functions: •... - Page 13 Touch then The Bluetooth menu screen appears. Touch [Connection]. Touch The unit starts to search for available devices, then displays them in the device list. Touch the Bluetooth device name. After the device is successfully registered, a Bluetooth connection is established by the system.
- Page 14 Menu Item Description [Connection] Connect, disconnect, or delete registered Bluetooth device manually. Touch to delete registered device. To connect a registered Bluetooth device manually, touch the name of the device. To disconnect the device, touch the name of the connected device in the list.
- Page 15 • Only one device can be connected as a hands-free phoning. Hands-free phoning To use this function you need to connect your cellular phone to this product via Bluetooth in advance (page 12). CAUTION For your safety, avoid talking on the phone as much as possible while driving. Making a phone call Press , then touch...
- Page 16 Using the preset dial lists ▶Registering a phone number You can easily store up to six phone numbers per device as presets. Press , then touch Touch On the [Phone Book] screen, touch the desired name to display the contact’s phone number.
- Page 17 Menu Item Description [Invert Name] Select [Yes] to change the order of the first and last names in the phone book. Setting the private mode During a conversation, you can switch to private mode (talk directly on your cellular phone). Touch to turn private mode on or off.
- Page 18 ▶The received call and dialed number histories • You cannot make a call to the entry of an unknown user (no phone number) in the received call history. • If calls are made by operating your cellular phone, no history data will be recorded in this product.
-
Page 19: Av Source
Basic operation Description of Bluetooth audio playback screen Track number indicator Sets a repeat play range. Plays files in random order. Selects a file or folder from the list to playback. NOTE This function is available only when the AVRCP version of the Bluetooth device is 1.4 or higher. -
Page 20: Smartphone Connection For Av Source
Source on the source list Touch on the AV Source screen. Touch the source key. When you select [Source OFF], the AV source is turned off. Smartphone connection for AV source When using a smartphone with this product, the settings are automatically configured according to the device to be connected. -
Page 21: Radio
Radio Starting procedure Press Touch [Radio]. The Radio screen appears. Basic operation Description of Radio screen Recalls the preset channel stored to a key from memory. Stores the current broadcast frequency to a key. Displays the preset channel list. Select an item on the list ([1] to [6]) to switch to the preset channel. Selects the FM1, FM2, FM3, or AM band. -
Page 22: Compressed Files
Touch to begin search. While searching, the six strongest broadcast frequencies will be stored under the preset channel keys in the order of their signal strength. To cancel the storage process Touch [Cancel]. Radio settings Press Touch then The system setting screen appears. Touch [AV Source Settings]. - Page 23 Connect the USB cable to the USB port on the rear panel of this product. NOTES • This product may not achieve optimum performance with some USB storage devices. • Connection via a USB hub is not possible. • A USB cable is required for connection. Unplugging a USB storage device Pull out the USB storage device from the USB cable.
- Page 24 Switches the following media file types. [Music]: Compressed audio files [Video]: Compressed video files [Photo]: Image files Selects a file from the list. Touch a file on the list to playback. Touching a folder on the list shows its contents. You can play a file on the list by touching it.
- Page 25 Switches the following media file types. [Music]: Compressed audio files [Video]: Compressed video files [Photo]: Image files Selects a file from the list. Touch a file on the list to playback. Touching a folder on the list shows its contents. You can play a file on the list by touching it.
-
Page 26: Ipod
iPod® Setup for iPod When connecting an iPod/iPhone to this product, the settings are automatically configured according to the device to be connected. iPod/iPhone compatibility This product supports only the following iPod/iPhone models and iPod software versions. Other may not work correctly. •... - Page 27 Basic operation Audio source Description of Audio source screen When you touch text information, all information is displayed by scrolling only when the parking brake is applied. Sets a repeat play range for all in the selected list/the current song. Plays songs within the selected list/album randomly.
-
Page 28: Aux
Displays the pop-up menu for Apple Music Radio. • Touch [Play More Like This] to play back songs similar to the current song. • Touch [Play Less Like This] to set it not to play back the current song again. •... -
Page 29: Settings
• You can set the screen size for the video image (page 39). Switches between the video input and audio input. Settings You can adjust various settings in the main menu. Displaying the setting screen Press Touch Touch one of the following categories, then select the options. System settings (page 29) Theme settings (page 34) Audio settings (page 34) - Page 30 (page 30). CAUTION Pioneer recommends the use of a camera which outputs mirror reversed images, otherwise the screen image may appear reversed. • Immediately verify whether the display changes to the rear view camera image when the shift lever is moved to REVERSE (R) from another position.
- Page 31 [System Language] Menu Item Description [System Language] Select the system language. NOTES • If the embedded language and the selected language setting are not the same, the text information may not display properly. • Some characters may not be displayed properly. [Restore Settings] Menu Item Description...
- Page 32 Menu Item Description [Touch Panel Calibration] Touch [Yes]. Touch four corners of the screen along the arrows. Press The adjustment results are saved. Press once again. Proceed to 16-point adjustment. Gently touch the center of the [+] mark displayed on the screen.
- Page 33 Menu Item Description [Dimmer Duration] Adjust the time that the dimmer is turned on or off by dragging the cursors or touching You can use this function when [Dimmer Trigger] is set to [Time]. TIPS • Each touch of moves the cursor backward or forward in the 15 minute width.
-
Page 34: Theme Settings
* With some pictures, you cannot adjust [Hue] and [Color]. NOTES • The adjustments of [Brightness], [Contrast], and [Dimmer] are stored separately when your vehicle's headlights are off (daytime) and on (nighttime). • [Brightness] and [Contrast] are switched automatically depending on the setting of [Dimmer Settings]. - Page 35 Menu Item Description [Graphic EQ] Select or customize the equalizer curve. [Super Bass] [Powerful] Select a curve that you want to use as the basis of customizing [Natural] [Vocal] [Flat] then touch the frequency that you want to adjust. [Custom1] [Custom2] TIPS •...
- Page 36 Menu Item Description [Speaker Level] Adjust the speaker output level of the listening position. [Front Left] [Front Right] Touch to select the listening position then [Rear Left] [Rear Right] select the output speaker. [Subwoofer] [Listening Touch to adjust the selected speaker output Position] level.
-
Page 37: Video Settings
NOTE [Subwoofer Settings] is available only when [Subwoofer] is [On]. Press Touch then Touch [Crossover] or [Subwoofer Settings]. Touch to switch the speaker. Touch to set the cutoff position. Touch to set the cutoff slope. The following items can also be set. Switches the subwoofer phase between normal and reverse position. - Page 38 Favorite menu Registering your favorite menu items in shortcuts allows you to quickly jump to the registered menu screen by a simple touch on the [Favorites] screen. NOTE Up to 12 menu items can be registered in the favorite menu. Creating a shortcut Press then touch...
- Page 39 • You can change the order of date display format: Day-month, Month-day. Changing the wide screen mode You can set the screen mode for AV screen and image files. Touch the screen display mode key. Screen display mode key Touch the desired mode. [Full] Displays 16:9 images on the full screen without changing the ratio.
- Page 40 Sound from the iPod cannot be heard. here, contact your dealer or the nearest → The audio output direction may switch authorized Pioneer service facility. automatically when the Bluetooth and USB connections are used at the same Common problems time.
- Page 41 If the error persists, Back image displayed when vehicle is not record the error message and contact your in reverse. dealer or your nearest Pioneer service → The camera polarity is not set properly center. in the Camera settings menu.
- Page 42 Pioneer Service Station. • There may be a slight delay when starting playback of audio files encoded with Detailed information image data.
- Page 43 Common notes about DivX files • The subtitles may not be displayed correctly if the displayed characters in the Notes specific to DivX files subtitle file include control code. • Only DivX files downloaded from DivX • For materials that use a high transfer rate, partner sites are guaranteed for proper the subtitles and video may not be operation.
- Page 44 Bluetooth • Files may not be played back properly SIG, Inc. and any use of such marks by PIONEER depending on the environment in which CORPORATION is under license. Other...
- Page 45 Windows Media is either a registered trademark • Pioneer accepts no responsibility for data or trademark of Microsoft Corporation in the lost from an iPod, even if that data is lost United States and/or other countries.
- Page 46 http://www.mp3licensing.com. Using the LCD screen iOS is a trademark on which Cisco holds the trademark right in the US and certain correctly other countries. iTunes Handling the LCD screen iTunes is a trademark of Apple Inc., registered in the U.S. and other •...
- Page 47 Continuous power output: visible. In that case, please consult your 22 W × 4 (50 Hz to 15 kHz, 5 %THD, 4 Ω dealer or the nearest authorized Pioneer LOAD, Both Channels Driven) Service Station. Load impedance: 4 Ω...
- Page 48 Preout output level (max): 2.0 V WMA decoding format: Equalizer (13-Band Graphic Equalizer): Ver. 7, 7.1, 8, 9, 9.1, 9.2 (2 ch audio) Frequency: (Windows Media Player) 50 Hz/80 Hz/125 Hz/200 Hz/315 Hz/ AAC decoding format: 500 Hz/800 Hz/1.25 kHz/2 kHz/3.15 MPEG-4 AAC (iTunes encoded only) (Ver.
- Page 49 AM tuner Frequency range: 530 kHz to 1 710 kHz Usable sensitivity: 28 μV (S/N: 20 dB) Signal-to-noise ratio: 62 dB (IEC-A network) CEA2006 Specifications Power output: < = 14 W RMS × 4 Channels (4 Ω and THD+N) S/N ratio: 91 dBA (reference: 1 W into 4 Ω) NOTE Specifications and design are subject to possible...
- Page 50 © 2018 PIONEER CORPORATION. All rights reserved. <QRI3119-A> UC...