Table of Contents
Advertisement
Quick Links
Advertisement
Table of Contents

Related Manuals for Serene SEREONICALERT CA-360Q


Summary of Contents for Serene SEREONICALERT CA-360Q
- Page 1 USER'S MANUAL VISUAL ALERT SYSTEM 06:30A 06:30P MODEL CA-360Q...
-
Page 2: Table Of Contents
Connecting an external lamp Energy Saving Mode CA-AX Special Warning Message Adding Extra Wireless Sensor Accessories View registered accessories Clear All Accessories System Menu System Reset Technical Specifications Warranty Service Information FCC & IC Information Copyright 2020 Serene Group, Inc. All rights reserved. -
Page 3: Ca-360Q Features
Features: 2.4GHz Wireless Smart-Code Technology - 360 full coverage of your entire home Advanced Visual alert system alerts you to daily sounds: Alarm clock Phone / cell Baby's crying Weather alerts (external alarm) Doorbell Audio alarms Motion Sensor SOS paging and more Multiple alerting outputs Loudspeaker Visual icons... -
Page 4: Important Safety Instructions
There is an electrical shock risk from lightning. Do not use telephone to report a gas leak while in the vicinity of the leak. Specifications of this product are subject to change without notice. Copyright 2020 Serene Group, Inc. All rights reserved. -
Page 5: General Description
General Description: Model CA-360Q is an advanced wireless visual alert system for the public and specially geared for the hard-of-hearing (HOH). It has a dual-alarm clock with a 5-inch (diagonal) color graphics display and uses an exclusive Smart-Code technology and operates in the 2.4 GHz band. -
Page 6: Package Contents
Items included are: 1 – Sereonic Alert CA360Q 1 – User's Guide 1 – Telephone Cable 1 – AC adapter Note: Batteries are user provided, please make sure you use NiMH Rechargeable Batteries. Copyright 2020 Serene Group, Inc. All rights reserved. -
Page 7: Unit Overview
Unit Overview: SOS/PAIR RESET CLOCK MODE FRONT VIEW BACK VIEW www.sereneinnovations.com... -
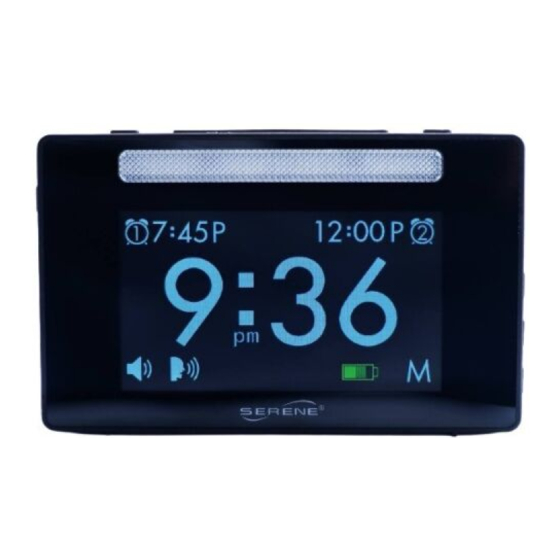
Page 8: Display Details
Display Details: Copyright 2020 Serene Group, Inc. All rights reserved. - Page 9 Display Detail Description Alarm-1 icon display. Detection of unregistered CA-AX audio transmitter icon. Alarm-2 icon display. System mode icon - (M) Master or (S) Sub. Power and battery status icon. Motion detection alerts enabled icon. Bed shaker connection icon. Voice enable icon. Speaker volume level –...
-
Page 10: Installation
Verify that all alerting outputs are triggered - display icon, flasher, ring tone, and bed shaker (if connected) – Answer call while the telephone is ringing. Verify that by answering the call (from any telephone), all alerting outputs stop. Copyright 2020 Serene Group, Inc. All rights reserved. - Page 11 INSTALLATION Cont’d: Pairing Sensor Accessories to the system: A new wireless sensor (example: a wireless doorbell) must be learned (registered) into the CA-360Q unit before it can be recog- nized. Press and hold the SOS/PAIR button for 6 seconds until the unit beeps, display, and announces “LEARN”.
-
Page 12: Setup Instructions
To enable the clock display again, press the for 2 seconds or until you hear a beep. Copyright 2020 Serene Group, Inc. All rights reserved. - Page 13 Set the Date: Press the (Down) button for 2 seconds to start. Use the buttons to change Year, then press MODE. Use the buttons to change Month, then press MODE. Use the buttons to select Day, then press MODE. Press the button once will momentarily display the date.
- Page 14 Press the MODE button once to confirm. Press RESET/SNOOZE to exit system menu. Note: All icons will be changed to the new color, except the alert icons, low battery icon and the master mode. Copyright 2020 Serene Group, Inc. All rights reserved.
-
Page 15: Enabling Alerts To Unregistered Ca-Ax
Enabling alerts to unregistered CA-AX audio transmitter CA-360Q will trigger an alert for all paired/registered accessories but you can enable the unit to trigger an alert for an un-paired CA-AX (audio/fire alarm) transmitter. To turn this function On/Off: Press buttons for 2 seconds or until the unit beeps. The CA-AX icon will display on the unitl Repeat setp 1 above to turn off. -
Page 16: Ca-Ax Special Warning Message
For normal operations, the user must perform a system reset to convert the CA-360Q back to a master mode. Copyright 2020 Serene Group, Inc. All rights reserved. -
Page 17: Adding Extra Wireless Sensor Accessories
Adding Extra Wireless Sensor Accessories to the system: You can add additional accessories and the quantity of accessories as listed in the table below by following the “Pairing Sensor Accesso- ries to the system:” instruction on page 11. Wireless Accessory Max Number Allowed CA-AX (Fire Alarm) CA-BX (Baby Monitor) -
Page 18: System Menu
(CA-AX) that is in range and has been activated. NOTE: The periodic check-in and low battery signals from these non-registered CA-AX units will not be acknowledged by the CA-360Q, so no warning messages will be generated. Copyright 2020 Serene Group, Inc. All rights reserved. - Page 19 2. Icons Color Use or button to scroll to this icon. Press MODE once. Use or button to scroll and highlight the desired color. Press the MODE button to confirm. The display will return to the menu. NOTE: All icons will be changed to the new color, except the alert icons, low battery icon and the master mode.
-
Page 20: System Reset
Press RESET will select the default selection “MAIN”. (Master) System reset is complete. All previous accessories are cleared. NOTE: As a confirmation, the main clock separator will be differed: “MASTER” mode – square shaped “SUB” (remote) mode – triangle shaped. Copyright 2020 Serene Group, Inc. All rights reserved. -
Page 21: Technical Specifications
Technical Specifications: 1. Technology 2.4 GHz Smart-Code 2. Phone Ringing Input >40 Vrms, 20 to 65 Hz 3. Phone jack type RJ-11C 4. Bed-shaker output jack 9VDC, 150mA 5. External Lamp Control output jack 9VDC, 150mA 6. Display size 5 inches diagonal 7. -
Page 22: Faq
The system can support up to 10 Remote-Receivers (CA-RX), 10 Personal pagers (CA-PX), 10 audio sensors (CA-AX), 4 SOS pendants (CA-SOS), 3 Baby-Sound sensors (CA-BX), 1 Cell-phone sensor (CA-CX), and 1 NOAA sensor (CA-NOAA) Copyright 2020 Serene Group, Inc. All rights reserved. - Page 23 9. I just bought an extra doorbell for my CA-360Q system, but it did not work. What do I need to do? Ans: All new accessory devices must be learned or registered by a CA-360Q master-unit before they can be worked or recog- nized.
-
Page 24: Warranty Service Information
Incidental or Consequential Damages: Neither Serene Innovations, nor the retailer dealer, or selling distributor has any responsibility for any incidental or consequential damages, including, without limitation, commercial loss of profit, or for any incidental expense, loss of time, or inconvenience. -
Page 25: Fcc & Ic Information
If trouble is experienced with this equipment, please contact: Company Name: Serene Group, Inc. Address: 14731 Carmenita Road, Norwark, CA. 90650 USA Tel: 562-407-5400 Fax: 562-483-2087... - Page 26 If the trouble persists and appears to be with this unit, disconnect the unit from the telephone line and discontinue use of the unit until it is repaired. For repair or warranty information, please contact Serene Innovations at 562-407-5400. Please note that the telephone...
- Page 27 FCC Part 15 Information and Rules: This device complies with Part 15 of the FCC rules. Operation is subject to the following two conditions: (1) this device may not cause harmful interference, and (2) this device must accept any interfer- ence received, including interference that may cause undesired operation.
- Page 28 Industry Canada Information and Rules Notice: The Industry Canada label identifies certified equipment. This certification means that the equipment meets telecommunica- tions network protective, operational, and safety requirements as prescribed in the appropriate Terminal Equipment Technical Require- ments document(s). The Department does not guarantee the equip- ment will operate to the the user's satisfaction.
- Page 29 Caution: Users should not attempt to make such connections them- selves, but should contact the appropriate electric inspections authority, or electrician, as appropriate. The REN for this device is stated on the IC regulatory label located on the back of the product. Notice: The Ringer Equivalence Number (REN) indicates the...