Advertisement
Available languages
Available languages
Quick Links
IMPORTANT SAFETY INSTRUCTIONS
WARNING
To guard against injury, basic safety precautions should be obser ved, including the following:
READ AND FOLLOW
ALL SAFETY INSTRUCTIONS
CAUTION
To prevent possible electrical shock resulting from water back-siphoning, Air Pump should
be used with the check-valve (included) or positioned higher than the water level
(see Illustration A).
DANGER
To avoid possible electrical shock resulting from contact with water, special care should be
taken. For each of the following situations, do not attempt repairs yourself; return the
appliance to Tetra for ser vice or discard the appliance.
1. If pump falls into the water, do not reach for it. First unplug it, then retrieve it. If electrical
components of the pump get wet, unplug it immediatel y.
2.
Carefully examine the pump after installation. It should not be plugged in if there is
water on parts not intended to get wet.
3.
Do not operate appliance if it has a damaged cord or plug, or if it is malfunctioning ,
or if it is dropped or damaged in any manner.
4.
When removing filter from the aquarium, do not let water run into the pump. Leave
pump running and prevent back-siphoning by removing the open end of the tubing
from the pump nozzle and taping it to the top frame of the aquarium.
5.
To avoid the possibility of the appliance plug or receptacle getting wet, position the
aquarium stand and tank to one side of a wall-mounted
outlet. Arrange a drip loop to prevent water from traveling
along the cord and coming in contact with the outlet
(see illustration A). The "drip loop" is that part of the
cord below the level of the receptacle, or the connector
if an extension cord is used, to prevent water traveling
along the cord and coming in contact with the receptacle.
If the plug or receptacle does get wet, don't unplug the
cord. Disconnect the fuse or circuit breaker that supplies
power to the appliance. Then unplug the appliance and
examine the outlet for the presence of water.
6. M aintain close super vision when using any appliance near children.
7.
To avoid injury, do not come in contact with moving parts or hot parts such as
heaters, reflectors, lamp bulbs, etc.
8.
Always unplug an appliance from an outlet when appliance is not in use, before
adding or removing parts, and prior to cleaning. Never yank the cord from an outlet.
Grasp the plug and pull to disconnect.
9.
Do not use an appliance for other than its intended use. The use of attachments not
recommended or sold by the appliance manufacturer may cause an unsafe condition.
10. Do not install or store the appliance where it will be exposed to the weather or to
temperatures below freezing.
11. Make sure any appliance mounted on a tank is securely installed before operating it.
12. Read and obser ve all notices on the appliance.
13. This appliance has a polarized plug (one blade is wider than the other). As a safety
feature, the plug will fit in a polarized outlet only one way. If the plug does not fit fully
into the outlet, reverse the plug. If the plug still does not fit, contact a qualified electrician.
Never use with an extension cord unless the plug can be fully inser ted. Do not
attempt to defeat this safety feature.
14. If an extension cord is necessar y, use a cord with a proper rating. A cord that calls for
fewer amperes or watts than the appliance rating may overheat. Care should be taken
to arrange the cord so that it will not be tripped over or pulled.
SAVE THESE INSTRUCTIONS
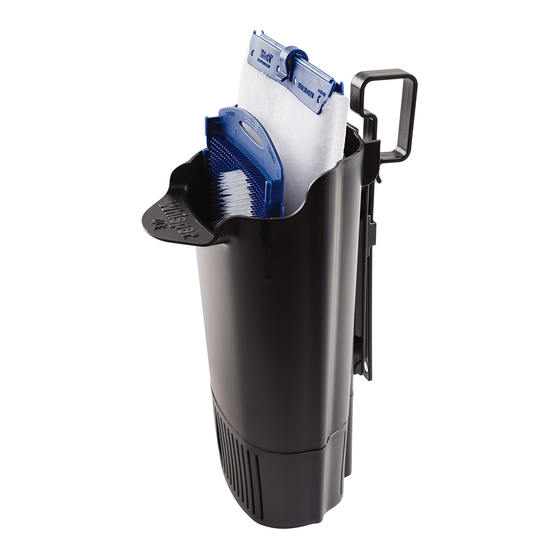
INSTALLING THE PUMP AND FILTER
INSTALACIÓN DE LA BOMBA Y DEL FILTRO
1
Lift the filter cover. Rinse with tap water
and insert the filter cartridge.
Levante la cubierta del ltro. Enjuague con agua del caño e
introduzca el car tucho del ltro.
2
Connect the airline tubing to the filter's
diffuser and Air Pump.
Conecte el tubo de la línea de aire en el difusor del ltro y en
la bomba de aire.
Illustration A
3
Install the filter inside the aquarium by
Check-valve
pressing the suction cups against the
aquarium glass. (Note: the spillway of the
filter should be approximately one-half inch
above the water level in the aquarium, and
the diffuser should be approximately one-half
inch above the aquarium gravel.)
Drip Loop
Drip Loop
Instale el ltro por el lado interno de la pecera y oprima la
ventosa contra su super cie de vidrio. (Nota: El derramadero
del ltro debe quedar aproximadamente 1.25 cm arriba del
agua de la pecera, y el difusor, aproximadamente 1.25 cm por
encima de la grava de la pecera.)
4
To place the pump on a surface lower
than the water level of the aquarium,
install the check-valve (included) on the
tube between the aquarium and the Air
Pump. (Note: The check-valve should be
attached close to the air pump nozzle. The
check valve prevents water from siphoning
into your Air Pump in case of an electrical
power failure. It is not necessary to use the
check valve if the Air Pump is positioned
higher than the water level.)
Para colocar la bomba en una super cie más baja que el nivel
del agua de la pecera, instale la válvula de retención (incluida)
en el tubo entre la pecera y la bomba de aire. (Nota: La válvula
de retención deberá acoplarse cerca de la boquilla de la bomba
de aire. La válvula de retención evita el sifonaje del agua hacia
la bommba de aire en caso de pérdida de alimentación eléctrica.
5
Plug in the Air Pump creating a drip loop in the power cord and
airline tubing (see "Impor tant Safeguards").
Conecte la bomba de aire creando un lazo de goteo en el cordón de alimentación y el tubo de la
línea de aire (véase "Nor mas de Seguridad Importantes").
MAINTAINING THE PUMP AND FILTER
MANTENIMIENTO DE LA BOMBA Y DEL FILTRO
1
The filter cartridge should be replaced ever y two weeks (or as needed).
To change cartridge, unplug the Air Pump to stop the water flow,
remove and replace the cartridge, then re-plug the Air Pump.
El car tucho del ltro deberá reemplazar se cada dos semanas (o según sea necesario). Para cambiar el car-
tucho, desconecte la bomba de aire de modo de detener el ujo de agua, retire y reemplace el car tucho, y
luego vuelva a conectar la bomba de aire.
2
Remove the filter cartridge when medicating fish, as it absorbs
Approximately 1/2 inch
most medications.
Aproximadamente 1.25cm
Si va a medicar a los peces, extraiga el car tucho del ltro, ya que puede absorber la mayoría
de medicamentos.
Approximately 1/2 inch
Aproximadamente 1.25cm
3
Clean the outside of the Air Pump with a damp cloth. When cleaning
the filter and Air Pump, unplug the Air Pump. Do not use detergents
or soap, as residue may be harmful to fish.
Limpie la super cie exterior de la bomba de aire con un paño húmedo. Cuando vaya a limpiar el ltro y la
bomba, desconecte la bomba de aire. No utilice detergentes ni jabón, ya que sus residuos pueden resultar
nocivos para los peces.
Check-valve
Válvula
de retención
Advertisement

Related Manuals for Tetra Whisper 3i


Summary of Contents for Tetra Whisper 3i
- Page 1 MAINTAINING THE PUMP AND FILTER taken. For each of the following situations, do not attempt repairs yourself; return the appliance to Tetra for ser vice or discard the appliance. MANTENIMIENTO DE LA BOMBA Y DEL FILTRO 1. If pump falls into the water, do not reach for it. First unplug it, then retrieve it. If electrical components of the pump get wet, unplug it immediatel y.
- Page 2 Tetra with a sales slip showing the date of porte pagado a Tetra con el comprobante de sí mismo; devuelva el artefacto a Tetra para su reparación o deséchelo. venta que indique la fecha de compra y $5.00 purchase and $5.00 to defray the cost of 1.