Table of Contents
Advertisement
Quick Links
Advertisement
Table of Contents

Related Manuals for Pyle PDMIUSBMT300


Summary of Contents for Pyle PDMIUSBMT300
- Page 1 PDMIUSBMT300 Computer Desktop Microphone 4 Polar Patterns Streaming & Pro Audio Recording Mic with Tripod Stand, Easy USB Plug-and-Play Questions? Issues? (for Podcast Recording, Streaming, Gaming) We are here to help! Phone: (1) 718-535-1800 Email: support@pyleusa.com...
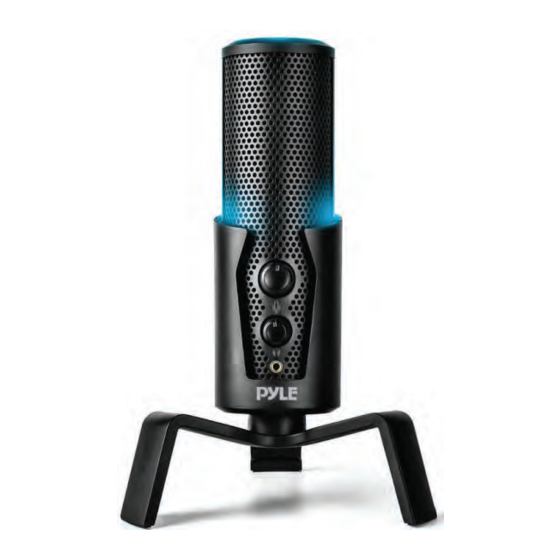
- Page 2 ASSEMBLY - ATTACHING THE STAND STAND ANGLE ADJUSTMENT 1. Twist knob counter-clockwise to loosen. Adjust leg height and twist clockwise to lock position MICROPHONE FUNCTIONS Dual Function Button A. Turn left to right to increase gain B. Press in to mute (LED glows RED) Headphone volume controller Headphone (3.5mm input)
-
Page 3: Led Controls
MICROPHONE FUNCTIONS SELECT POLAR PATTERN Press the Mode button to select di erent polar pattern settings. LED lights will illuminate to show each pattern. POLAR PATTERN SELECTION CARDIOID (FRONT LED) Multi-color Ambient LED switch BIDIRECTIONAL STEREO Type C OMNIDIRECTIONAL (Connect to computer) LED CONTROLS CARDIOID MODE: is perfect for recording sounds directly in front of the microphone. -
Page 4: Selecting Software
SELECTING SOFTWARE FREQUENCY RESPONSE DIAGRAM You have many choices in recording software. Select the program that will best suit your audio needs and budget. SETTING YOUR SOFTWARE LEVELS The correct adjustment of microphone level is Important for optimum performance. Ideally, the microphone level should be as high as possible without overloading the input of your computer. -
Page 5: Preliminary Setup With Mac Os
1. Plug the free end of the provided USB cable into the USB port on your computer. Your computer will automatically recognize the USB device. 2. To select the PDMIUSBMT300 as your audio input, rst open your System Preferences. 4. Click the input tab and select the PDMIUSBMT300 USB as the device for sound input. PDMIUSBMT300 NOTE: Many recording software programs are available online. -
Page 6: Preliminary Setup With Windows Xp
1. Plug the free end of the provided USB cable into the USB port on your computer. Your computer will automatically recognize the USB device. 2. To select the PDMIUSBMT300 as your default recording device, select START MENU> Control Panel. -
Page 7: Preliminary Setup With Windows Vista
START MENU > Control Panel > Sound PDMIUSBMT300 PDMIUSBMT300 8. Your preferences are now set to use the PDMIUSBMT300 with Windows XP with the recording program of your choice. 3. Select the Recording tab. Make sure that the PDMIUSBMT300 microphone is set as the default recording device. -
Page 8: Preliminary Setup With Windows 7
Your computer will automatically recognize the USB device. 2. START menu > Control Panel > Sound To select the PDMIUSBMT300 USB as your default recording device, begin at your START menu. Select Control Panel. 5. The following screen will pop up www.PyleUSA.com... -
Page 9: System Requirements
6. Select the Recording tab & choose PDMIUSBMT300 USB as the default device. Features: 7. Double click on the PDMIUSBMT300 USB icon to open the Microphone Properties • Pro Audio Broadcasting Desktop Microphone window. Select the levels tab to adjust microphone level (loudness). You may •...