Advertisement
Quick Links
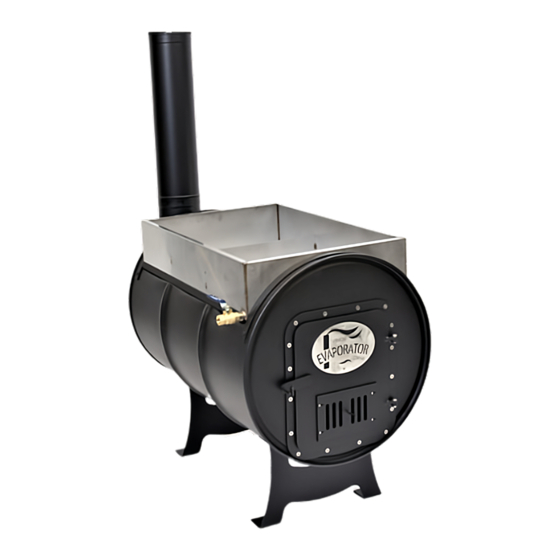
WELCOMES YOU TO SUGARING WITH THE SAPLING EVAPORATOR
The Vermont Evaporator Company's Sapling Evaporator is designed for the backyard sugaring enthusiast with
5 to 50+ taps. The Sapling does not require a sugar house, and, with additional purchases, converts to a grill and
a smoker for year-round use!
Although the Sapling is simply designed, it still has the advanced features of more expensive evaporators. The
Sapling is a continuous-flow evaporator, meaning that sap is channeled around the pan using dividers to create a
sugar gradient. This configuration allows syrup to be drawn off and sap to be added without emptying the
pan. The continuous flow is more efficient than preexisting DIY methods, which means more syrup on more
pancakes in less time.
We hope you get many years of enjoyment from your Sapling. Here's how to start!
Setting up your Sapling
Before you start, be smart! You're dealing with hot temperatures and a live fire so:
●
DO NOT operate your Sapling while intoxicated or under the influence of alcohol or drugs.
●
DO NOT install your Sapling near combustible materials.
●
DO NOT install your Sapling indoors; DO NOT install in a garage, barn or sugar-shack unless you know
how to do so safely with proper ventilation and fire protection.
●
DO NOT attempt to move your Sapling while the unit is hot.
●
DO NOT start your Sapling as a grill OR as an evaporator without an insulating layer of sand or ash in the
bottom of the barrel. Failure to place an insulating layer in the bottom of your barrel can result in coals burning
right through the bottom of your barrel.
1
Advertisement

Related Manuals for Vermont Castings SAPLING EVAPORATOR


Summary of Contents for Vermont Castings SAPLING EVAPORATOR
- Page 1 WELCOMES YOU TO SUGARING WITH THE SAPLING EVAPORATOR The Vermont Evaporator Company’s Sapling Evaporator is designed for the backyard sugaring enthusiast with 5 to 50+ taps. The Sapling does not require a sugar house, and, with additional purchases, converts to a grill and a smoker for year-round use! Although the Sapling is simply designed, it still has the advanced features of more expensive evaporators.
- Page 2 ● DO NOT start or run your Sapling as an evaporator without sap or other fluid in the boiling pan; DO NOT allow your Sapling to cool without sap or other fluid in the pan. You can quickly destroy your pan by doing so. Assembling your Sapling What you will need besides your Sapling: 1.
- Page 3 uninstall it. Orient your Sapling “bottom-up,” with the cavity facing down. (It helps to have a skinny table or workbench or pair of saw horses to do this while steadying the unit.) Align the holes in each leg set (so that the feet face the rear of the machine) on the corresponding holes on the barrel and push a bolt through each pair of holes.
- Page 4 the front. 11. Starting one thread back from the exit, wrap your bit of pipe tape around the draw-off to the right and wind around until completely used. Screw the ball valve on over the pipe tape. Does your unit look like the one in our logo? Excellent! You’re done! Preparing Your Sapling for Use 1.
- Page 5 8. Allow the unit to cool and then drain the pan. 9. Rinse the pan thoroughly with clean water and dry. NOTE: It’s always best to use non-chlorinated water if possible (chlorinated water can eventually cause corrosion of the pan). Operating Your Sapling! CAUTION: NEVER, EVER, EVER fire the Sapling without liquid in the pan (or allow it to cool without liquid).
- Page 6 Finishing on the Sapling requires practice and skill. You will get better at this every year! 11. At the end of your boiling day, draw off about a gallon of the sap closest to being syrup. You can finish it as described above, or use it the next time you boil for a faster startup. 12.