Table of Contents
Advertisement
Quick Links
Advertisement
Table of Contents

Related Manuals for Leica A60 F


Summary of Contents for Leica A60 F
- Page 1 Leica A60 F User Manual...
-
Page 2: Table Of Contents
Accessories, Maintenance and Repair Leica A60 LED Ring Illuminator Replacing the Protective Glass The Leica A60 F Congratulations! Dimensions An Overview of the Leica A60 F Dimensions Assembling the Leica A60 F Optical Data Table Clamp Optical Data Flexible Arm Stand and Optics Carrier... -
Page 3: Safety Instructions
Safety Instructions Leica A60 F User Manual Safety Instructions... -
Page 4: Symbols Used
Warning of hazardous electrical voltage This symbol indicates especially impor- tant information that is mandatory to read and observe. Failure to comply can cause the following: Hazards to personnel Instrument malfunctions and damage Leica A60 F User Manual Safety Instructions... -
Page 5: Important Notes
Important Notes Description User manual Legal requirements The Leica A60 F stereomicroscope meets This user manual includes important instruc- Adhere to general and local regulations relat- today's state of the art of technology. Neverthe- tions related to operating safety, maintenance ing to accident prevention and environmental less, hazards may still arise during operation. -
Page 6: Instructions On Use
Intended use Place of use Non-intended use The Leica A60 F stereomicroscope is an opti- Use the stereomicroscope in closed, dust-free Using the stereomicroscope in any way cal instrument for improving the visibility of rooms at +10 °C to +40 °C. Protect it from oil,... - Page 7 and...
-
Page 8: Health Risks And Dangers Of Use
Dangers during use Workplaces with stereomicroscopes of the Leica stereomicroscopes are intended to The stereomicroscope must be connected facilitate and improve the viewing task, reduce the exertion of the user to a minimum. to a grounded outlet. but they also impose high demands on the eyes Danger of infection and holding muscles of the user. -
Page 9: Information For The Person Responsible For The Instrument
(as long as maintenance was not carried out by us), or is handled improperly, Leica Carry out regular inspections to make If you use accessories from other manu- will not accept any liability. -
Page 10: Care Instructions
Never use chemicals to clean colored manufacturer. surfaces or accessories with rubberized parts. This could damage the surfaces, We recommend concluding a service and specimens could be contaminated by contract with Leica Service. abraded particles. Leica A60 F User Manual Safety Instructions... -
Page 11: Accessories, Maintenance And Repair
Accessories, Maintenance and Repair Accessories Maintenance Repairs and service work Only the following accessories may be used The Leica A60 F stereomicroscope is basi- Only original Leica Microsystems spare with the stereomicroscope: cally maintenance-free. To ensure that it parts may be used. -
Page 12: The Leica A60 F
The Leica A60 F Leica A60 F User Manual The Leica A60 F... -
Page 13: Congratulations
Congratulations! You have just purchased a Leica A60 F – an In developing the Leica A60 F, we have placed excellent choice! The outstanding features of great emphasis on simple, self-explanatory this stereomicroscope are its flexible design, its operation. However, please take the time to... -
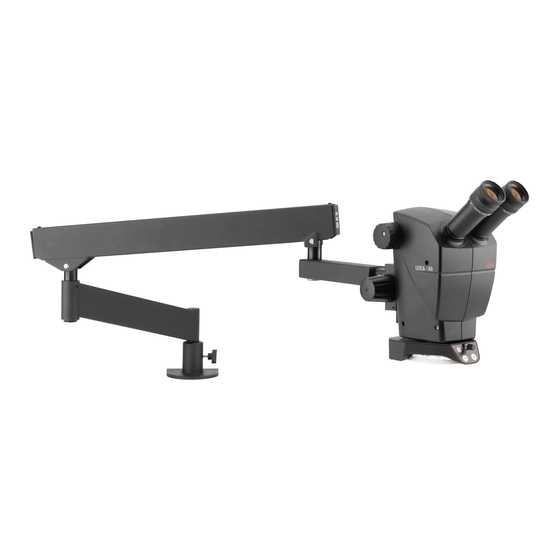
Page 14: An Overview Of The Leica A60 F
An Overview of the Leica A60 F 1. Flexarm 2. Rotatable joint 3. Eyepieces 4. Magnification changer (zoom) 5. Focusing drive 6. Optics carrier 7. Leica A60 LED ring Illuminator 8. Fastening lever (NOT PICTURED) Leica A60 F User Manual... -
Page 15: Assembling The Leica A60 F
Assembling the Leica A60 F Leica A60 F User Manual Assembling the Leica A60 F... - Page 16 Before assembly, ensure that the selected tabletop can carry the weight. 3. Insert the flexarm into the table clamp. Otherwise persons can be injured and the stereomicroscope and the specimen can be damaged. Leica A60 F User Manual Assembling the Leica A60 F...
-
Page 17: Flexible Arm Stand And Optics Carrier
The flexarm is adjusted at the factory 1. Unscrew both clamping screws on the connecting pin of the focusing arm. This so that it can keep the Leica A60 F and connecting pin. also locks the tilt. the LED ring illuminator in balance – without having to tighten the fastening lever to do so. -
Page 18: Assembling The Illuminator
Illuminator assembly Assembly The standard delivery of the illuminator The Leica A60 LED ring illuminator is 1. Connect the power supply cable to the ring includes two Velcro strips that you can installed with a single screw on the illuminator. -
Page 19: Using The Leica A60 F
Using the Leica A60 F Leica A60 F User Manual Using the Leica A60 F... -
Page 20: Adjusting The Working Height
During setup, use the distance bar provided in 1. Move the flexarm to the desired height. between the objective and the specimen the "Quick Start Guide" for orientation: in focus. For the Leica A60 F, this is 122 mm. 122 mm 100 mm 122 mm 2. -
Page 21: The Correct Interpupillary Distance
Not to worry – after a little while, it will become automatic. If you wear glasses, fold the eyecups back – otherwise, fold the eyecups forwards. Leica A60 F User Manual Using the Leica A60 F... -
Page 22: Focusing
If precise focusing is not possible, check eyepiece correctly for your eyes (see page 24). whether the working distance is in the permitted range (see page 20). 2. Begin to focus on the specimen. Leica A60 F User Manual Using the Leica A60 F... -
Page 23: Magnification Display
Magnification Display You can read the configured magnifica- tion on the right-hand rotary knob. For the tables with the optical data, including object field diameter, refer to page 32. Leica A60 F User Manual Using the Leica A60 F... -
Page 24: Dioptric Correction And Parfocality
Like all other Leica stereomicroscopes, just the sharpness. item 8. the Leica A60 F is parfocally matched. The prerequisite for this is the correct setting of 4. Select the lowest magnification again, but 10. Select the highest magnification and refo- cus if necessary. -
Page 25: Adjusting The Torque Of The Focus Drive
1. Grip the drive knobs with both hands and turn them towards each other until the desired torque is reached during focusing. Leica A60 F User Manual Using the Leica A60 F... -
Page 26: Leica A60 Led Ring Illuminator
Leica A60 LED Ring Illuminator The light of the Leica A60 LED ring illu- The ring illuminator offers a great Using the keypad minator can be very bright. Therefore, number of advantages you will not want Use the... -
Page 27: Replacing The Protective Glass
The protective glass protects the optics Replacing the protective glass from dirt and possible damage. Never 1. Remove the Leica A60 LED ring illuminator use the Leica A60 without the protective glass, (see page 18). as otherwise dust and dirt can get into the optics. - Page 28 Dimensions Leica A60 F User Manual Dimensions...
-
Page 29: Dimensions
Dimensions 1242 1242 Leica A60 F User Manual Dimensions... - Page 30 Optical Data Leica A60 F User Manual Optical Data...
-
Page 31: Optical Data
Object field diam. Depth of field* cation 46.0 13.62 0.63 36.5 9.03 28.8 5.89 10.0 23.0 3.96 1.25 12.5 18.4 2.66 16.0 14.4 1.71 20.0 11.5 1.15 25.0 0.76 30.0 0.54 * according to Berek Leica A60 F User Manual Optical Data... - Page 32 CONNECT WITH US! Leica Microsystems (Schweiz) AG · Max-Schmidheiny-Strasse 201 · 9435 Heerbrugg, Switzerland T +41 71 726 34 34 · F +41 71 726 34 44 www.leica-microsystems.com...