Table of Contents
Advertisement
Quick Links
Advertisement
Table of Contents

Related Manuals for Pyle PureClean PUCRC105


Summary of Contents for Pyle PureClean PUCRC105
- Page 1 PUCRC105 User Manual...
-
Page 2: Table Of Contents
CONTENTS 1. SAFETY INSTRUCTION 2. COMPONENTS OF CLEANER 2.1 PARTS NAME 2.2 TECHNICAL PARAMETER 3. OPERATION INSTRUCTION 3.1 QUICK USER GUIDE 3.2 CLEANING/STOP/SLEEP 3.3 CLEANING MODES SELECTION 3.4 PRE-SET TIMER 9-11 4. MAINTENANCE 4.1 CLEANING SIDE BRUSH 4.2 CLEANING THE DUST BOX AND FILTER 4.3 CLEANING THE INFRARED RECEIVER AND CHARGING CONNETOR 4.4 ASSEMBLY THE MOPPING PAD... -
Page 3: Safety Instruction
1. SAFETY INSTRUCTION Please read the following instruction carefully before using. ● Read the instruction and follow the step on operating the unit. ● Keep this instruction manual for future reference. ● Send this instruction manual if you need third party transfer. ●... -
Page 4: Components Of Cleaner
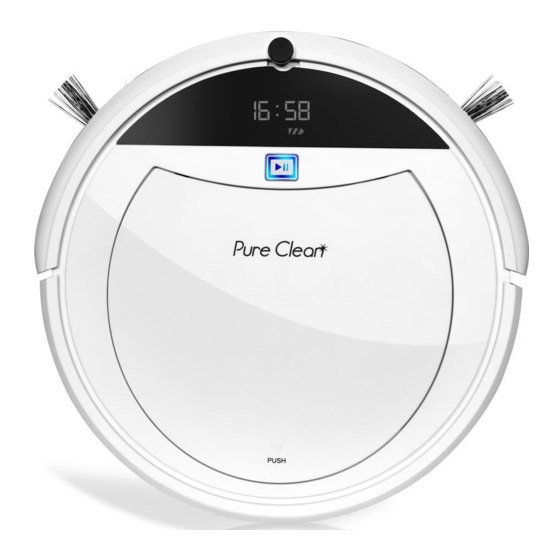
2. COMPONENTS OF CLEANER 2.1 Parts Name Infrared signal receiver LED display Front bumper Infrared sensor window Operate key Faceplate Ground detection sensor Front wheel Dustbin release button Charging electrode Right side brush Left side brush Ground detection Ground detection sensor sensor Suction channel Right wheel... - Page 5 2. COMPONENTS OF CLEANER Control Panel Indicator light: 1.Cleaning Mode: Blue Flash Light. 2.Error: Red Flash Light. Turn on or stop 3.Charging: Red Flash Light. 4.Full Charging: Blue Lighting Display screen Timer symbol Clock symbol Current time display Voice symbol High speed Battery symbol Auto cleaning symbol...
-
Page 6: Technical Parameter
2. COMPONENTS OF CLEANER Remote Control 1. On/off switch (cancel key) 2. Mode (Normal/low speed) 3. Turn left button POWERFUL 4. Forward button VOICE FULL-GO 5. Turn right button 6. Backward button 7. Full-Go, Auto cleaning after fully charged AUTO SPOT Open/Close voice. -
Page 7: Operation Instruction
3. OPERATION INSTRUCTION 3.1 Quick User Guide 1.Charging station position information Please make sure the adaptor has been connected to the charging station. *Reminders Install the charging station on the flat ground firmly and against the vertical wall (fixed on the wall with the charging station sticker). -
Page 8: Cleaning/Stop/Sleep
3. OPERATION INSTRUCTION 3.2 Cleaning/Stop/Sleep 1.Cleaning A. Turn on power switch. B. Press“ ”on unit or press “AUTO“on remote controller to start work. 2. Stop Stop will switch the cleaning mode to stand-by mode, press related button on remote controller or "... - Page 9 3. OPERATION INSTRUCTION 2.Spot Mode Press the spot cleaning button, it will clean the area within 1m2 and clean by spiral mode. It will automatic operate in around 2-3 minutes. 3. Mopping Mode Press " " button, it will switch to mopping mode, and under this mode the vacuum cleaning mode will stop working.
-
Page 10: Pre-Set Timer
3. OPERATION INSTRUCTION 3.4 Pre-set timer Set the timer under stand-by mode(stop any working mode), and set the current time (clock) before using the timer function. Set the current time (Clock) 1.Press the “ ” button on remote control, the clock symbol display on screen. 2.Press“... -
Page 11: Maintenance
4. MAINTENANCE 4.1 Cleaning Side Brush Check the side brushes regularly, and clean them, please replacement it when side brushes are damaged *Reminders Please use the screw driver to take out the brush, then clean the side brush or replacement it. 4.2 Cleaning the dust box and filter Please clean the dustbin box on time after working, cleaning step as following operation figure. -
Page 12: Cleaning The Infrared Receiver
4. MAINTENANCE 4.3 Cleaning the Infrared Receiver and Charging Connector Please use the dry soft cloth to clean the charging electrode and sensor in front of the unit. *Reminders Please clean the charging electrode on time to avoiding charging issue. Charging electrode... -
Page 13: Assembly The Mopping Pad
4. MAINTENANCE 4.4 Assembly the Mopping Pad 1. Please stickup the mop cloth on to mop pad, refer following figure. 2. Reverse the cleaner, assembly the mop cloth to the unit, beware of the direction is correct... -
Page 14: Failure Checking
Failure Code Failure Cause How to solve Left wheel has been stucked Please clean the left wheel. Right wheel has been stucked Please clean the right wheel. The ground is not flat, please move the robot to a Detected the cliff new place then start again. -
Page 15: Accessories List
6. ACCESSORIES LIST Description Q'ty Robot cleaner(including Li-ion battery) Charging station Remote controller Adaptor Clean brush (1pc packed in robot cleaner) HEPA filter Side brushes Mop pad Mopping cloth Instruction manual Warranty card *Reminders We will improve the product continuously. We reserve the right to change the product specification without notice.