Table of Contents
Advertisement
Quick Links
Download this manual
See also:
Manual
Package Contents
®
• D-Link
DSA-5100 Airspot
• CAT5 UTP Straight-Through Ethernet Cables (Qty. 3)
• CAT5 UTP Crossover Cable (Qty. 1)
• CD-ROM with manual
• Null modem RS-232 console cable (Qty. 1)
• Power Cord
System Requirements
• Computer with an Ethernet adapter and a Windows, Mac, or Unix based operating system.
• Internet Explorer or Netscape Navigator, version 6.0 or above, with JavaScript enabled.
©2006 D-Link Systems, Inc. All rights reserved. Trademarks or registered trademarks are the property of their respective holders. Software and specifications subject to change without notice. DSA-5100. 04182006
™
Enterprise Gateway
DSA-5100
INSTALLATION GUIDE
Advertisement
Table of Contents

Related Manuals for D-Link AirSpot DSA-5100


Summary of Contents for D-Link AirSpot DSA-5100
-
Page 1: Installation Guide
• Internet Explorer or Netscape Navigator, version 6.0 or above, with JavaScript enabled. ©2006 D-Link Systems, Inc. All rights reserved. Trademarks or registered trademarks are the property of their respective holders. Software and specifications subject to change without notice. DSA-5100. 04182006... -
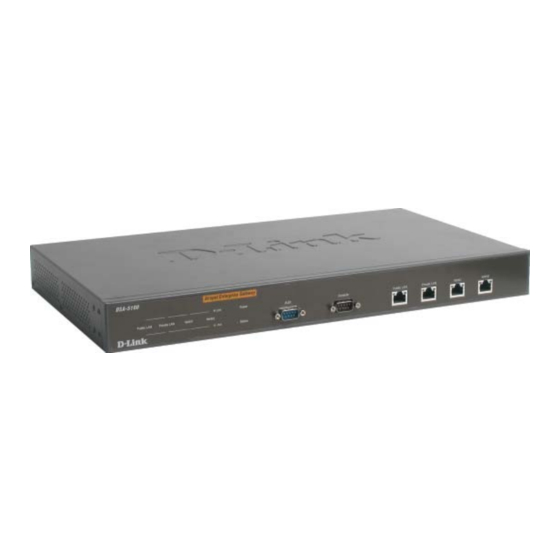
Page 2: Hardware Overview
DSA-5100 Installation Guide Hardware Overview Front Panel Function Link Solid green indicates a good connection on the associated port. The Act LED flashes during data transmission on the associated port. Power A solid light indicates a proper connection to the power supply. -
Page 3: Hardware Installation
Hardware Installation Hardware Installation 1. Connect the power cord to the power connector on the rear panel of the DSA-5100. Plug the other end of the power cord to a wall outlet or power strip. 2. Turn on the power switch on the rear panel of the DSA-5100. The Power LED will illuminate. -
Page 4: The Setup Wizard
JavaScript enabled. To access the configuration screen, launch your Web browser and enter the IP address of the DSA-5100 in the address field and press enter. If using the DSA-5100’s default IP address, you would enter https://192.168.0.40 (Note: Include the “s”... -
Page 5: Step 1 - Change Admin's Password
DSA-5100 Installation Guide The Setup Wizard Click on the Run Wizard button to begin the Setup Wizard. The Setup Wizard appears, click Next to begin. Step 1 - Change Admin’s Password Enter a new password for the admin account and retype it in the verify password field. -
Page 6: Step 2 - Choose System's Time Zone
DSA-5100 Installation Guide Step 2 - Choose System’s Time Zone Select your time zone and click Next to continue. Step 3 - Set System Information • Succeed Page: Enter the URL that users should be directed to when successfully authenticated. - Page 7 DSA-5100 Installation Guide The Setup Wizard Step 4 - Set WAN1 Port’s Static IP Address If you selected Static IP, enter the IP address information provided by your Internet Service Provider. You must complete all of the fields. Click Next and continue to Step 5 on page 8.
- Page 8 DSA-5100 Installation Guide Step 5 - Configure Public LAN • IP Address and Subnet Mask: Enter the IP Address and Subnet Mask of the DSA-5100 for the Public LAN port. • Disable DHCP Server: If this option is selected, then LAN clients must be configured with an IP address manually.
-
Page 9: System Configuration
• Administrator Info: Information on how to contact the system administrator can be entered here. The administrator’s name, phone number, and e-mail address can be entered here. If a user connects to the DSA-5100 and WAN1 has a connection problem, the user logon screen will show the system administrator information that was entered here. -
Page 10: Interface Configuration
IP PNP: When enabled, you can use any IP address to connect to the Public LAN. You can authenticate to the DSA-5100 and access network resources regardless of your IP configuration. Note: This function only works when NAT is used. -
Page 11: Dhcp Server Options
A description can be entered but is not mandatory. Click Apply to save the settings. DHCP Server Relay: Select this mode to specify another DHCP server’s IP address. DSA-5100 Installation Guide Reserved IP Address List... -
Page 12: User Authentication
User Authentication Authentication Policies The DSA-5100 provides five different management setups. The Administrator can adopt different authentication methods according to each management setup. Each management setup can use up to twenty management rules in addition to the group configuration. This allows more diversified and flexible management options for general users. - Page 13 • Set as Default: Selecting this option will set the selected control group as the preferred authentication method. Only one policy can be selected as the default. • Policy Name: The friendly name for the authentication policy. The DSA-5100 controls priority according to the following postfix when the user logs on the system (example user1@postfix1).
-
Page 14: Authentication Methods
Authentication Methods Local The Local user authentication method authenticates users from a list of users created on the DSA-5100. The DSA-5100 has a maximum of 2000 user accounts. To access the list of accounts, click on the Authentication Policies Configuration page when Local is selected as the Authentication Server. -
Page 15: Editing Accounts
Upload User Account You can copy user account information to the DSA-5100 from a text file. You can either upload a previously saved file or create a text file using the proper format. In the text file, each user must have their own line and there are no spaces. Use the colon (:) between the octets of the MAC address. - Page 16 Download User Account This option will save all of your user accounts to a text file that can be uploaded back to the DSA-5100. To Download the user accounts, click on the Download User Account button. The user accounts will be displayed on the screen. Scroll to the bottom of the page.
- Page 17 DSA-5100 Installation Guide User Authentication RADIUS When selecting RADIUS as the authentication method, there are several parameters that need to be configured. 802.1X Authentication: When 802.1x Authentication is enabled, an Edit option will appear just below the enable button. Click the Edit hyperlink to configure the additional parameters.
- Page 18 DSA-5100 Installation Guide User Authentication LDAP When selecting LDAP as the authentication method, you must configure all of the fields under Primary LDAP Server. The Secondary LDAP Server fields are optional. Server IP: The IP address or domain name of the LDAP server.
-
Page 19: External Authentication
Note: Currently only Windows 2000 domain controllers can be used. External Authentication The DSA-5100 also allows external authentication, allowing you to put the login page on an external web server. The login page can be changed at any time. Protocol: Select HTTP or HTTPS. -
Page 20: Group Profile
DSA-5100 Installation Guide Group Profile Group Profile The DSA-5100 has three types of profile configurations: Firewall Profile, Specific Route Profile, and Login Schedule Profile. Firewall Profile The system has a default global firewall profile and five additional firewall profiles. You can use the global firewall profile to define the firewall rules for all users and create indepent profiles using the other five settings. - Page 21 DSA-5100 Installation Guide Group Profile Filter Rule Item: The filter rules use a serial filter to determine permissions for transmitting from the source address to the target address or examine whether there is a data loss. Click on the item number to display the details.
- Page 22 Specific Route Profiles Profile Name: The name for the Specific Route Profile. Destination IP Address: Specifies the target network or host IP. Subnet Mask: Specifies the target subnet mask. Gateway IP Address: Specifies the IP address of the next hop router.
- Page 23 DSA-5100 Installation Guide Group Profile Login Schedule Profiles This allows you to set the hours that users are allowed to login.
-
Page 24: Network Configuration
DSA-5100 Installation Guide Network Configuration Network Configuration Five functions are provided to control individual jobs of the network transmission: Network Address Translate, Privilege List, Monitor IP List, Free Surfing Area, and Proxy Server properties. Network Address Translate If you have several Public IP addresses, you can assign External IP Addresses (Public IP Addresses) to Internal IP Addresses (Virtual IP Addresses). -
Page 25: Port And Ip Redirect
DSA-5100 Installation Guide Network Configuration Port and IP Redirect When any user attempts to connect to the defined destination, the connection packet will be converted to the corresponding destination. You can define up to forty groups for redirection. These settings are effective as soon as you click the Apply button. - Page 26 DSA-5100 Installation Guide Network Configuration MAC Pass Through Configuration This feature allows designated MAC addresses to bypass authentication. Up to one hundred MAC addresses can be added to be given network access rights without authentication. Be sure to include the colon (:) between each octet (xx:xx:xx:xx:xx:xx).
- Page 27 DSA-5100 Installation Guide Notes This page left blank intentionally.
-
Page 28: Technical Support
Technical Support You can find software updates and user documentation on the D-Link website. D-Link provides free technical support for customers within the United States and within Canada for the duration of the warranty period on this product. U.S. and Canadian customers can contact D-Link technical support through our website or by phone.