
Related Manuals for Curtis CD266


Summary of Contents for Curtis CD266
- Page 1 PERSONAL CD PLAYER WITH ANTI-SKIP PROTECTION OWNER'S MANUAL MODEL: CD266 PLEASE READ BEFORE OPERATING THIS EQUIPMENT...
-
Page 2: Safety Precautions
SAFETY PRECAUTIONS CAUTION RISK OF ELECTRIC SHOCK DO NOT OPEN CAUTION: TO REDUCE THE RISK OF ELECTRIC SHOCK, DO NOT REMOVE COVER (OR BACK). NO USER-SERVICEABLE PARTS INSIDE. REFER SERVICING TO QUALIFIED SERVICE PERSONNEL. DANGEROUS VOLTAGE: The lightning flash with arrowhead symbol, within an equilater- al triangle is intended to alert the user to the presence of unin- sulated dangerous voltage within the product's enclosure that may be of sufficient magnitude to constitute a risk of electric... - Page 3 SAFETY PRECAUTIONS INFORMATION: This equipment has been tested and found to comply with the limits for a Class B digital device, pursuant to Part 15 of the FCC Rules. These limits are designed to provide reasonable protection against harmful interference in a residential installation.
- Page 4 Dear Customer: Selecting fine audio equipment such as the unit you've just purchased is only the start of your musical enjoyment. Now it's time to consider how you can maximize the fun and excite- ment your equipment offers. This manufacturer and the Electronic Industries Association's Consumer Electronics Group want you to get the most out of your equipment by playing it at a safe level.
-
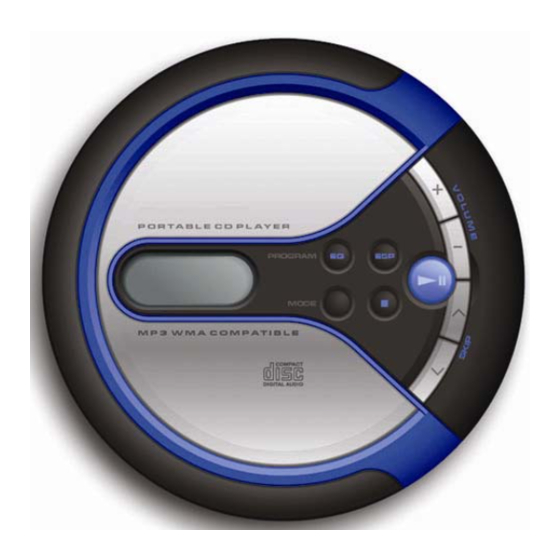
Page 5: Location Of Controls
LOCATION OF CONTROLS Display PROGRAM Button DC 4.5V Jack (Side of Unit) CD Compartment CD Door Open Switch Line Out Jack (Side of Unit) Play/Pause )/Power on Button Phones Jack (Side of Unit) SKIP UP Button SKIP DOWN Button STOP ( ) Button MODE Button VOLUME UP VOLUME DOWN... -
Page 6: Power Sources
POWER SOURCES This CD player requires either two (2) "AA" batteries (not included) or the AC adapter (not included). BATTERY INSTALLATION The low battery indicator will light in the dis- play when batteries are low (when using battery power). Open the battery compartment door on the bottom of the unit by sliding it out and then lifting it. - Page 7 Plug a connection cable (not included) between the LINE OUT jack on the side of the CD player and the amplifier's AUX or CD input jack. (Do not connect it to the amplifier's PHONO jack.) NOTE: If the radio interferes with TV reception, move the unit away from the TV or turn off the power to this unit.
-
Page 8: Operation
OPERATION Press the PLAY/PAUSE ( )/Power On button to turn the unit on. To turn the unit off, press the STOP ( )/Power Off button twice. The unit will automatically shut off if stopped (CD Standby) for 30 seconds. TO INSERT AND PLAY A CD This unit plays CD, CD-R and CD-RW discs. -
Page 9: Cd Playback Notes
OPERATION (CONTINUED) CD PLAYBACK NOTES: • When reocrding ("burn") CDs, make sure the session is "finalized", or simply record ("burn") only one session. You can find more information in your recorder's manual. • This unit is capable of playing standard CDs or 3" singles; no adapter is required. -
Page 10: To Begin Playback From A Specific Track
OPERATION (CONTINUED) TO BEGIN PLAYBACK FROM A SPECIFIC TRACK After you insert the disc into the CD player and the total number of tracks appears on the display, you may press either the Skip/Search button to select a specific track for playback. -
Page 11: Repeat Playback Of One Track
OPERATION (CONTINUED) REPEAT PLAYBACK OF ONE TRACK To repeat a single track, while in the Stop mode, press the Skip/Search button to select the specific track that you wish to repeat. Press the MODE button once, the Repeat 1 indicator will appear in the display. -
Page 12: To Randomly Playback A Cd
OPERATION (CONTINUED) TO RANDOMLY PLAYBACK A CD While in the Stop mode, press the MODE button 4 times; "RAND" will appear in the display. Press the PLAY/PAUSE ( )/Power On button to begin playback. The unit will play all the tracks in random order. When all the tracks have been played, the unit will stop. - Page 13 OPERATION (CONTINUED) Press the PROG. Button to memorize the track. Repeat steps 2 and 3 to program additional tracks. Press the PLAY/PAUSE ( )/Power On button to begin program playback. NOTES ON PROGRAM PLAYBACK • To add a track to the program memory, simply press the PROG. button repeatedly until the track appears and "PROG"...
-
Page 14: Care And Maintenance
CARE AND MAINTENANCE Caring for Compact Discs • Treat the compact disc carefully. Handle the compact disconly by its edges. Never allow your fingers to come in contact with the shiny, unprinted side of the compact disc. • Do not attach adhesive tape, stickers, etc. to the compact disc label. -
Page 15: Troubleshooting Guide
TROUBLESHOOTING GUIDE If you experience a problem with this unit, check the chart below before calling for service. Symptom Possible Cause Unit will not turn on. Weak or dead batteries. Batteries not inserted correctly. AC adapter not connected. CD compartment not closed. Close CD compartment Disc will not play. -
Page 16: Specifications
SPECIFICATIONS LINE OUT Frequency Response Tracking System Laser Pick-up D/A Conversion 8-times oversampling digital filter +1 bit DAC POWER SOURCE Batteries AC adaptor Dimensions Weight Accessories 20 to 20,000 Hz 1-beam laser Semiconductor laser 3V DC, (2 "AA" size) Input Voltage: AC 120V Output Voltage: DC 4.5V, 600mA, Positive Center 5.5 (D) x 5.5 (W) x 1.25 (H) inches... -
Page 17: Limited Product Warranty
LIMITED PRODUCT WARRANTY Audio Product Telecom Product DVD Player This quality product is warranted to be free from manufacturer’s defects in material and workman-ship, provided that the unit is used under the normal operating conditions intended by the manufacturer. Should you have any problem with this product, please and it is highly recommended to visit our website at www.curtisint.com before you take any other steps as we have additional copies of instruction manuals, operating manuals and trouble shooting tips on our website which gives you the answer on most of the questions you could have in operating the unit.