Table of Contents
Advertisement
Quick Links
C A T E Y E
PADRONE
CYCLOCOMPUTER
CC-PA110W
•
This instruction manual is subject to change
without notice. See our website for the latest
instruction manual (PDF).
•
Please visit our website, where a detailed
Quick Start manual containing videos can be
downloaded.
http://www.cateye.com/products/detail/CC-PA110W/manual/
+
Changing settings
Warning / Caution
Product Warranty, etc.
1
Mounting the
computer
Setting up the
computer
Starting
measurement
1
2
3
4
SET
Advertisement
Table of Contents

Related Manuals for Cateye PADRONE+ CC-PA110W


Summary of Contents for Cateye PADRONE+ CC-PA110W
- Page 1 This instruction manual is subject to change without notice. See our website for the latest instruction manual (PDF). • Please visit our website, where a detailed Quick Start manual containing videos can be downloaded. Warning / Caution http://www.cateye.com/products/detail/CC-PA110W/manual/ Product Warranty, etc.
-
Page 2: Mounting The Computer
Mounting the computer ( 1/3 ) Bracket band Bracket rubber pad Speed sensor Magnet ( 2/3 ) Sensor rubber pad Nylon tie Bracket Dial (x2) Mount the bracket • When mounting on stem Bracket band Bracket rubber pad Stem Bracket •... - Page 3 ( 1/3 ) Mounting the computer ( 2/3 ) Mount the speed sensor ( 3/3 ) Mount the speed sensor in a posi- • Mounting on right front fork tion where the distance from the computer to the speed sensor is within the signal range.
-
Page 4: Test Operation
( 2/3 ) Mounting the computer ( 3/3 ) Adjust the speed sensor and the magnet The magnet passes through The clearance between the the speed sensor zone. speed sensor and the magnet is within 5 mm (3/16”). Magnet Magnet Speed sensor Sensor zone Speed sensor... -
Page 5: Setting Up The Computer
Setting up the computer Battery case Short press cover MODE When using the MENU computer for the Long press first time, configure (2 sec.) MODE the initial settings. MODE Dot section Clear all data. Press the AC button on the back of the computer. ( 1/2 ) * All data is deleted and the computer is reset to its factory default settings. -
Page 6: Tire Circumference
Setting up the computer Tire circumference Tire circumference can be determined by either of the following two methods: • Measure the actual tire circumference (L) After ensuring that the tire pressure is appropriate, sit on your bike, roll it forward so that the tire makes one full revolution (use the valve or other marking as a reference), and measure the dis- ( 1/2 ) L mm... -
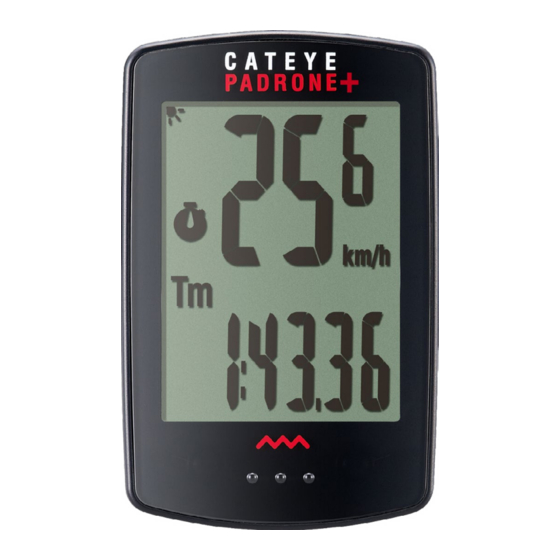
Page 7: Starting Measurement
Starting measurement [Measurement screen] Night Mode icon Turns on when Night Mode MODE operation when mounted on bracket is ON. For details, refer to page 10. Current speed 0.0 (4.0) – 99.9 km/h [0.0 (3.0) – 62.0 mph] Measurement unit Current function MODE When the computer is mounted on the brack-... -
Page 8: Starting/Stopping Measurement
Starting measurement [Measurement screen] Starting/stopping measurement Measurement starts automatically when the bicycle moves. Measurement starts Measurement stops During measurement the measurement unit (km/h or mph) flashes. Resetting data Pressing MODE for 2 seconds when on the measurement screen resets all measurement data to 0 (excluding Odo). MODE (2 seconds) Backlight (Night Mode) -
Page 9: Power Saving Function
Starting measurement [Measurement screen] Power-saving function Power-saving screen If the computer does not receive 10 minutes any signal for 10 minutes, the power-saving screen is activated and only the clock is displayed. If MODE is pressed or a sensor 1 hour signal is received while the pow- er-saving screen is activated, the Sleep... -
Page 10: Changing Settings
Changing settings [Menu screen] On the measurement screen, press MENU to go to the menu screen. Various settings can be changed on the menu screen. * After changing settings, always press MENU to confirm changes. * When the menu screen is left on for 1 minute, the computer returns to the measurement screen. Measurement Description Menu screen... - Page 11 Changing settings [Menu screen] Measurement Menu screen Description screen Night Mode setting MENU MODE Tire circumference Set the tire circumference. (0100 – 3999 mm) Change setting Increase numbers MODE MODE (Press and hold) Move to next digit MODE (Press and hold) Confirm Increase MODE...
-
Page 12: Manual Distance Input
Changing settings [Menu screen] Measurement Menu screen Description screen Night Mode setting MENU MODE Tire circumference MODE Clock MODE Manual distance input Set total distance traveled manually. (0 – 99999 km [mile]) * Fractions cannot be entered. * Setting an arbitrary value for total distance allows you to start from the value you entered. -
Page 13: Select Measurement Unit
Changing settings [Menu screen] Measurement Menu screen Description screen Night Mode setting MENU MODE Tire circumference MODE Clock MODE Manual distance input MODE Select measurement unit Select the measurement unit (km/h or mph) Change setting km/h↔mph MODE (Press and hold) ( 3/4 ) MODE Confirm... -
Page 14: Wireless Sensor
Hereby, CATEYE Co., Ltd. declares that the radio equipment type CC-PA110W is in compliance with Directive 2014/53/EU. The full text of the EU declaration of conformity is available at the following internet address: cateye.com/doc This device complies with Part 15 of the FCC Rules. Operation is subject to the following two conditions:(1) This device may not cause harmful interference, and (2) this device must accept any interference received, including interference that may cause undesired operation. -
Page 15: Maintenance
Appendix Maintenance If the computer or accessories become dirty, clean with a soft cloth which is moistened with mild soap. Replacing the battery • Computer When (battery icon) is turned on, replace the battery. Insert a new lithium battery (CR2032) with the (+) side up. Close * After replacing the battery, always follow the procedure CR2032... -
Page 16: Main Specifications
If the product fails to work due to normal use, CatEye will repair or replace the defect at no charge. Service must be performed by CatEye or an autho- rized retailer.