Barco FL40 Series Quick Start Manual
Hide thumbs
Also See for FL40 Series:
- User manual (126 pages) ,
- Quick start manual (4 pages) ,
- Quick manual (2 pages)
Advertisement
Quick Links
FL40 series
Quick Start Guide
Download Product Manual
Product manuals and documentation are available online at www.barco.com/en/support/fl40-wu
Registration may be required; follow the instructions given on the website.
IMPORTANT!
Read Installation Instructions before connecting equipment to the mains power supply.
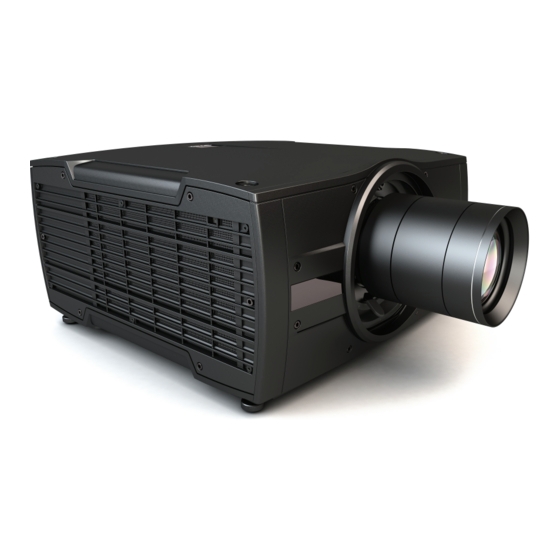
Projector Main Components and interface
Projector Main Components and interface
4
1
1
Adjustable feet
1
4
Projector lens
2
5
3
Lens holder
6
Warning
Risk Group 2 (RG2) LED product according to IEC EN 62471-5.
Do not stare in to beam
Refer to user manual before operating
Do not attempt to disassemble or modify this projector.
3
2
4
8
IR receiver: For receiving remote control signals
Connector panel: Control and communication interface
Keypad. Used for local operation of the projector
7
6
1
LCD panel
7
8
Lens lock handle
5
1
Advertisement

Related Manuals for Barco FL40 Series


Summary of Contents for Barco FL40 Series
- Page 1 FL40 series Quick Start Guide Download Product Manual Product manuals and documentation are available online at www.barco.com/en/support/fl40-wu Registration may be required; follow the instructions given on the website. IMPORTANT! Read Installation Instructions before connecting equipment to the mains power supply.
-
Page 2: Local Keypad
Local keypad Menu Navigation Menu Selection Open Menu Menu Back Power On/O OSD On/O Input Selection Shutter Open/Close Test Patterns Lens Menu LCD Panel Button backlight status BUTTON COLOR STATUS DESCRIPTION Power button Blinking WHITE Projector starts up (Booting) Solid WHITE Projector is in Standby Error condition Blinking RED... -
Page 3: Ventilation Requirements
Ventilation Requirements Ventilation Requirements Caution 250mm Do not place heat sensitive objects in the area of the orange arrow 250mm Power up procedure Power down procedure Press Power Button for 3 sec Pull out Connector Connect power Press Power On Button 110-240V 110-240V 1. - Page 4 RCU buttons Button pressed indicator Shutter Open Shutter Close LCD panel On/O OSD On/O Lens Zoom Lens Shift Menu Open/Close Menu Selection, OK button Menu Navigation Input Selection Address button Numeric buttons Backspace (when entering values) XLR connector Decimal mark (when entering values) Macro button Menu Back Default button...
-
Page 5: Installing Lens
Installing lens Warning Always keep shutter closed when installing or removing the lens. 1. When handling lens in or out, always close shutter, see keypad explanation. Press Shutter keypad, and verify that the shutter keypad turn in to red illumination. This indicate that the shutter is closed. When the lens is installed, open shutter by pressing the shutter key. -
Page 6: Software Upgrade
NOTE ! Once initiated, the upgrade procedure can take up to 20 minutes to complete. 1. Go to www.barco.com and select your product. All available firmware downloads are filed under the Technical Downloads tab 2. Download the firmware. Extract and save the file to a USB Stick with FAT file system. Use the eject function on your PC to safely remove the device from your computer.