Advertisement
Quick Links
Before you begin
• Read all instructions before set up.
• Select a level site clear of rocks, branches, and other hard or
sharp objects, to install your tent.
WARNING: Keep clear of overhead power lines.
• Do not set up your tent under trees because of potential lightning
strikes or falling tree limbs in inclement weather.
• Secure with all pegs and guylines provided to prevent property
damage or personal injury.
• For best results in windy conditions, position narrow end of tent
into the wind.
• Do not drop tent.
• Do not bounce tent bag on its end to remove tent, as these
actions may damage the frame.
• THIS RECREATIONAL PRODUCT REQUIRES A MINIMUM OF TWO
PEOPLE TO ASSEMBLE.
• Under no circumstances should this product be used to cover
automobiles, marine products or similar items.
CAUTION: Avoid pinch points when opening and closing the tent frame.
1
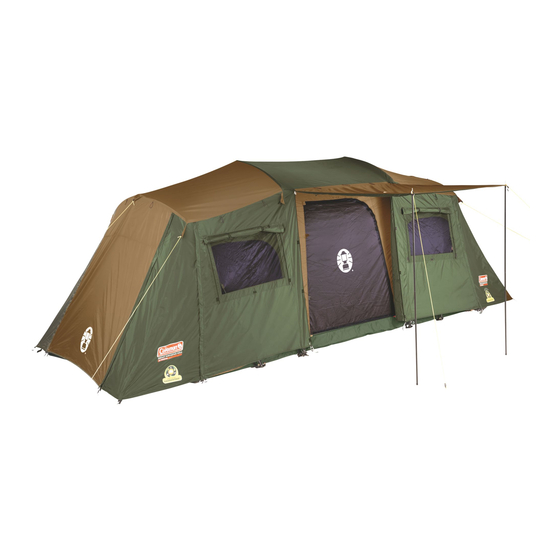
Layout & Positioning of Tent
• Layout and position the tent with door facing desired
direction. (Fig. 1)
• Stake down tent corners first through the webbing loops.
(Fig. 2)
Peg
2
Raise the Tent
• Unfold the roof joint at top of the Side Pole Set. (Fig. 3 and 4).
• Repeat for the remaining Pole Sets. (Side x 2, Middle x 2)
Fig. 4
Side Pole
Set
TENT SETUP INSTRUCTIONS
Fig. 1
Fig. 2
Side Pole
Set
Fig. 3
Middle Pole Set
MODEL 1417721 (2000030954)
• Unfold arm joints located at each of the tent top corners (x8).
(Fig. 5 and 6)
• Extend each of the telescoping leg poles until they lock into
place (locking button engaged). (Fig. 5 and 7)
• The tent will raise as the leg poles are extended.
Fig. 5
Arm
Joint
Fig. 6
3
Verify Connections and Lock
• Verify the clips along the edges of the tent are properly
attached to the frame poles. (Fig. 8 and 9)
• From inside of the tent pull down the all 4 "D" rings
underneath the Roof Joints to ensure the joints are
locked in place. (Fig. 8 and 10)
Pole
Clip
Fig. 9
4
Stake the tent
• Secure tent by driving stakes through the webbing
loops / grommets-on-webbing around the tent base.
(Fig. 11 & 12)
Fig. 11
Locking
Button
Fig. 7
Fig. 10
Fig. 8
Fig. 12
(continued on other side)
Advertisement

Related Manuals for Coleman 1417721


Summary of Contents for Coleman 1417721
- Page 1 TENT SETUP INSTRUCTIONS MODEL 1417721 (2000030954) • Unfold arm joints located at each of the tent top corners (x8). Before you begin (Fig. 5 and 6) • Read all instructions before set up. • Extend each of the telescoping leg poles until they lock into • Select a level site clear of rocks, branches, and other hard or place (locking button engaged). (Fig. 5 and 7) sharp objects, to install your tent. • The tent will raise as the leg poles are extended. WARNING: Keep clear of overhead power lines. • Do not set up your tent under trees because of potential lightning strikes or falling tree limbs in inclement weather. • Secure with all pegs and guylines provided to prevent property damage or personal injury. • For best results in windy conditions, position narrow end of tent into the wind. • Do not drop tent.
- Page 2 Coleman Brands Pty. Ltd. Unit 5-6, 13 Lord Street, AND HEAT SOURCES AWAY FROM Botany NSW 2019 THIS TENT FABRIC. Australia This tent meets the flammability Telephone: 1800 224 350 Email: customerservice@colemanaust.com.au requirements of CPAI-84. The fabric www.colemanaustralia.com.au may burn if left in continuous Fig. 17 contact with any flame source. The application of any foreign © 2017 The Coleman Company, Inc. All rights reserved. substance to the tent fabric Coleman , and ® may render the flame-resistant registered trademarks of properties ineffective. The Coleman Company, Inc. 4010052723 (ECN20060939-02)