
Related Manuals for Motorola FW200L


Summary of Contents for Motorola FW200L
- Page 1 Motorola FW200L Fixed Wireless Telephone Warning: Charge the phone for 16 hours before use.
- Page 2 Alternatively, you may find the answer in the ‘Help’ section at the back of this guide. 3G and 4G SIM cards can be used in the FW200L, but will only be compatible with 2G network capabilities. Number dependent on the capacity of the SIM card. SIM card not included.
- Page 3 This User Guide provides you with all the information you need to get the most from your phone. Before you make your first call you will need to set up your phone. Follow the simple instructions in ‘Getting Started’, on the next few pages.
-
Page 4: Table Of Contents
1. Getting started ................7 2. Getting to know your phone ..........10 3. Using the phone ............... 15 3.1 Inserting the SIM ......................15 3.2 Switch the handset on / off ...................15 3.3 Calls 15 3.3.1 Make a call ......................15 3.3.2 Preparatory dialling ..................15 3.3.3 Make a call using speed dial keys ............15 3.3.4 End a call .......................15 3.3.5 End a single call ..................16 3.3.6 Receive a call ....................16... - Page 5 4.14 Memory status ......................23 4.15 Send text message to a phonebook contact ..........23 4.16 Add to blacklist ......................24 5. Text messaging.................25 5.1 Write a message ......................25 5.2 Send a message ......................25 5.3 Message boxes ......................26 5.4.1 Use a template ....................27 5.4.2 Create a template ..................28 5.4.3 Edit a template ..................28 5.4.4 Delete a template ..................28 5.5 SMS settings .........................29 5.5.1 Profile settings ....................29...
- Page 6 8.1.6 Dedicated keys ...................39 8.1.7 Display contrast ..................39 8.1.8 Backlight timeout ..................40 8.2 Call settings .........................40 8.2.1 Caller ID ......................40 8.2.2 Call waiting ....................40 8.2.3 Call divert ......................41 8.2.4 Call barring ....................42 8.2.5 Blacklist ......................43 8.2.6 Call time reminder .................. 44 8.2.7 Answer mode .................... 45 8.2.8 Delay dial ..................... 45 8.3 Network settings .......................
-
Page 7: Getting Started
1. Getting started Important Do not place your FW200L in the bathroom or other humid areas. Signal strength icon on your display indicates that you have a strong signal. When the signal strength reduces the number of bars reduces. If you are on a call, the line will hang up if the base loses signal. - Page 8 Note Once the SIM card is installed, place the battery in (D) and plug the battery wire into (G) and then replace the battery cover. Connecting the base to a PC / Charging the battery Plug the USB cable into socket (A) on the side of the base. 2.
- Page 9 Date and time You can set the date and time for your FW200L. When setting the date and time check whether the time format setting is 12 or 24 hours. The default is 24 hours. To change the format, see ”Set the time and date format” on page 37.
-
Page 10: Getting To Know Your Phone
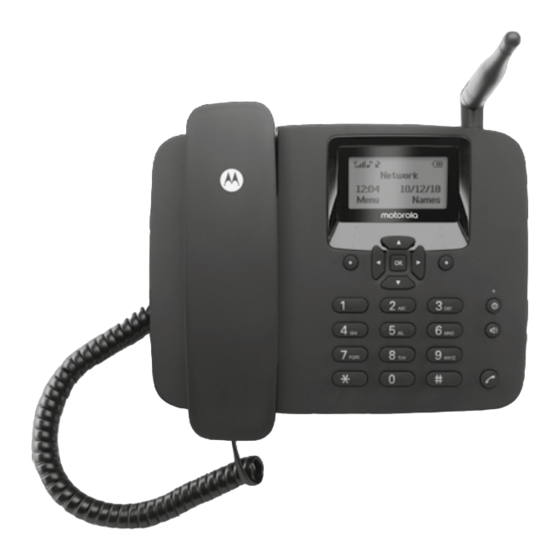
2. Getting to know your phone Overview of your handset A Antenna B Display For display icons, see “Display” on page 12. C Scroll up / FM Radio Scroll up through lists and settings. Press to turn on the FM Radio. Press to move the cursor up. - Page 11 H OK Press this key to select the lower left corner function on the screen. Phonebook / Clear / Back Enter the phonebook menu. Delete characters on screen when entering names and numbers. Go back to the previous menu, Back is displayed on the screen.
- Page 12 Display Signal icon Displays when in hands-free mode Roaming Mute is activated Displays when you have new text messages Indicates the ringer is on Phone is in silent mode (replaces the ringer on icon) USB cable is connected Alarm is set Indicates a missed call Displays when you have new voicemails Keypad is locked...
- Page 13 Battery is empty Charger is connected with no battery installed (replaces the battery icon) Note The icons will always align to the left and as higher priority icons appear the other icons will shift to the right. Some icons replace others along the top of the display depending on which function is activated.
- Page 14 Menu map Call time SMS templates Phonebook reminder SMS settings Add new contact Answer mode When no contact Delay dial is stored Add new Memory status contact is highlighted, Network settings Save sent message press Options Network selection Preferred storage add a contact.
-
Page 15: Using The Phone
3. Using the phone Note Your phone will automatically time the duration of all external calls, the call timer will display on the screen. When the call ends, the total duration of your talk time is shown for 1 second. 3.1 Inserting the SIM Make sure the phone is turned off (see below) and not connected to the power when you insert or remove the SIM card. -
Page 16: End A Single Call
Note If before the line connects, you decide that you want to end the call, replace the handset on the base or press Abort. To end a hands-free call press press Abort. 3.3.5 End a single call During a call press Options and scroll End a single call... -
Page 17: Phonebook
4.2 Storing contacts The FW200L can be set so it stores contacts either to the SIM card or the phone and you can copy or move individual contacts or the whole phonebook from the SIM card to the phone or from the phone to the SIM card. -
Page 18: Move Or Copy Individual Contacts
6. Press to return to standby. Note When moving or copying contacts the FW200L will move / copy all contacts even if that contact is already saved. 4.3 View contacts Press Names. The first contact is highlighted. to the contact you want to view and press Options. -
Page 19: Delete A Contact
4.6 Delete a contact Press Names. The first contact is highlighted. 2. Scroll to the contact you want to delete and press Options. 3. Scroll Delete and press Select. 4. Display shows Delete?. Press to delete or to cancel. 5. Press to return to standby. -
Page 20: Edit A Direct Memory Number
4.10 Edit a direct memory number Press Names. The first contact is highlighted. Press Options. 2. Scroll Phonebook settings and press Select. 3. Scroll Speed dial and press OK. Set numbers and press OK. 4. Scroll 5. Scroll to the contact you want to edit. Press Options. Edit is highlighted, press Select... -
Page 21: Delete Your Mobile Number
4.12.3 Delete your mobile number Press Names. The first contact is highlighted. Press Options. Phonebook settings and press Select. 2. Scroll My number and press OK. 3. Scroll 4. Press Options, scroll Delete and press Select. 5. Display shows Delete?. Press to delete or to cancel. -
Page 22: Turn Fixed Dial On / Off
4.13.3 Turn fixed dial on / off Press Names. The first contact is highlighted. Press Options. Phonebook settings and press Select. 2. Scroll Extra number and press OK. 3. Scroll 4. Scroll Fixed dial and press OK. Mode is highlighted, press OK. and press OK. -
Page 23: Delete A Fixed Dial Number
4.13.6 Delete a fixed dial number Press Names. The first contact is highlighted. Press Options. Phonebook settings and press Select. 2. Scroll Extra number and press OK. 3. Scroll 4. Scroll Fixed dial and press OK. Fixed dial list and press OK. 5. -
Page 24: Add To Blacklist
4.16 Add to blacklist You can add a phonebook contact to the blacklist, so that when the contact calls the phone does not ring. Press Names. The first contact is highlighted. to the contact you want to add and press Options. Scroll 2. -
Page 25: Text Messaging
5. Text messaging Your FW200L can send and receive text messages from participating mobile networks and compatible landline telephones. Note All messaging features can also be accessed while on a call. Press Options Messaging and press Select. If you write a message it will be stored to... -
Page 26: Message Boxes
To enter a number from the phonebook Select Add from Phonebook and press OK. The first Press and scroll contact is displayed. Enter the first letter of the name to search alphabetically then scroll to the exact contact, then press OK. Add from Phonebook Options 2. -
Page 27: Use A Template
Select message has a number in the text press and the Options number will be highlighted. Press and you can then call the number, save it to the phonebook or send a text Use USSD, Select message. Scroll press and the number will be highlighted. -
Page 28: Create A Template
User defined Default is highlighted, press to select, or scroll press OK. 4. The templates are listed, scroll to the template you want to use and press Options. is highlighted, press Select. 6. The template will be added to a new message box. 5.4.2 Create a template Press Menu, scroll Messaging... -
Page 29: Sms Settings
5.5 SMS settings 5.5.1 Profile settings The number of SIM profiles is determined by the SIM. In the FW200L and you can set different SMSC (short message service centre) addresses so that the phone sends messages through a specified SMSC server. Press Menu, scroll Messaging and press OK. -
Page 30: Delivery Report
5.5.4 Delivery report Press Menu, scroll Messaging and press OK. SMS settings and press OK. 2. Scroll is highlighted, press Select. 4. Scroll Delivery report and scroll t or u to the and press Save to confirm. 5. Press to return to standby. 5.5.5 Reply path Press Menu, scroll Messaging... -
Page 31: Save Sent Messages
5. Press to return to standby. 5.7 Save sent messages Press Menu, scroll Messaging and press OK. 2. Scroll SMS settings and press OK. Save Sent message Save 3. Scroll and scroll t or u to the and press to confirm. 4. -
Page 32: Call History
You can view or delete your recent calls and see the duration of those calls in the FW200L call history menu, there are 3 call logs, Missed calls, Dialled calls and Received calls, each log can store up to 20 entries. -
Page 33: Edit A Number Before You Call
6.5 Edit a number before you call Press Menu, scroll Call history and press OK. 2. Press to select Missed calls or scroll Dialled calls Received calls press OK. to the contact you want to edit and press Options. 3. Scroll 4. -
Page 34: Reset The Call Duration
6.9 Reset the call duration Press Menu, scroll Call history and press OK. 2. Scroll Call timer and press OK. 3. Scroll Reset all and press OK. 4. Press to reset or to cancel. 5. Press to return to standby. Call history... -
Page 35: Organizer
7. Organizer 7.1 Calendar The FW200L has a calendar so you can look up dates and jump to a chosen day. Press Menu, scroll Organizer and press OK. Calendar is highlighted, press OK. 3. Scroll to the day you want to view and press the left softkey Jump to date is highlighted, press Select. -
Page 36: Calculator
Snooze Press for the alarm to repeat after 5 minutes. 7.3 Calculator Your FW200L can be used as a calculator, it can perform basic additions, subtractions, multiplication and division. 7.3.1 Enter calculator mode Press Menu, scroll Organizer and press OK. -
Page 37: Settings
Set the date and time You can set the date and time fro the FW200L. When setting the date and time check whether the time format setting is 12 or 24 hours. The default is 24 hours. -
Page 38: Language
Update with time zone You can set the FW200L so that when you receive a call it does not automatically set the time zone for the date and time. Press Menu, scroll Settings and press OK. Phone settings is highlighted. Press OK. -
Page 39: Screen Lock
8.1.5 Screen lock You can set the FW200L screen to lock after a certain amount of time. The time settings include 15 secs / 30 secs / 1 min / 5 mins and Off. Once the screen is locked press Unlock to unlock the screen. -
Page 40: Backlight Timeout
8.1.8 Backlight timeout You can set the FW200L screen backlight to turn off after a certain amount of time. There are 12 levels to choose from. Press Menu, scroll Settings and press OK. Phone settings is highlighted. Press OK. Backlight Time Setting(sec) and press OK. -
Page 41: Call Divert
8.2.3 Call divert You can set the phone to divert all voice calls, divert if the call is unreachable, divert if there is no answer, divert if busy or divert all data calls. When activated you can choose to divert to a certain number or to voicemail. Set call diverts Press Menu, scroll Settings... -
Page 42: Call Barring
Note This feature is network service dependent. 8.2.4 Call barring You can set the FW200L to bar incoming or outgoing calls. Outgoing call barring You can set the phone to bar all voice calls, all international voice calls or all international voice calls except to your home number. -
Page 43: Blacklist
This feature is network service dependent. 8.2.5 Blacklist You can set the FW200L so that when certain phone numbers call the phone does not ring. Contacts can be blocked through the phonebook menu, see “Add to blacklist” on page 24 or though the Blacklist menu. You can store up to 20 numbers in the Blacklist. -
Page 44: Call Time Reminder
8.2.6 Call time reminder You can set the FW200L to give a reminder beep after a set amount of time during a call. This can be set to off, to give a single beep or to beep periodically during calls. -
Page 45: Answer Mode
8.2.8 Delay dial You can set the FW200L so that after dialling a number there is a delay before it automatically dials out. This can be set to between 1 and 9 seconds or off. Press Menu, scroll Settings and press OK. - Page 46 PIN code 3 times continuously, you must input the PUK number to set a new PIN code. If you want to use this function, you must contact your network operator first, as the default PIN and PUK number are provided by your network operator. To turn the SIM lock on / off Press Menu, scroll Settings...
-
Page 47: Restore Settings
5. Type in the phone password and press OK, if the phone lock was on this will turn the lock off and visa versa. 8.5 Restore settings You can reset your FW200L to the default settings. Press Menu, scroll Settings and press OK. -
Page 48: Profile Settings
9. Profile settings You can personalise you phone profile, changing both the tones and their volume. 9.1 Ringer 9.1.1 Ringtone Press Menu, scroll Profiles and press OK. Tone settings is highlighted, press OK. Ring is highlighted, press OK. 4. The current ringtone is highlighted scroll to the ring tone you require, Select you will hear a sample, press... -
Page 49: Message Tone Volume
9.2.2 Message tone volume Press Menu, scroll Profiles and press OK. Message and press OK. 2. Scroll Message volume and press OK. 3. Scroll 4. The current setting is show on the screen, scroll t or u to the volume you require, you will hear a sample, press to confirm. -
Page 50: Power On/Off Tone Volume
5. Press to return to standby. 9.5 Error tone If when using the FW200L there is an error you will hear a tone. This tone can be turned on or off. Press Menu, scroll Profiles and press OK. -
Page 51: Fm Radio
10. FM Radio Your FW200L has a FM radio facility, so you can play your favourite radio stations through the base. 10.1 Turn the FM radio on There are 2 ways to turn on the FM Radio, If you haven’t changed the destination of your navigation keys... -
Page 52: Channel List
10.5 Channel list FM Radio menu (see above) and press Options. Go to the 2. Scroll Channel list and press Select. 3. The saved channels are listed (only the first 3 are visible), scroll to the required channel and press Select. 4. -
Page 53: Help
11. Help No display when the phone is turned on • Check the USB cable is connected correctly • Check the battery is charged • Try turning the phone on and off again Calls will not connect • Check the network signal •... -
Page 54: General Information
12. General information Important This product is intended for connection GSM networks in Europe. Important safety instructions Follow these safety precautions when using your phone to reduce the risk of fire, electric shock, and injury to persons or property: • Keep all slits and openings of the phone unblocked. Do not set the phone on a heating register or over a radiator. - Page 55 Installation Guidelines • Read and understand all instructions and save them for future reference. • Follow all warnings and instructions marked on the product. • Do not install this product near a bath tub, sink, or shower. • Operate this phone using only the power source that is indicated on the marking label.
- Page 56 Meizhou, Guangdong, P.R.China. (“MZGW”) What Does this Warranty Cover? Subject to the exclusions contained below, MZGW warrants that this Motorola branded product (“Product”) or certified accessory (“Accessory”) sold for use with this product that it manufactured to be free from defects in materials and workmanship under normal consumer usage for the period outlined below.
- Page 57 (c) use of the Products or Accessories for commercial purposes or subjecting the Product or Accessory to abnormal usage or conditions; or (d) other acts which are not the fault of Motorola or MZGW are excluded from coverage.
- Page 58 Unauthorized Service or Modification. Defects or damages resulting from service, testing, adjustment, installation, maintenance, alteration, or modification in any way by someone other than Motorola, MZGW or its authorized service centers, are excluded from coverage. Altered Products. Products or Accessories with (a) serial numbers or date tags that have been removed, altered or obliterated;...
- Page 59 The SAR limit adopted by the USA is 1.6 W/kg averaged over one gram of tissue. The highest SAR value reported to the FCC for this device type complies with this limit. The highest SAR value reported to the FCC for this device type when using in portable exposure conditions is 0.33 W/kg.
- Page 60 <This page has been intentionally left blank>...
- Page 61 <This page has been intentionally left blank>...
- Page 62 <This page has been intentionally left blank>...
- Page 63 We, Meizhou Guowei Electronics Co., Ltd. declare under our sole responsibility that the following products: Brand name: Motorola Type: FW200L Descriptions: Fixed Wireless Telephone to which this declaration related is in conformity with the essential requirements of the following directives of the Council of the European Communities:...
- Page 64 28108 ALCOBENDAS MADRID SPAIN Manufactured, distributed or sold by MZGW Technologies Ltd., official licensee for this product. MOTOROLA and the Stylized M Logo are trademarks or registered trademarks of Motorola Trademark Holdings, LLC. and are used under license. All other trademarks are the property of their respective owners.