
Related Manuals for HoMedics EnviraScape SilverSprings

Summary of Contents for HoMedics EnviraScape SilverSprings
- Page 1 WFL-SLVSA-2EU_IB.qxd:Layout 1 9/11/10 15:06 Page 1 S I L V E R S P R I N G S Instruction Manual WFL-SLVS-3GB WFL-SLVS-2EU...
-
Page 2: Important Safeguards
• NEVER operate the appliance if it has a damaged cord or plug, if it is not working properly, if it has been dropped or damaged, or dropped into water. Return it to the HoMedics Service Centre for examination and repair. - Page 3 • Operate pump completely submerged for proper cooling. • The electrical cord of this product cannot be replaced. If it sustains damage, you must stop using this product immediately and return it to the HoMedics Customer Service Center for repair. (See the guarantee section for HoMedics address.) •...
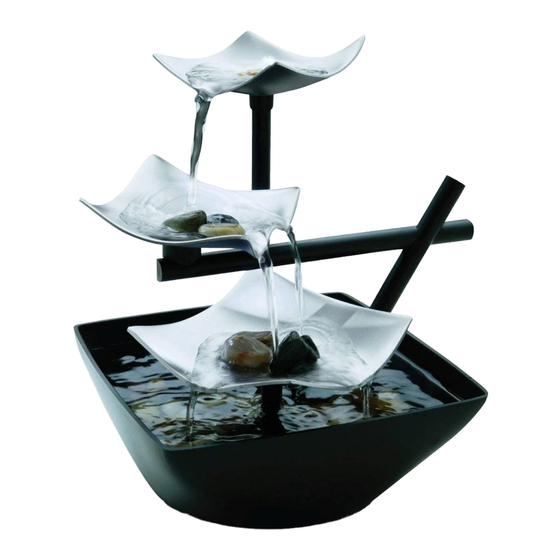
- Page 4 WFL-SLVSA-2EU_IB.qxd:Layout 1 9/11/10 15:06 Page 4 Package Contents Part Description Quantity Leaf One Leaf Two/Post Leaf Three/Post ‘V’ Post Pump Cover Water Pump Power Cord ON/OFF Switch Adapter River Rocks 1 set Fountain Base ASSEMBLY AND INSTRUCTIONS FOR USE : Unpack the product.
- Page 5 WFL-SLVSA-2EU_IB.qxd:Layout 1 9/11/10 15:06 Page 5 5. Fill FOUNTAIN BASE (K) with enough clean water to completely cover the WATER PUMP (F). Use the Fill Line as a guide. (Figure 5) 6. Place RIVER ROCKS (J) as desired on (A), (B) and (C), as well as in the FOUNTAIN BASE. (Figure 6) 7.
-
Page 6: Troubleshooting
If splash continues, adjust the flow control valve to a lower setting, and/or rearrange the river rocks by moving them away from the edge of the base. CAUTION: All servicing of this fountain must be performed by authorized HoMedics service personnel only. ATTENTION: In order to get best results, please operate pump completely submerged. -
Page 7: Maintenance
WFL-SLVSA-2EU_IB.qxd:Layout 1 9/11/10 15:06 Page 7 MAINTENANCE : To clean the pump: Figure 9 Unplug from electrical PVC Tubing outlet. Remove it from the Inserts Here Back Plate base of the fountain. Use a small brush or stream of water to remove any debris (Fig 9). -
Page 8: Précautions Importantes
• Ne JAMAIS mettre en marche l’appareil en cas de cordon ou de connecteur endommagé, en cas de fonctionnement incorrect, en cas de chute ou de détérioration ou de chute dans l’eau. Le retourner au Centre Service HoMedics en vue de contrôle et de réparation. • Maintenir le cordon à l’écart des surfaces chauffées. - Page 9 Centre de Service HoMedics pour réparation. (l’adresse de HoMedics est indiquée sur la fiche de garantie.) • Débrancher l’appareil de la prise avant de mettre les mains dans l’eau.
- Page 10 WFL-SLVSA-2EU_IB.qxd:Layout 1 9/11/10 15:06 Page 10 Contenu de l’emballage Pièce Description Quantité Feuille Un Feuille Deux/Pilier Feuille Trois/Pilier Pilier en ‘V’ Couvercle Pompe Pompe à eau Cordon d’alimentation Interrupteur ON/OFF Adaptateur Galets 1 set Base de la fontaine MONTAGE ET CONSIGNES D’UTILISATION : Déballez le produit.
- Page 11 WFL-SLVSA-2EU_IB.qxd:Layout 1 9/11/10 15:06 Page 11 5. Remplir la BASE DE LA FONTAINE (K) avec suffisamment d’eau claire pour recouvrir complètement la POMPE À EAU (F). Se baser sur l’Indicateur de remplissage. (Figure 5) 6. Disposer les GALETS (J) à votre convenance sur (A), (B) et (C), ainsi que sur la BASE DE LA FONTAINE.
-
Page 12: Dépannage
éloignant du rebord de la base. ATTENTION : Tout dépannage de cette fontaine doit être réalisé uniquement pas un personnel de service HoMedics agréé. ATTENTION: Pour obtenir les meilleurs résultats, prière de faire fonctionner la pompe complètement immergée. -
Page 13: Entretien
WFL-SLVSA-2EU_IB.qxd:Layout 1 9/11/10 15:06 Page 13 Entretien : Nettoyer la Figure 9 Inserts de tube Plaque pompe : PVC ici PVC Tubing arrière Débranchez de la prise Inserts Here électrique. Retirez-la de la Back Plate base de la fontaine. Utilisez une petite brosse ou passez sous l’eau du robinet pour enlever tous Rotor... -
Page 14: Wichtige Sicherheitsvorkehrungen
• Benutzen Sie das Gerät NIEMALS, wenn das Kabel oder der Stecker beschädigt sind, wenn es nicht ordnungsgemäß funktioniert, wenn es fallen gelassen oder beschädigt wurde oder ins Wasser gefallen ist. Schicken Sie es zur Prüfung und Reparatur ins HoMedics Service Centre zurück. - Page 15 • Die Pumpe muss zwecks einwandfreier Kühlung vollständig eingetaucht sein. • Das Stromkabel dieses Geräts kann nicht ausgewechselt werden. Im Schadensfall muss das Gerät unmittelbar außer Betrieb genommen und zwecks Reparatur an das HoMedics Service Centre eingesandt werden. (Die Adresse von HoMedics finden Sie im Garantieheft.) •...
- Page 16 WFL-SLVSA-2EU_IB.qxd:Layout 1 9/11/10 15:06 Page 16 Packungsinhalt Teil Beschreibung Menge Blatt 1 Blatt 2 / Stange Blatt 3 / Stange ‘V’-Stange Pumpenabdeckung Wasserpumpe Netzkabel EIN/AUS-Schalter (ON/OFF) Adapter Flusssteine 1 set Brunnenboden MONTAGE UND GEBRAUCHSANLEITUNG : Das Produkt auspacken. Sicherstellen, dass alle aufgelisteten Teile vorhanden sind. 1.
- Page 17 WFL-SLVSA-2EU_IB.qxd:Layout 1 9/11/10 15:06 Page 17 5. Den BRUNNENBODEN (K) mit ausreichend sauberem Wasser füllen. Die WASSERPUMPE (F) muss vollständig bedeckt sein. Die Fülllinie als Richtschnur verwenden. (Abbildung 5) 6. Die FLUSSSTEINE (J) je nach Wunsch auf (A), (B) und (C) und im BRUNNENBODEN verteilen.
-
Page 18: Störungssuche
Steine neu und von der Kante des Unterteils entfernt anordnen. VORSICHT: Jegliche Wartungsarbeiten am Zimmerbrunnen dürfen nur von Servicepersonal durchgeführt werden, das von HoMedics autorisiert ist. ACHTUNG: Für bestes Betriebsergebnis die Pumpe immer vollständig eingetaucht halten. Der Wasserstand muss IMMER oberhalb der Mindestmarke liegen. -
Page 19: Wartung
WFL-SLVSA-2EU_IB.qxd:Layout 1 9/11/10 15:06 Page 19 Wartung : Reinigen der Figure 9 PVC- Pumpe: Schlaucheinsätze hier Rückwand PVC Tubing Das Gerät vom Inserts Here Stromnetz trennen. Die Back Plate Pumpe aus dem Unterteil des Zimmerbrunnens nehmen. Jegliche Verunreinigungen mit Laufrad Gehäuse einer kleinen Bürste oder unter fließendem Wasser... -
Page 20: Precauciones Importantes
• NO trate de reparar el aparato. No contiene piezas que las pueda reparar el usuario. Para servicio, envíelo al Centro de Servicio de HoMedics. Todas las revisiones y arreglos de este aparato los debe realizar solamente el personal autorizado de HoMedics. - Page 21 • El cable de alimentación de este producto no puede cambiarse. Si se daña, debe dejar de usar este aparato inmediatamente y devolverlo al Centro de Servicio de HoMedics para que se repare. (Para obtener la dirección de HoMedics, consulte el folleto de garantía.) •...
- Page 22 WFL-SLVSA-2EU_IB.qxd:Layout 1 9/11/10 15:06 Page 22 Contenido del Paquete Pieza Descripción Cantidad Hoja Uno Hoja Dos/Poste Hoja res/Poste Poste ‘V’ Cubierta de la bomba Bomba de Agua Cable de la Bomba Interruptor ENCENDIDO/APA GADO Adaptador Rocas de Río 1 set Base de la Fuente COMTAJE E INSTRUCCIONES DE USO: Desempaquete el artículo.
- Page 23 WFL-SLVSA-2EU_IB.qxd:Layout 1 9/11/10 15:06 Page 23 5. Llene la BASE DE LA FUENTE (K) con suficiente agua limpia para cubrir completamente la BOMBA DE AGUA (F). Use la Línea de Llenado como guía. (Figura 5) 6. Coloque las ROCAS DE RIO (J) como desee en (A), (B) y (C), además de en la BASE DE LA FUENTE.
-
Page 24: Resolución De Problemas
PRECAUCIÓN: Todas las revisiones y arreglos de esta fuente los debe realizar solamente el personal autorizado de HoMedics. ATENCIÓN: Para obtener resultados óptimos, haga funcionar la bomba completamente sumergida. -
Page 25: Mantenimiento
WFL-SLVSA-2EU_IB.qxd:Layout 1 9/11/10 15:07 Page 25 MANTENIMIENTO : Para limpiar la Figure 9 Introducir aquí Placa bomba: los tubos de PVC PVC Tubing Posterior Desenchúfela del Inserts Here Back Plate tomacorriente. Retírela de la base de la fuente. Utilice un pequeño cepillo o chorro de agua para eliminar cualquier residuo Impulsor... - Page 26 • NON tentare di riparare il prodotto. Il prodotto non contiene parti soggette a manutenzione da parte dell’utente. Se il prodotto richiede manutenzione, rispedirlo al Centro Assistenza HoMedics. Qualunque intervento di manutenzione del prodotto deve essere affidato esclusivamente al personale autorizzato HoMedics.
-
Page 27: Precauzioni Di Sicurezza
• Il cavo elettrico di questo prodotto non può essere sostituito. Se il cavo subisce danni, interrompere immediatamente l’uso del prodotto e rispedirlo al Centro Assistenza HoMedics per la riparazione. (Per l’indirizzo di HoMedics sonsultare il foglietto della garanzia). • Scollegare l’apparecchio dalla presa prima di immergere le mani nell’acqua. - Page 28 WFL-SLVSA-2EU_IB.qxd:Layout 1 9/11/10 15:07 Page 28 Contenuto della confezione Componente Descrizione Quantità Ripiano a forma di foglia 1 Ripiano a forma di foglia 2/Supporto Ripiano a forma di foglia 3/Supporto ‘V’ Supporto a ‘V’Post Coperchio pompa Pompa dell’acqua Cavo di alimentazione Interruttore acceso/spento (ON/OFF)
- Page 29 WFL-SLVSA-2EU_IB.qxd:Layout 1 9/11/10 15:07 Page 29 5. Riempire la BASE DELLA FONTANA (K) con una quantità sufficiente di acqua a coprire interamente la POMPA DELL’ACQUA (F). Prendere la linea di livello di riempimento come riferimento. (Figura 5) 6. Collocare a piacere le PIETRE (J) su (A), (B) e (C), e anche all’interno della BASE DELLA FONTANA.
- Page 30 PRECAUZIONE: qualunque intervento di manutenzione di questa fontana deve essere affidato esclusivamente al personale autorizzato HoMedics. ATTENZIONE: per ottenere i migliori risultati, azionare la pompa quando è completamente immersa nell’acqua. Mantenere SEMPRE il livello dell’acqua sopra il livello minimo.
-
Page 31: Manutenzione
WFL-SLVSA-2EU_IB.qxd:Layout 1 9/11/10 15:07 Page 31 MANUTENZIONE: Per pulire la pompa: Figura 9 Il tubo in PVC va Pannello Scollegare la pompa dalla inserito qui PVC Tubing posteriore presa elettrica. Rimuoverla Inserts Here Back Plate dalla base della fontana. Utilizzare una piccola spazzola o acqua corrente per rimuovere qualsiasi residuo (Figura 9). -
Page 32: Belangrijke Voorzorgsmaatregelen
• Het apparaat NOOIT gebruiken als het snoer of de stekker is beschadigd, als het niet goed werkt, is gevallen of beschadigd, of in water is gevallen. Retourneer het naar het onderhoudscentrum van HoMedics, waar het zal worden onderzocht en gerepareerd. • Het snoer uit de buurt van verwarmde oppervlakken houden. - Page 33 • Het stroomsnoer van dit product kan niet vervangen worden. Als het snoer beschadigd is, dient u het gebruik van dit product onmiddellijk te staken en het terugsturen naar het onderhoudscentrum van HoMedics voor reparatie. (Het adres van HoMedics staat op de garantiefolder vermeld.) •...
- Page 34 WFL-SLVSA-2EU_IB.qxd:Layout 1 9/11/10 15:07 Page 34 Inhoud verpakking Onderdeel Beschrijving Aantal Blad 1 Blad 2/pilaar Blad 3/pilaar ‘V’-pilaar Pompdeksel Waterpomp Stroomsnoer AAN/UIT-knop Adapter Rivierstenen 1 set Fonteinbodem MONTAGE- EN GEBRUIKSINSTRUCTIES : Pak het product uit. Controleer of alle onderdelen op de lijst aanwezig zijn. 1.
- Page 35 WFL-SLVSA-2EU_IB.qxd:Layout 1 9/11/10 15:07 Page 35 5. Vul de FONTEINBODEM (K) met voldoende water om de WATERPOMP (F) volledig onder te dompelen. Gebruik de vulstreep als richtlijn. (Figuur 5) 6. Schik de RIVIERSTENEN (J) naar wens op (A), (B) en (C) alsook in de FONTEINBODEM. (Figuur 6) 7.
-
Page 36: Problemen Oplossen
PAS OP!: Onderhoud aan de fontein mag uitsluitend worden uitgevoerd door bevoegde medewerkers van HoMedics. ATTENTIE: Voor de beste resultaten dient de pomp volledig ondergedompeld te worden tijdens gebruik. - Page 37 WFL-SLVSA-2EU_IB.qxd:Layout 1 9/11/10 15:07 Page 37 ONDERHOUD : De pomp reinigen: Figure 9 PVC-buis wordt hier Achterplaat De stekker uit het ingestoken PVC Tubing stopcontact halen. De Inserts Here Back Plate pomp van de bodem van de fontein af nemen. Een kleine borstel of waterstraal gebruiken om vuil te verwijderen (Fig.9).
- Page 38 έλλειψη εμπειρίας και γνώσεων, εκτός και αν τους παρασχεθεί επίβλεψη ή οδηγίες σχετικά με τη χρήση της συσκευής από ένα άτομο υπεύθυνο για την ασφάλειά τους. Τα παιδιά πρέπει να επιτηρούνται ώστε να μην παίζουν με τη συσκευή. HoMedics. • HoMedics V AC.
- Page 39 WFL-SLVSA-2EU_IB.qxd:Layout 1 9/11/10 15:07 Page 39...
- Page 40 WFL-SLVSA-2EU_IB.qxd:Layout 1 9/11/10 15:07 Page 40 1 set...
- Page 41 WFL-SLVSA-2EU_IB.qxd:Layout 1 9/11/10 15:07 Page 41...
- Page 42 WFL-SLVSA-2EU_IB.qxd:Layout 1 9/11/10 15:07 Page 42...
- Page 43 WFL-SLVSA-2EU_IB.qxd:Layout 1 9/11/10 15:07 Page 43 PVC Tubing Inserts Here Back Plate Impeller Housing Pump Inlet Front Plate Suction Feet Flow Control Lever...
- Page 44 WFL-SLVSA-2EU_IB.qxd:Layout 1 9/11/10 15:07 Page 44 HoMedics...
- Page 45 WFL-SLVSA-2EU_IB.qxd:Layout 1 9/11/10 15:07 Page 45...
- Page 46 WFL-SLVSA-2EU_IB.qxd:Layout 1 9/11/10 15:07 Page 46 1 set...
- Page 47 WFL-SLVSA-2EU_IB.qxd:Layout 1 9/11/10 15:07 Page 47 Stones...
- Page 48 WFL-SLVSA-2EU_IB.qxd:Layout 1 9/11/10 15:07 Page 48...
- Page 49 WFL-SLVSA-2EU_IB.qxd:Layout 1 9/11/10 15:07 Page 49 PVC Tubing Inserts Here Back Plate Impeller Housing Pump Inlet Front Plate Suction Feet Flow Control Lever...
-
Page 50: Zalecenia Dotyczące Bezpieczeństwa
WFL-SLVSA-2EU_IB.qxd:Layout 1 9/11/10 15:07 Page 50 ZALECENIA DOTYCZĄCE BEZPIECZEŃSTWA PODCZAS KORZYSTANIA Z URZĄDZEŃ ELEKTRYCZNYCH, SZCZEGÓLNIE W OBECNOŚCI DZIECI, NALEŻY ZAWSZE PRZESTRZEGAĆ PODSTAWOWYCH PRZEPISÓW BEZPIECZEŃSTWA - W TYM NASTĘPUJĄCYCH:... - Page 51 WFL-SLVSA-2EU_IB.qxd:Layout 1 9/11/10 15:07 Page 51...
- Page 52 WFL-SLVSA-2EU_IB.qxd:Layout 1 9/11/10 15:07 Page 52 1 set...
- Page 53 WFL-SLVSA-2EU_IB.qxd:Layout 1 9/11/10 15:07 Page 53 Kamienie Linia napełniania...
- Page 54 WFL-SLVSA-2EU_IB.qxd:Layout 1 9/11/10 15:07 Page 54 Figure 8 Minimalny poziom wody Zawór kontrolujący przepływ (+) szybszy przepływ wody (-) wolniejszy przepływ wody...
- Page 55 WFL-SLVSA-2EU_IB.qxd:Layout 1 9/11/10 15:07 Page 55 Rysune 9 Miejsce przyłączenia Płytka rurek PCW PVC Tubing tylna Inserts Here Back Plate Wirnik Obudowa Wlot pompy Impeller Housing Pump Inlet Płytka przednia Front Plate Nogi z przyssawkami Suction Feet Dźwignia kontrolująca Flow przepływ Control Lever...
- Page 56 WFL-SLVSA-2EU_IB.qxd:Layout 1 9/11/10 15:07 Page 56 IB-WFLSLVSEU-1...