JVC UX-H35 Series Instructions Manual
Micro component system
Hide thumbs
Also See for UX-H35 Series:
- Service manual (55 pages) ,
- Přiručka k obsluze (35 pages) ,
- Instructions manual (32 pages)
Table of Contents
Advertisement
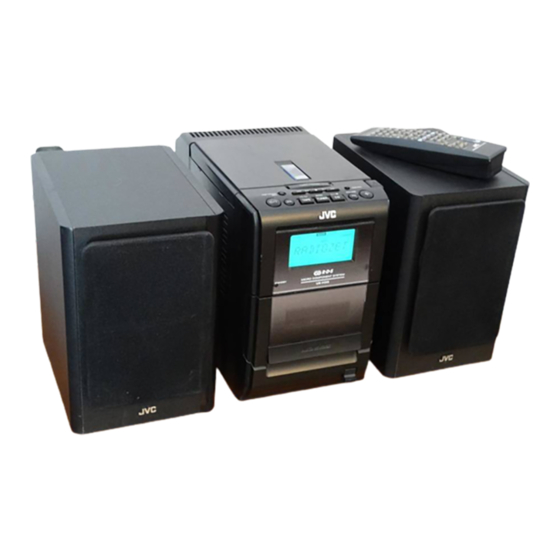
MICRO COMPONENT SYSTEM
UX-H35
UX-H33
UX-H30
— Consists of CA-UXH35 and SP-UXH35
—
CA-UXH35
— Consists of CA-UXH33 and SP-UXH33
—
CA-UXH33
— Consists of CA-UXH30 and SP-UXH30
—
CA-UXH30
MICRO COMPONENT SYSTEM
INSTRUCTIONS
SP-UXH35
SP-UXH33
SP-UXH30
For Customer Use:
Enter below the Model No. and Serial No.
which are located either on the rear, bot-
tom or side of the cabinet. Retain this
information for future reference.
Model No.
Serial No.
GVT0101-003A
[U, UJ]
Advertisement
Chapters
Table of Contents
Troubleshooting

Related Manuals for JVC UX-H35 Series


Summary of Contents for JVC UX-H35 Series
- Page 1 MICRO COMPONENT SYSTEM UX-H35 — Consists of CA-UXH35 and SP-UXH35 — CA-UXH35 SP-UXH35 UX-H33 — Consists of CA-UXH33 and SP-UXH33 — CA-UXH33 SP-UXH33 UX-H30 — Consists of CA-UXH30 and SP-UXH30 — CA-UXH30 SP-UXH30 MICRO COMPONENT SYSTEM INSTRUCTIONS For Customer Use: Enter below the Model No.
- Page 2 Warnings, Cautions and Others CAUTION— (standby/on) button! Disconnect the mains plug to shut the power off completely (all lamps and indications go off). The (standby/on) button in any position does not disconnect the mains line. • When the unit is on standby, the STANDBY lamp lights red. •...
- Page 3 IMPORTANT FOR LASER PRODUCTS REPRODUCTION OF LABELS 1 CLASSIFICATION LABEL ON EXTERIOR SURFACE 2 WARNING LABEL INSIDE THE UNIT ADVARSEL: Usynlig laser- VARO: Avattaessa ja suo- CAUTION: Invisible laser VARNING: Osynlig laser- stråling ved åbning, når jalukitus ohitettaessa olet radiation when open and strålning när denna del är sikkerhedsafbrydere er ude alttiina...
- Page 4 Introduction We would like to thank you for purchasing one of our JVC products. Before operating this unit, read this manual carefully and thoroughly to obtain the best possible performance from your unit, and retain this manual for future reference.
-
Page 5: Table Of Contents
Contents Location of the Buttons ..........3 Main Unit ................3 Remote Control ..............5 Getting Started ............. 6 Supplied Accessories ............6 Connecting Antennas ............6 Connecting Speakers ............7 Connecting Other Equipment ..........8 Adjusting the Voltage Selector .......... 8 Putting the Batteries into the Remote Control .... -
Page 6: Location Of The Buttons
Location of the Buttons Become familiar with the buttons on your unit. Main Unit Top view P H O N E S COMPACT DIGITAL AUDIO TIMER/SNOOZE OPEN MULTI CONTROL ONE TOUCH AHB PRO ¢ VOLUME BAND TAPE TUNER Front view STANDBY MICRO COMPONENT SYSTEM... - Page 7 Continued Display window BASS SLEEP SNOOZE REC ON STEREO CLOCK MONO 1 2 3 4 5 6 7 8 9 10 11 12 13 14 15 PROGRAM RANDOM OVER See the pages in parentheses for details. Main unit Display window 1 PHONES jack (11) 1 Tape operation indicators •...
- Page 8 Remote Control See the pages in parentheses for details. 1 Number buttons 2 BASS button (11) 3 Multi control buttons UP, 4 (reverse skip), 7 (stop), ¢ STANDBY/ON • (forward skip), and DOWN 4 SET button (13) 5 Source buttons DISPLAY •...
-
Page 9: Remote Control
Getting Started Continued Supplied Accessories To connect an outdoor FM antenna Before connecting the antenna, disconnect the supplied FM antenna. Make sure that you have all the following items. The number in parentheses indicates the quantity of each piece supplied. Outdoor FM antenna •... -
Page 10: Connecting Speakers
AM antenna Connecting Speakers Vinyl-covered wire (not supplied) Speaker cord Speaker cord AM loop antenna (supplied) Right speaker Left speaker Connect the AM loop antenna to the Press and hold the clamp of the AM LOOP terminals as illustrated. speaker terminal on the rear of the unit. -
Page 11: Connecting Other Equipment
Continued To remove the speaker grilles Adjusting the Voltage Selector The speaker grilles are removable. Before plugging in the unit, set the correct voltage for your area with the voltage selector on the rear of the Projections unit. V O L T A G E Holes S E L E C T O R 2 3 0 V... -
Page 12: Putting The Batteries Into The Remote Control
12V 4A Car adapter DC IN (JVC model: CA-R120E) R6(SUM-3)/AA(15F) Connect a car adapter to the DC IN (12 V, 4 A) connector and the cigarette lighter socket. • DO NOT connect the car adapter to the cigarette lighter socket before connecting it to the DC IN connector. -
Page 13: Common Operations
Common Operations Continued Setting the Clock To check the clock time during play On the remote control ONLY: Before operating the unit any further, first set the unit’s Press DISPLAY (grey-colored). DISPLAY clock. When you plug in the power cord, the CLOCK •... -
Page 14: Turning On The Power
Turning On the Power Adjusting the Tone (Bass/Treble) To turn on the unit, press You can adjust the bass level (low frequency range) STANDBY/ON STANDBY/ON on the unit). and the treble level (high frequency range) within a The STANDBY lamp on the unit goes off. range of –5 to +5. -
Page 15: Listening To Fm And Am Broadcasts
Listening to FM and AM Broadcasts Continued Tuning in to a Station Presetting Stations You can preset 30 FM and 15 AM stations—using Press TUNER (or BAND either automatic presetting or manual presetting. TUNER In some cases, test frequencies have been already TUNER on the unit) to select memorized for the tuner since the factory examined the the band. -
Page 16: Tuning In To A Preset Station
To preset stations manually—Manual presetting To tune in to a preset station directly using the number buttons You need to preset stations separately for the FM and AM bands. On the remote control ONLY: • There is a time limit in doing the following steps. If Pressing the number button(s) the setting is canceled before you finish, start over allows you to select the preset... -
Page 17: Playing Back Discs
Playing Back Discs Continued This unit has been designed to play back the following Close the disc cover gently. discs—CD, CD-R, and CD-RW. Press 3/8 CD. When playing a CD-R or CD-RW The unit automatically turns on and the User-edited CD-Rs (CD-Recordable) and CD-RWs first track of the disc starts playing. -
Page 18: Basic Disc Operations
Basic Disc Operations Programming the Playing Order of the Tracks—Program Play While playing a disc, you can do the following operations. You can arrange the order in which tracks play before you start playing. You can program up to 20 tracks. To stop playing for a moment During play, press 3/8 CD. -
Page 19: Playing At Random-Random Play
To skip the current track, press ¢. To check the program contents • You cannot go back to the previous You can check the program track by pressing 4. contents by pressing ¢ or 4 before or after playback. To stop playing, press 7. •... -
Page 20: Playing Back Tapes
Playing Back Tapes You can play back type I tapes. If no cassette is inserted when you press 2 3 TAPE “NO TAPE” appears on the display. Playing Back a Tape To stop playing, press 7. Press ) for cassette deck on the unit. The cassette holder opens. -
Page 21: Recording
Recording Continued IMPORTANT: Close the cassette holder gently and • It may be unlawful to record or play back check the recording direction for the copyrighted material without the consent of the tape. copyright owner. • If the tape direction is not correct, press 2 3 •... -
Page 22: Disc Direct Recording
Disc Direct Recording To record on both sides—Reverse Mode On the remote control ONLY: Everything on the disc goes onto the tape in the order it Press REV.MODE (reverse mode) REV.MODE is on the disc, or according to the order you have set in repeatedly until is lit. -
Page 23: Using The Timers
Using the Timers Continued There are four timers available—Daily Timer, Set the on-time when you want the unit Recording Timer, Snooze Timer, and Sleep Timer. to turn on. Before using the timers, you need to set the unit’s On the remote control: clock (see page 10). - Page 24 Select the timer (Daily Adjust the clock if you need. Timer or Recording Timer) • See “Setting the Clock” on page 10. DOWN with the source to play. Press STANDBY/ON STANDBY/ON On the remote control: on the unit) to turn Press UP or DOWN to...
-
Page 25: Using Snooze Timer
Using Snooze Timer Using Sleep Timer The Snooze Timer turns off the unit (standby) only for With the Sleep Timer, you can fall asleep to music. You 5 minutes while the Daily Timer is in operation. can set the Sleep Timer when the unit is turned on. •... -
Page 26: Maintenance
Maintenance To get the best performance from the unit, keep your discs, tapes, and mechanism clean. Cleaning the unit Handling cassette tapes • If the tape is loose in its cassette, • Stains on the unit take up the slack by inserting a Should be wiped off with a soft cloth. -
Page 27: Troubleshooting
Troubleshooting If you are having a problem with your unit, check this list for a possible solution before calling for service. If you cannot solve the problem from the hints given here, or the unit has been physically damaged, call a qualified person, such as your dealer, for service. - Page 28 Mains (AC) Line Instruction (not applicable for Europe, U.S.A., Canada, Australia, and U.K.) IMPORTANT for mains (AC) line BEFORE PLUGGING IN, do check that your mains (AC) line voltage corresponds with the position of the V O L T A G E voltage selector switch provided on the outside of this S E L E C T O R equipment and, if different, reset the voltage selector...
- Page 29 MICRO COMPONENT SYSTEM SISTEMAS DE MICROCOMPONENTES SISTEMA DE MICRO COMPONENTES UX-H35 — Consists of CA-UXH35 and SP-UXH35 UX-H33 — Consists of CA-UXH33 and SP-UXH33 UX-H30 — Consists of CA-UXH30 and SP-UXH30 MICRO COMPONENT SYSTEM INSTRUCTIONS For Customer Use: MANUAL DE INSTRUCCIONES Enter below the Model No.
- Page 30 Warnings, Cautions and Others Avisos, precauciones y otras notas Advertências, precauções e outras notas CAUTION— (standby/on) button! Disconnect the mains plug to shut the power off completely (all lamps and indications go off). The (standby/on) button in any position does not disconnect the mains line. •...
- Page 31 CAUTION To reduce the risk of electrical shocks, fire, etc.: CAUTION 1. Do not remove screws, covers or cabinet. • Do not block the ventilation openings or holes. 2. Do not expose this appliance to rain or moisture. (If the ventilation openings or holes are blocked by a newspaper or cloth, etc., the heat may not be able to get out.) PRECAUCIÓN...
- Page 32 CAUTION: Proper Ventilation To avoid risk of electric shock and fire, and to prevent damage, locate the apparatus as follows: Front: No obstructions and open spacing. Sides/ Top/ Back: No obstructions should be placed in the areas shown by the dimensions below. Bottom: Place on a level surface.
- Page 33 IMPORTANT FOR LASER PRODUCTS / IMPORTANTE PARA PRODUCTOS LÁSER / IMPOTANTE PARA PRODUTOS LASER REPRODUCTION OF LABELS / REPRODUCCIÓN DE ETIQUETAS / REPRODUÇÃO DE ETIQUETAS 1 CLASSIFICATION LABEL ON EXTERIOR SURFACE 2 WARNING LABEL INSIDE THE UNIT 1 ETIQUETA DE CLASIFICACION SOBRE LA 2 ETIQUETA DE ADVERTENCIA DEL INTERIOR DE LA SUPERFICIE EXTERIOR UNIDAD...
- Page 34 Introduction We would like to thank you for purchasing one of our JVC products. Before operating this unit, read this manual carefully and thoroughly to obtain the best possible performance from your unit, and retain this manual for future reference.
- Page 35 Contents Location of the Buttons ..........3 Main Unit ................3 Remote Control ..............5 Getting Started ............. 6 Supplied Accessories ............6 Connecting Antennas ............6 Connecting Speakers ............7 Connecting Other Equipment ..........8 Adjusting the Voltage Selector .......... 8 Putting the Batteries into the Remote Control ....
-
Page 36: Location Of The Buttons
Location of the Buttons Become familiar with the buttons on your unit. Main Unit Top view P H O N E S COMPACT DIGITAL AUDIO TIMER/SNOOZE OPEN MULTI CONTROL ONE TOUCH AHB PRO ¢ VOLUME BAND TAPE TUNER Front view STANDBY MICRO COMPONENT SYSTEM... - Page 37 Continued Display window BASS SLEEP SNOOZE REC ON STEREO CLOCK MONO 1 2 3 4 5 6 7 8 9 10 11 12 13 14 15 PROGRAM RANDOM OVER See the pages in parentheses for details. Main unit Display window 1 PHONES jack (11) 1 Tape operation indicators •...
- Page 38 Remote Control See the pages in parentheses for details. 1 Number buttons 2 BASS button (11) 3 Multi control buttons UP, 4 (reverse skip), 7 (stop), ¢ STANDBY/ON • (forward skip), and DOWN 4 SET button (13) 5 Source buttons DISPLAY •...
-
Page 39: Remote Control
Getting Started Continued Supplied Accessories To connect an outdoor FM antenna Before connecting the antenna, disconnect the supplied FM antenna. Make sure that you have all the following items. The number in parentheses indicates the quantity of each piece supplied. Outdoor FM antenna •... -
Page 40: Connecting Speakers
AM antenna Connecting Speakers Vinyl-covered wire (not supplied) Speaker cord Speaker cord AM loop antenna (supplied) Right speaker Left speaker Connect the AM loop antenna to the Press and hold the clamp of the AM LOOP terminals as illustrated. speaker terminal on the rear of the unit. -
Page 41: Connecting Other Equipment
Continued To remove the speaker grilles Adjusting the Voltage Selector The speaker grilles are removable. Before plugging in the unit, set the correct voltage for your area with the voltage selector on the rear of the Projections unit. V O L T A G E Holes S E L E C T O R 2 3 0 V... -
Page 42: Putting The Batteries Into The Remote Control
12V 4A Car adapter DC IN (JVC model: CA-R120E) R6(SUM-3)/AA(15F) Connect a car adapter to the DC IN (12 V, 4 A) connector and the cigarette lighter socket. • DO NOT connect the car adapter to the cigarette lighter socket before connecting it to the DC IN connector. -
Page 43: Common Operations
Common Operations Continued Setting the Clock To check the clock time during play On the remote control ONLY: Before operating the unit any further, first set the unit’s Press DISPLAY (grey-colored). DISPLAY clock. When you plug in the power cord, the CLOCK •... -
Page 44: Turning On The Power
Turning On the Power Adjusting the Tone (Bass/Treble) To turn on the unit, press You can adjust the bass level (low frequency range) STANDBY/ON STANDBY/ON on the unit). and the treble level (high frequency range) within a The STANDBY lamp on the unit goes off. range of –5 to +5. -
Page 45: Listening To Fm And Am Broadcasts
Listening to FM and AM Broadcasts Continued Tuning in to a Station Presetting Stations You can preset 30 FM and 15 AM stations—using Press TUNER (or BAND either automatic presetting or manual presetting. TUNER In some cases, test frequencies have been already TUNER on the unit) to select memorized for the tuner since the factory examined the the band. -
Page 46: Tuning In To A Preset Station
To preset stations manually—Manual presetting To tune in to a preset station directly using the number buttons You need to preset stations separately for the FM and AM bands. On the remote control ONLY: • There is a time limit in doing the following steps. If Pressing the number button(s) the setting is canceled before you finish, start over allows you to select the preset... -
Page 47: Playing Back Discs
Playing Back Discs Continued This unit has been designed to play back the following Close the disc cover gently. discs—CD, CD-R, and CD-RW. Press 3/8 CD. When playing a CD-R or CD-RW The unit automatically turns on and the User-edited CD-Rs (CD-Recordable) and CD-RWs first track of the disc starts playing. -
Page 48: Basic Disc Operations
Basic Disc Operations Programming the Playing Order of the Tracks—Program Play While playing a disc, you can do the following operations. You can arrange the order in which tracks play before you start playing. You can program up to 20 tracks. To stop playing for a moment During play, press 3/8 CD. -
Page 49: Playing At Random-Random Play
To skip the current track, press ¢. To check the program contents • You cannot go back to the previous You can check the program track by pressing 4. contents by pressing ¢ or 4 before or after playback. To stop playing, press 7. •... -
Page 50: Playing Back Tapes
Playing Back Tapes You can play back type I tapes. If no cassette is inserted when you press 2 3 TAPE “NO TAPE” appears on the display. Playing Back a Tape To stop playing, press 7. Press ) for cassette deck on the unit. The cassette holder opens. -
Page 51: Recording
Recording Continued IMPORTANT: Close the cassette holder gently and • It may be unlawful to record or play back check the recording direction for the copyrighted material without the consent of the tape. copyright owner. • If the tape direction is not correct, press 2 3 •... -
Page 52: Disc Direct Recording
Disc Direct Recording To record on both sides—Reverse Mode On the remote control ONLY: Everything on the disc goes onto the tape in the order it Press REV.MODE (reverse mode) REV.MODE is on the disc, or according to the order you have set in repeatedly until is lit. -
Page 53: Using The Timers
Using the Timers Continued There are four timers available—Daily Timer, Set the on-time when you want the unit Recording Timer, Snooze Timer, and Sleep Timer. to turn on. Before using the timers, you need to set the unit’s On the remote control: clock (see page 10). - Page 54 Select the timer (Daily Adjust the clock if you need. Timer or Recording Timer) • See “Setting the Clock” on page 10. DOWN with the source to play. Press STANDBY/ON STANDBY/ON On the remote control: on the unit) to turn Press UP or DOWN to...
-
Page 55: Using Snooze Timer
Using Snooze Timer Using Sleep Timer The Snooze Timer turns off the unit (standby) only for With the Sleep Timer, you can fall asleep to music. You 5 minutes while the Daily Timer is in operation. can set the Sleep Timer when the unit is turned on. •... -
Page 56: Maintenance
Maintenance To get the best performance from the unit, keep your discs, tapes, and mechanism clean. Cleaning the unit Handling cassette tapes • If the tape is loose in its cassette, • Stains on the unit take up the slack by inserting a Should be wiped off with a soft cloth. -
Page 57: Troubleshooting
Troubleshooting If you are having a problem with your unit, check this list for a possible solution before calling for service. If you cannot solve the problem from the hints given here, or the unit has been physically damaged, call a qualified person, such as your dealer, for service. - Page 58 MEMO...
- Page 59 MEMO...
- Page 60 Mains (AC) Line Instruction (not applicable for Europe, U.S.A., Canada, Australia, and U.K.) Instrucción sobre la línea de la red (CA) (no aplicable para Europa, EE.UU., Canadá, Australia, ni el Grã-Bretanha) Instrução sobre a tensão da rede eléctrica (CA) (não aplicável para a Europa, os E.U.A., o Canadá, a Austrália e o Reino Unido) IMPORTANT for mains (AC) line BEFORE PLUGGING IN, do check that your mains (AC) line...