Table of Contents
Advertisement
Quick Links
OUTDOOR FIREPIT TABLE
ITEM: 96057
OWNER'S MANUAL AND SAFETY INSTRUCTIONS
SAVE THIS MANUAL: KEEP THIS MANUAL FOR SAFETY WARNINGS, PRECAUTIONS, ASSEMBLY,
OPERATING, INSPECTION, MAINTENANCE AND CLEANING PROCEDURES. WRITE THE PRODUCT'S
SERIAL NUMBER ON THE BACK OF THE MANUAL NEAR THE ASSEMBLY DIAGRAM (OR MONTH
AND YEAR OF PURCHASE IF PRODUCT HAS NO NUMBER)
FOR QUESTIONS PLEASE CALL OUR CUSTOMER SUPPORT: (909) 628 0880 MON-FRI 9AM TO 3PM PST
Advertisement
Table of Contents

Related Manuals for Barton 96057


Summary of Contents for Barton 96057
- Page 1 OUTDOOR FIREPIT TABLE ITEM: 96057 OWNER’S MANUAL AND SAFETY INSTRUCTIONS SAVE THIS MANUAL: KEEP THIS MANUAL FOR SAFETY WARNINGS, PRECAUTIONS, ASSEMBLY, OPERATING, INSPECTION, MAINTENANCE AND CLEANING PROCEDURES. WRITE THE PRODUCT’S SERIAL NUMBER ON THE BACK OF THE MANUAL NEAR THE ASSEMBLY DIAGRAM (OR MONTH...
-
Page 2: Important Safety Information
IMPORTANT SAFETY INFORMATION GENERAL SAFETY WARNINGS Read all safety warnings and instructions. Failure to follow the warnings and instructions may result in fire and/or serious injury. Save all warnings and instructions for future reference. SAFETY WARNING DO NOT use this product or any available optional equipment without first completely reading and understanding these instructions and any additional instructional material such as owner’s manuals, service manuals or instruction sheets supplied with this product or optional equipment. - Page 3 IMPORTANT SAFETY INFORMATION FOR OUTDOOR USE ONLY. Never use inside house, or other unventilated or enclosed areas. This fire pit consumes air (oxygen). Do not use in unventilated or enclosed areas to avoid endangering your life. DO NOT store or use gasoline or other flammable vapors and liquids in the vicinity of this or any other appliance.
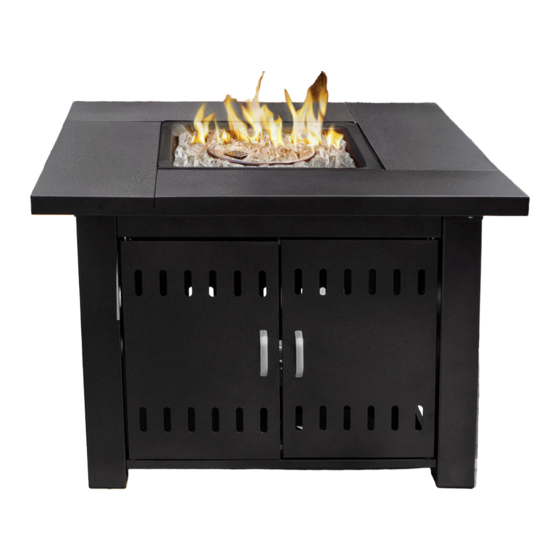
- Page 4 FEATURES This hammered fire pit is ideal for heating and keeping warm in yard, deck, and patio. It has solid steel construction with bronze finish for incredibly durable and rustic decorated look that suits outdoor living as well as serves as an outdoor wine table. It features battery- operated pulse ignition that gives way to a propane heater for emitting up to 42000 BTUs of heat.
-
Page 5: Parts List
PARTS LIST... -
Page 6: Hardware Needed
ASSEMBLY 1. Attach the door knob (P) to one door (LEFT) with two washers (AA) and two M4x8 screws (BB). Repeat to complete the assembly of the other door (RIGHT) HARDWARE NEEDED: 2. Attach angle iron (D) to the 1/4 table (C) with M6x10 bolt (EE). -
Page 7: Door Installation
ASSEMBLY 4. Attach the propane tank strap (HH) to the bottom plate (K). HARDWARE NEEDED: 5. Attach the propane tank strap (HH) to the bottom plate (K). HARDWARE NEEDED: DOOR INSTALLATION: 6. Attach the two doors and put the Door Bracket E) above the two doors, fasten the door bracket with four M6x10 bolts (EE). -
Page 8: Base Assembly
ASSEMBLY DO NOT put the door bracket too close to the doors to ensure the two doors can open easily. 7. Side panel (J) installation. Attach the three side panels to the bracket posts with twelve M6x10 bolts (EE). HARDWARE NEEDED: 8. - Page 9 ASSEMBLY 9. Line up the holes in the assembled table with corresponding holes in base assembly, insert eight M6x10 bolts (EE) through the holes, tighten them. HARDWARE NEEDED: After assembly, the fire pit table should look like this.
-
Page 10: Burner Installation
ASSEMBLY BURNER INSTALLATION: 10. Line up the holes in the burner assembly (B) with the corresponding holes in the table assembly, insert four M4x20 screws (FF) through holes, fasten them. HARDWARE NEEDED: CAUTION: The battery side should face the door side. After assembly, the fire pit table should look like this. - Page 11 ASSEMBLY 10. Connect the hose and regulator to cylinder. The propane gas and STANDARD 20LB TANK cylinder and sold separately. Use a standard 20lb propane cylinder only. Use this appliance only with a propane vapor withdrawal supply system. Storage of an appliance indoors is permissible only if the cylinder is disconnected and removed from the appliance.
-
Page 12: Operation
OPERATION BEFORE TURNING GAS SUPPLY ON: 1. Be sure there is no obstruction to air ventilation. Be sure all gas connections are tight and there are no leaks. 2. Be sure the cylinder cover is clear of debris. Be sure any component removed during assembly or servicing is replaced and fastened prior to starting. -
Page 13: Troubleshooting
TROUBLESHOOTING WHEN THE FIRE PIT IS ON: The burner will display tongues of blue and yellow flame. These flames should not be yellow or produce thick black smoke, indicating an obstruction of airflow through the burners, The flame should be blue with straight yellow tops. -
Page 14: Please Read The Following Carefully
PLEASE READ THE FOLLOWING CAREFULLY THE MANUFACTURER AND/OR DISTRIBUTOR HAS PROVIDED THE PARTS LIST AND ASSEMBLY DIAGRAM IN THIS MANUAL AS A REFERENCE TOOL ONLY. NEITHER THE MANUFACTURER OR DISTRIBUTOR MAKES ANY REPRESENTATION OR WARRANTY OF ANY KIND TO THE BUYER THAT HE OR SHE IS QUALIFIED TO MAKE ANY REPAIRS TO THE PRODUCT, OR THAT HE OR SHE IS QUALIFIED TO REPLACE ANY PARTS OF THE PRODUCT.