Advertisement
Quick Links
High Intensity Solar Light
Thank you for purchasing an EasyPro Solar Light. Following are a few simple instructions to
help you during the installation process.
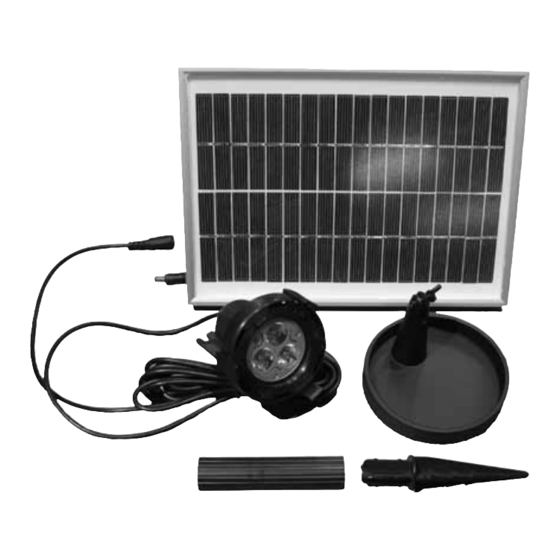
Parts Included:
1 Solar panel
1 Spot light
1 Stand
1 Stake
1 Tube
Warnings & Cautions:
Do not use in heavily chlorinated water such as swimming pools, it
will shorten the life span of the light and void the warranty. To reduce
risk of fire or injury, keep lamp away from materials that may burn.
Preparation:
Before beginning assembly of product make sure all parts are present. Compare parts with package contents list and diagram
above. If any part is missing or damaged, do not attempt to assemble, install or operate the light.
Contact customer service for replacement parts.
• Estimated assembly time - five minutes
• Tools required for assembly - phillips head screw driver (not included)
Charging Battery:
The charge and battery life ratings are under direct sunlight. Overcast and inclement weather will
decrease performance. To maximize charge time and performance position the solar panel in direct
sunlight for as much time possible. It is recommended to charge the batteries for one full day in clear
and sunny weather before initial use.
• Battery charge time - four hours
• Battery life time - eight hours
Assembly Instructions:
1. Open the package and carefully remove the light and solar panel.
First insert the stake into the ground and then attach the tube and so-
lar panel. Do not use a hammer or other object to force stake into
the ground and never push the stake into the ground by using the
solar panel (figure 1).
2. Untie the cords and place the light in or out of the water, then con-
nect the light plug to the connection from the back of the solar panel
(figure 2).
3. Turn switch on back of panel to the "on" position. This will activate
the LED light by the photo eye in the panel (figure 3).
4. Position the solar panel so that it is in direct sunlight as much as pos-
sible.
SOL1 - Solar Light
Instructions
• Battery size - 12 volt 2000mAH Pack
• Battery type - Ni-MH
Figure 2
Figure 1
Figure 3
Advertisement

Related Manuals for EasyPro SOL1

Summary of Contents for EasyPro SOL1
- Page 1 SOL1 - Solar Light High Intensity Solar Light Instructions Thank you for purchasing an EasyPro Solar Light. Following are a few simple instructions to help you during the installation process. Parts Included: 1 Solar panel 1 Spot light 1 Stand...
- Page 2 Warranty does not cover any cost associated with the installation or removal of the product subject to warranty claim. An RA number must be obtained by calling EasyPro Pond Products at 800-448-3873. It is your responsibility to pay the return shipping charges.