Table of Contents
Advertisement
Quick Links
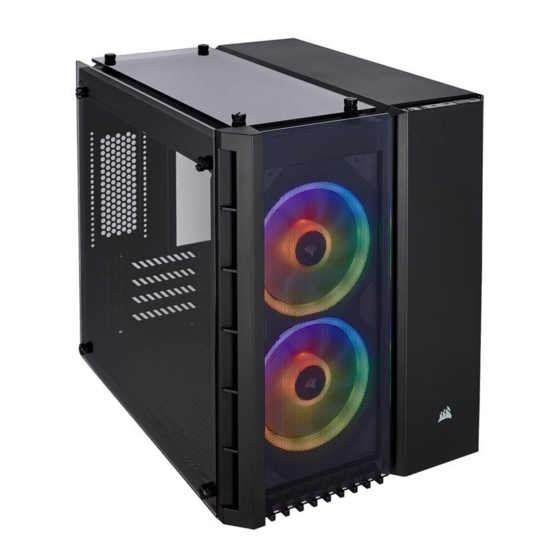
CRYSTAL SERIES
®
280X
CRYSTAL SERIES
®
corsair.com
280X
EMAIL: support@corsair.com
FORUM: forum.corsair.com
FACEBOOK: facebook.com/corsair
TWITTER: twitter.com/corsair
BLOG: corsair.com/blog
USA and CANADA: (510) 657-8747 | INTERNATIONAL: (888) 222-4346
| FAX: (510) 657-8748
MICRO ATX CASE
© 2018-2019 CORSAIR MEMORY, Inc. All rights reserved.
CORSAIR and the sails logo are registered trademarks of CORSAIR in the United States
and/or other countries. All other trademarks are the property of their respective owners.
Product may vary slightly from those pictured. 49-001671 AD
47100 Bayside Parkway • Fremont • California • 94538 • USA
INSTALLATION GUIDE
Advertisement
Table of Contents

Related Manuals for Corsair CRYSTAL Series 280X


Summary of Contents for Corsair CRYSTAL Series 280X
- Page 1 MICRO ATX CASE © 2018-2019 CORSAIR MEMORY, Inc. All rights reserved. CORSAIR and the sails logo are registered trademarks of CORSAIR in the United States and/or other countries. All other trademarks are the property of their respective owners. Product may vary slightly from those pictured. 49-001671 AD 47100 Bayside Parkway •...
-
Page 2: Table Of Contents
CRYSTAL SERIES ® 280X Table of Contents Table of Contents Table des matières Inhaltsverzeichnis Tavola dei contenuti Table des matières Inhaltsverzeichnis Tavola dei contenuti Contenido Contenido Содержание Índice Содержание Índice Case Specifications ................................3-4 Installing PCI-e Card(s) ................................ 14 Spécifications du boîtier • Technische Daten des Gehäuses • Specifiche del prodotto Installation des cartes PCI-e •... -
Page 3: Case Specifications
CRYSTAL SERIES ® 280X Case Specifications Case Specifications Spécifications du boîtier Technische Daten des Gehäuses Specifiche del prodotto Spécifications du boîtier Technische Daten des Gehäuses Specifiche del prodotto Especificaciones del chasis Especificaciones del chasis Технические характеристики корпуса Технические характеристики корпуса Especificações do Gabinete Especificações do Gabinete Length .................. -
Page 4: Accessory Kit Contents
CRYSTAL SERIES ® 280X Accessory Kit Contents Accessory Kit Contents Contenu du kit d’accessoires Inhalt des Zubehörkits Contenuto kit accessori Contenu du kit d’accessoires Inhalt des Zubehörkits Contenuto kit accessori Contenido del kit de accesorios Contenido del kit de accesorios Содержимое... - Page 5 CRYSTAL SERIES ® 280X Case Features Caractéristiques du boîtier Funktionsmerkmale des Gehäuses Proprietà del prodotto Características del chasis Recursos do gabinete Особенности корпуса Tempered Glass Side Panel Dust Filters Panneau latéral en verre trempé Filtre anti-poussière Seitenabdeckung aus Gehärtetem Glas Staubfilter Pannello laterale in vetro temperato Filtri antipolvere...
-
Page 6: Removing The Side Panels
CRYSTAL SERIES ® 280X Removing the Side Panels Installing the Motherboard Retrait des panneaux latéraux Abnehmen der Seitenplatten Installation de la carte mère Installation des Motherboards Rimozione del pannello laterale Retirada de los paneles laterales Installazione scheda madre Instalación de la placa base Remover os painéis laterais Instalar a placa-mãe Снятие... -
Page 7: Installing Hdds
CRYSTAL SERIES ® 280X Installing HDDs Installing SSDs Installation des disques durs Installation von HDD-Laufwerken Installation des SSD Installation von SSD-Laufwerken Installazione hard disk Instalación de las unidades HDD Installazione SSD Instalación de las unidades SSD Instalar HDDs Instalar SSDs Установка... -
Page 8: Installing Psu
CRYSTAL SERIES ® 280X Installing PSU Installing PCI-e Cards Installation du bloc d’alimentation Installation des Netzteils (PSU) Installation des cartes PCI-e Installieren von PCI-e-Karten Installazione alimentatore Instalación de la PSU Installazione periferiche PCI-e Instalación de las tarjetas PCI-e Instalar a PSU Установка... -
Page 9: Removing The Front Bezel
CRYSTAL SERIES ® 280X Removing the Front Bezel Removing Top Panel Retrait du panneau avant Abnehmen der vorderen Blende Retrait du panneau supérieur Entfernen der oberen Abdeckung Rimozione del pannello frontale Retirada del embellecedor frontal Rimozione del pannello superiore Retirada del panel superior Remover o bisel dianteiro Removendo painéis superiores Снятие... -
Page 10: Installing The Front I/O Connectors
CRYSTAL SERIES ® 280X Installing the Front I/O Connectors Installation des connecteurs E/S avant Installation der vorderen I/O-Anschlüsse Using Lighting Node PRO (CRYSTAL 280X RGB only) Installazione connettori I/O frontali Instalación de los conectores de E/S frontales Instalar os conectores de E/S dianteiros Установка... - Page 11 CRYSTAL SERIES ® 280X Table of Contents Utilisation de Lighting Node PRO (CRYSTAL 280X RGB uniquement) Mit Lighting Node PRO (nur CRYSTAL 280X RGB) • Éteignez votre système avant d’installer le Lighting Node PRO. • Schalten Sie Ihren Computer aus, bevor Sie den Lighting Node PRO installieren. •...
-
Page 12: Utilizzo Di Lighting Node Pro (Solo Crystal 280X Rgb)
CRYSTAL SERIES ® 280X Utilizzo di Lighting Node PRO (solo CRYSTAL 280X RGB) Usando Lighting Node PRO (solo en CRYSTAL 280X RGB) • Assicurarsi che il sistema sia spento prima di procedere con l’installazione • Apague el sistema antes de instalar el Lighting Node PRO. del Lighting node PRO. -
Page 13: Использование Lighting Node Pro (Только Для Crystal 280X Rgb)
CRYSTAL SERIES ® 280X Table of Contents Использование Lighting Node PRO (только для CRYSTAL 280X RGB) Uso do Lighting Node PRO (CRYSTAL 280X RGB apenas) • Перед установкой Lighting Node PRO отключите ПК. • Desligue o sistema antes de instalar o Lighting Node PRO. •... -
Page 14: Frequently Asked Questions
Non, uniquement pour les cavaliers à LED. 2. Who should I contact if I received my case damaged? Please go to support.corsair.com and request an RMA so that we can replace the 2. À qui dois-je m’adresser si mon boîtier est endommagé? damaged part(s). - Page 15 2. An wen kann ich mich wenden, wenn ich ein beschädigtes Gehäuse? non è più funzionante? Gehen Sie zu support.corsair.com und fordern Sie eine RMA an, damit wir die Per favore utilizza il modulo RMA on line support.corsair.com così che possiamo beschädigten Teile ersetzen können.
- Page 16 2. ¿Con quién debo ponerme en contacto si recibo mi chasis dañado? 2. К кому следует обратиться, если корпус получен поврежденным? Vaya a support.corsair.com y solicite un RMA para que podamos reemplazar las Перейдите на веб-сайт support.corsair.com и запросите разрешение на возврат...
- Page 17 2011/65/EU. Puede obtener una copia de Para saber mais sobre este gabinete, visite a página do produto em corsair.com. > Consult the dealer or an experienced radio/TV technician la declaración de conformidad original en “regulatory@...
- Page 18 ANVISNINGER TIL BESKYTTELSE AF MILJØET sähkö- ja elektroniikkalaitteet niiden käyttöiän päätyttyä niille varattuihin julkisiin keräyspisteisiin tai palauttaa ne Efter implementeringen af det europæiske direktiv myyntipaikkaan. Tähän liittyvistä yksityiskohdista säädetään 2012/19/EU i det nationale lovgivningssystem kulloisenkin osavaltion laissa. Näistä määräyksistä mainitaan gælder følgende: NOTE ON ENVIRONMENTAL PROTECTION basura doméstica.