Advertisement
Quick Links
ATTACH YOUR RECEIPT HERE
Serial Number
Questions, problems, missing parts? Before returning to your retailer, call our customer
service department at 1-877-447-4768, 8:00 a.m. – 4:30 p.m. CST, Monday – Friday, or
email customerservice@ghpgroupinc.com
70-10-021
Purchase Date
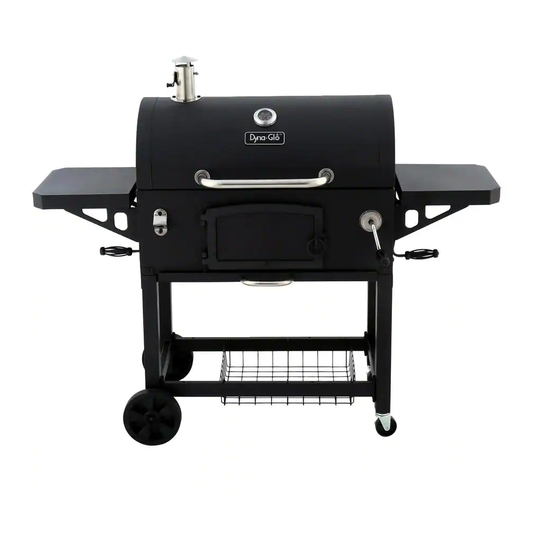
CHARCOAL GRILL
1
HEAVY-DUTY
MODEL #DGN576DNC/
DGN576DNC-D
Français p. 19
Español p. 37
Rev. 7/12/19
Advertisement

Related Manuals for Dyna-Glo DGN576DNC


Summary of Contents for Dyna-Glo DGN576DNC
- Page 1 HEAVY-DUTY CHARCOAL GRILL MODEL #DGN576DNC/ DGN576DNC-D Français p. 19 Español p. 37 ATTACH YOUR RECEIPT HERE Serial Number Purchase Date Questions, problems, missing parts? Before returning to your retailer, call our customer service department at 1-877-447-4768, 8:00 a.m. – 4:30 p.m. CST, Monday – Friday, or email customerservice@ghpgroupinc.com...
- Page 2 TABLE OF CONTENTS Package Contents ....................... 3 Hardware Contents......................4 Preparation .......................... 4 Safety Information ....................... 5 Assembly Instructions......................6 Operating Instructions ....................... 14 Care and Maintenance ...................... 16 Warranty ..........................16 Replacement Parts List ..................... 17 SAFETY INFORMATION Please read and understand this entire manual before attempting to assemble, operate or install the product.
- Page 3 SAFETY INFORMATION • Use caution when lifting and moving the unit to avoid back strain or back injury. Do not move the unit while it is in use. • DO NOT operate the unit near or under flammable or combustible materials such as decks, porches or carports.
- Page 4 PACKAGE CONTENTS PART DESCRIPTION QUANTITY PART DESCRIPTION QUANTITY Side Shelf Right Leg Assembly Lid and Firebox Assembly Caster Lid Handle Assembly Storage Basket Smoke Stack Assembly Axle Charcoal Access Door Wheel Crank Handle Left Leg Assembly Damper Handle – Right Charcoal Tray Damper Grate...
- Page 5 HARDWARE CONTENTS (shown actual size) PREPARATION Before beginning assembly of product, make sure all parts are present. Compare parts with package contents list and hardware contents list. If any part is missing or damaged, do not attempt to assemble the product. Estimated Assembly Time: 50 minutes with two people Tools Required for Assembly (not included): Phillips screwdriver, adjustable wrench.
- Page 6 ASSEMBLY INSTRUCTIONS 1. Insert axle (P) into left leg assembly (R). Attach one wheel (Q) to each side of axle (P) using one wheel axle sleeve (GG), one M8 washer (DD), and one M8 nut (EE). Hardware Used Wheel axle sleeve M8 Washer M8 Nut...
- Page 7 ASSEMBLY INSTRUCTIONS 4. Attach two cart braces (L) to right leg assembly (M) using two M6x12 bolts (AA) on each side. Hardware Used M6x12 Bolt 5. Attach storage basket (O) to cart braces (L). NOTE: Make sure four hooks on storage basket (O) are fully inserted into holes on cart braces (L).
- Page 8 ASSEMBLY INSTRUCTIONS 7. Secure lid and firebox assembly (B) on top of left leg assembly (R) and right leg assembly (M) using six M6x20bolts (BB). Hardware Used M6x20 Bolt 8. Attach damper (H) to inside of lid and firebox assembly (B) using four M5 shoulder bolts (CC) and four M5 lock nuts (II).
- Page 9 ASSEMBLY INSTRUCTIONS 10. With shelf upside down, attach side shelf support – left rear/right front (W) and side shelf support – left front/right rear (I) to side shelf (A) using four M6x12 bolts (AA) on each side. Repeat for remaining shelf (A). Hardware Used M6x12 Bolt 11.
- Page 10 ASSEMBLY INSTRUCTIONS 13. Attach ash tray handle (K) to ash tray (J) using two M6x12 bolts (AA). Hardware Used M6x12 Bolt 14. Insert ash tray (J) into lid and firebox assembly (B). 15. Attach smoke stack assembly (D) to lid and firebox assembly (B) using three M6x12 bolts (AA).
- Page 11 ASSEMBLY INSTRUCTIONS 16. Attach temperature gauge (X) to lid and firebox assembly (B) using pre-assembled nut . 17. Attach lid handle assembly (C) to lid and firebox assembly (B) using two M6x12 bolts (AA). Hardware Used M6x12 Bolt 18. Thread crank handle (F) into lid and firebox assembly (B).
- Page 12 ASSEMBLY INSTRUCTIONS 19. Attach charcoal tray (S) to inside of lid and firebox assembly (B) using four M6x12 bolts (AA). Hardware Used M6x12 Bolt 20. Place one grate (T) onto the far left side of grate frame inside the lid and firebox assembly (B).
- Page 13 ASSEMBLY INSTRUCTIONS 22. Attach one M6x30 bolt (JJ) on each side of lid and firebox assembly (B). DO NOT fully tighten. Hardware Used M6x30 Bolt 23. Insert one end of warming rack (U) onto M6x30 bolt (JJ) and into the hole on lid and firebox assembly (B).
- Page 14 REPLACEMENT PARTS LIST For replacement parts, call our customer service department at 1-877-447-4768, 8:00 a.m. – 4:30 p.m. CST, Monday – Friday. PART DESCRIPTION PART # Hardware pack 404-03026-00 Owner’s/instruction manual 70-10-021 Smoke stack-stainless steel 404-01002-05 Lid outer 404-03003-04 DynaGlo badge 213-02002 Temperature gauge –...
- Page 15 REPLACEMENT PARTS LIST Printed in China...