Table of Contents
Advertisement
Quick Links
Advertisement
Table of Contents

Related Manuals for Hobie iTrek


Summary of Contents for Hobie iTrek
- Page 1 Hobie Mirage ® ® iTrek Kayak Manual...
- Page 3 In 1950, Hobie’s dream was born in his parents’ garage when he decided to apply his love of woodworking to the sport of surfing. Dad backed out the Buick... Hobie carved out his very first surfboard... Hobie’s business of fun had begun.
-
Page 4: Table Of Contents
On the Water ......................14 Storage and Transportation ..................18 Maintenance and Care ...................23 Kick-Up Adjustment ....................25 Safety ..........................26 Warranty ........................28 Accessories .........................29 Look for this icon. Online video is available at www.hobie.com/support/products Please read through the instruction manual before using this product... -
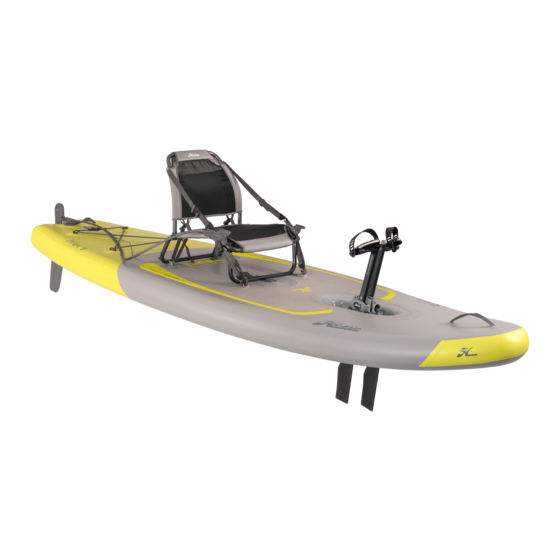
Page 5: Anatomy
Anatomy Hull MirageDrive Seat Steering Paddle Cassette Plug Repair Kit Air Pump iTrek 11 shown here, Electric Pump model may vary Cup Holder 7/32 Hex Wrench 7/32 hobie.com... -
Page 6: Assembly
Assembly MirageDrive Cranks Depending on the Mirage kayak model, cranks may or may not require assembly. Insert the Left and Right crank into drums while depressing button at top. 7/32 7/32 Tighten crank bolt all the way (snug not tight) using the included 7/32”... - Page 7 Assembly iTrek 11 shown here, model may vary MirageDrive Paddle Holder Seat Steering Handle Paddle Holder Cable Keeper Rudder Up/Down Rudder hobie.com...
-
Page 8: Inflating And Deflating
Inflating & Deflating Inflating the Kayak Locate the air valve(s) on your kayak near the stern. Unscrew the cover of the valve and make sure the pin is “up”. If it does not spring up it is in the “down” position. - Page 9 Connect nozzle to the valve on kayak to deflate. Pressure Warning Side Tube Hull (all models) (iTrek 11, 14 and Fiesta) It is important to never inflate your kayak past the reccomended pres- sure. Pressure recco- mendations are found around the air valve.
- Page 10 MirageDrive Instruction Installation Lower drive straight down making sure the spine is level. Level Press down and CLICK lock drive into Click and Go’s. The drive locks automatically when installed. Removal Level Pull back each Click and Go lever in unison. Lift drive straight...
- Page 11 Make sure both cranks are in the same position number. With both feet on the pedals and together (fins straight down), your knees should be comfortably bent and not over crunched or extended. hobie.com...
-
Page 12: Seat
Seat Installation There are two con- nection points on the kayak to secure the seat. Connect the rear seat bottom frame into the seat holders on the back of the kayak. Push down on the seat until it snaps into the holders. - Page 13 Loosen the webbing through the plastic buckle to recline the seat. Pull the webbing tabs on the left and right straps to adjust the seat more upright. hobie.com...
-
Page 14: On The Water
On the Water MirageDrive Operation Shallow Kick Up Fins Water Beaching The kick-up fins will automatically Press either pedal forward in retract backwards when coming in shallow water to raise fins. contact with any object and resume Pressing one pedal fully forward their normal position when clear of will orient the fins with the kayak obstruction when you pedal. - Page 15 To remove the rudder pull the red locking knob out while pulling the rudder up. Your rudder pin is designed to break under high loads. An extra pin is stored inside the pocket on your seatback. hobie.com...
- Page 16 On the Water Steering There are steer- ing tracks located on both sides of the seat. Choose which side is best for you. Slide the steering handle onto the track over the lock pin. The pin will click into place. To remove the steering handle, pull down on the...
- Page 17 Once the up/down line is connected, Pull pull up on the line to flip the rudder down and back Cup Holder Place on the opposite side of the steering handle hobie.com...
-
Page 18: Storage And Transportation
Storage and Transportation Cart Plug cart in here The cart should be used for transportation purposes only and not as a storage platform. Turn kayak on its side and line up the two prongs on the cart and the two receivers on the bottom of the Mirage well. - Page 19 Storage and Transportation Folding iTrek 9 Note: Folding directions are also featured on the inside cover of the storage bag hobie.com...
- Page 20 Storage and Transportation Folding iTrek 11 Note: Folding directions are also featured on the inside cover of the storage bag...
- Page 21 Storage and Transportation Folding iTrek 14 Note: Folding directions are also featured on the inside cover of the storage bag 前修7cm 前修7cm 修 前 hobie.com...
- Page 22 Storage and Transportation Folding Fiesta Note: Folding directions are also featured on the inside cover of the storage bag.
-
Page 23: Maintenance And Care
Maintenance and Care MirageDrive Regular Maintenance Rinse after use. Checking Cable Tension Cables should be tight enough so they can only be slightly squeezed in under firm finger pressure. Visit the “support” section at hobie.com for information on the MirageDrive. hobie.com... - Page 24 Maintenance and Care Rudder Tuning Loosen the left and right Loosen L screw Loosen R screw screws so the steering cables are free to move Align steering handle pointing straight Align the steering handle straight. Tip: Fully tighten the screw under the steering handle to keep the handle from turning during the adjustment.
-
Page 25: Kick-Up Adjustment
Tighten the screw 1/4 turn at a time until the set screw just touches the fin. Test the fin by moving it in and out of the kick-up position to determine if it needs to be tightened or loosened. hobie.com... -
Page 26: Safety
• Never go in flood and/or • Dress appropriately for fast moving water weather conditions; cold conditions. Hobie kayaks water and/or weather can are not designed for fast result in hypothermia; apply moving water. sunscreen and other sun •... - Page 27 To do this, reach across the bottom of the boat and grab the Hobie MirageDrive and pull the boat upright. Position yourself so your head is near the cockpit area of the boat and you are facing the boat.
-
Page 28: Warranty
Scan this QR code with your smart phone If you have a question or issue with your Hobie product, please see your Authorized Hobie Kayak Dealer. They will assess the problem, assist with a repair and file a warranty claim with Hobie Cat Company if needed. -
Page 29: Accessories
Accessories i-Series Plug-In-Cart Hobie Multi-Lube Inflatable PFD Hobie Boat Cleaner Hobie UV Protectant Accessories can be purchased on www.hobie.com hobie.com... - Page 31 Enjoy the Ride! hobie.com...
- Page 32 Hobie Cat Company Holding Company Oceanside, California, USA 1-800-HOBIE-49 Hobie Cat Australasia Subsidiary Huskisson, New South Wales, Australia 1-800-4-HOBIE Hobie Cat Europe Subsidiary Toulon, France +33 (0) 494 08 78 78 Hobie Kayak Europe Independent Distributor Stellendam, The Netherlands +31 (0) 187 499 440...