Advertisement
Quick Links
IMPORTANT! Keep these instructions for future reference.
Please read these instructions before assembly and use of
this product.
• Adult assembly is required. Tool needed for assembly:
Phillips Screwdriver (not included). Assembly
instructions on back side of this sheet.
• Requires an AC adaptor (input 120 - 240 VAC, 50 - 60Hz,
with an output of 8 VDC) for operation (included).
• Always use the product where there is adequate
ventilation. To prevent overheating, keep the product
away from heat sources such as radiators, heat registers,
direct sunlight, stoves, amplifiers, or other appliances
which produce heat.
• Never use extension cords with the AC adaptor.
• Never use the product near water (ie.: bathtub, sink,
laundry tub or wet basement, etc.).
• Do not connect to more than the recommended number
of power supplies.
• The product must only be used with the recommended
AC adaptor.
• The AC adaptor is not a toy.
• Disconnect the AC adaptor from the product
before cleaning.
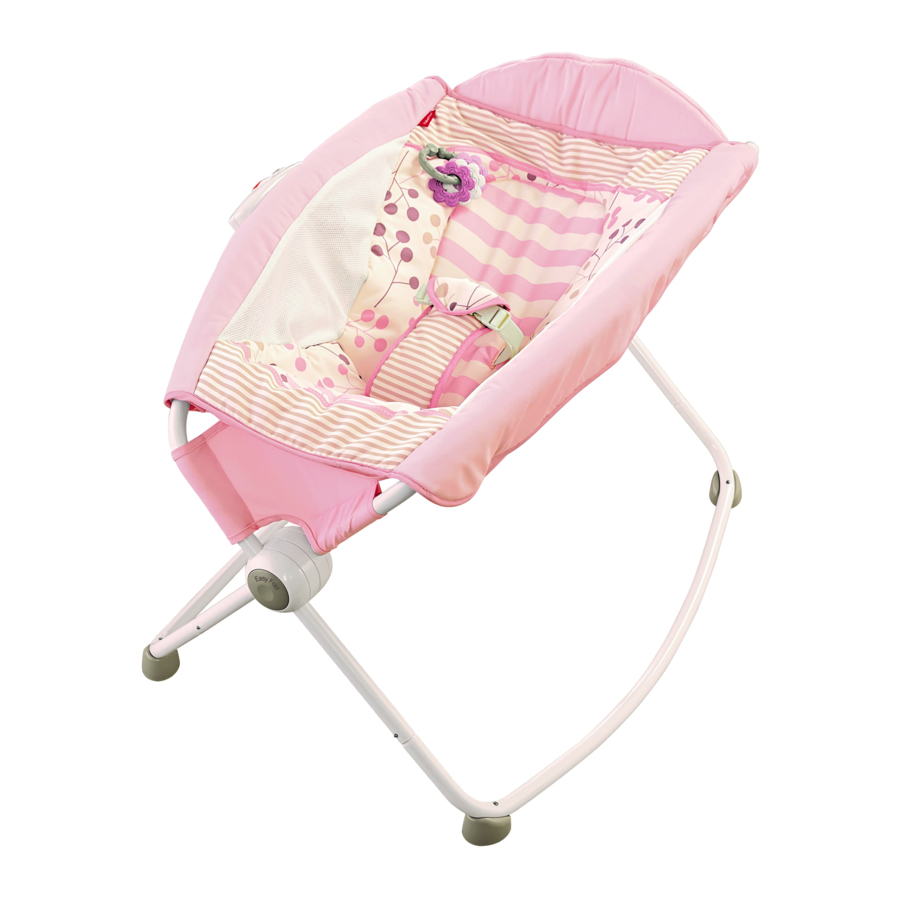
• Product features and decorations may vary
from photographs.
IMPORTANT! Conserver ce mode d'emploi pour s'y référer
en cas de besoin. Lire attentivement ce mode d'emploi
avant d'assembler et d'utiliser le produit.
• Doit être assemblé par un adulte. Outil requis pour
l'assemblage : un tournevis cruciforme (non fourni).
Les instructions d'assemblage se trouvent au verso.
• Fonctionne avec un adaptateur c.a. (entrée de 120-240 V
c.a., 50-60 Hz, sortie de 8 V c.c.), fourni.
• Toujours utiliser le siège dans un endroit suffisamment
aéré. Pour éviter toute surchauffe, tenir le siège éloigné
des sources de chaleur telles que les radiateurs, les
grilles d'air chaud, la lumière directe du soleil, les
cuisinières, les amplificateurs et autres appareils qui
produisent de la chaleur.
• Ne jamais brancher l'adaptateur c.a. sur une rallonge
électrique.
• Ne jamais utiliser le siège près de l'eau (par exemple près
d'une baignoire, d'un évier, d'un bac à lessive ou dans un
sous-sol mouillé, etc.).
• Ne pas utiliser d'autres sources d'alimentation que
celles recommandées.
• Ce produit doit être utilisé seulement avec l'adaptateur
c.a. recommandé.
• L'adaptateur c.a. n'est pas un jouet.
• Débrancher l'adaptateur c.a. avant de nettoyer le siège.
• Les caractéristiques et les décorations du produit
peuvent varier par rapport aux illustrations.
fisher-price.ca
1
FHW33
FHW33
Advertisement

Related Manuals for Fisher-Price FHW33


Summary of Contents for Fisher-Price FHW33
- Page 1 FHW33 FHW33 IMPORTANT! Conserver ce mode d’emploi pour s’y référer IMPORTANT! Keep these instructions for future reference. en cas de besoin. Lire attentivement ce mode d’emploi Please read these instructions before assembly and use of avant d’assembler et d’utiliser le produit.
- Page 2 • SUFFOCATION HAZARD • Infants have suffocated: - On added pillows, blankets and extra padding. - Use ONLY the pad provided by Fisher-Price. NEVER place extra padding under or beside infant. • ALWAYS place child on back to sleep. • Strings can cause strangulation! NEVER place items with a string around a child’s neck such as hood strings or pacifier cords.
- Page 3 • Des bébés se sont déjà étouffés : - Sur des oreillers, des couvertures ou des objets rembourrés supplémentaires. - Utiliser SEULEMENT le coussin fourni par Fisher-Price. NE JAMAIS ajouter un objet rembourré sous l’enfant ou à ses côtés. • TOUJOURS placer l’enfant sur le dos pour dormir.
- Page 4 Atomiumsquare, Bogota 202 - B 275, 1020 Brussels. Gratis nummer België: 0800-16 936; Gratis nummer UNITED STATES Luxemburg: 800-22 784; Gratis nummer Nederland: 1-800-432-5437. Fisher-Price, Inc., 0800-262 88 35. 636 Girard Avenue, East Aurora, NY 14052. Hearing-impaired consumers: 1-800-382-7470. AUSTRALIA Mattel Australia Pty.
- Page 5 Securing Your Child Comment installer l’enfant Waist Belt Waist Belt Courroie Courroie abdominale abdominale TIGHTEN TIGHTEN LOOSEN LOOSEN SERRER SERRER DESSERRER DESSERRER To tighten the waist belts: • Feed the anchored end of the waist belt up through the buckle to form a loop .
- Page 6 Preventing Baby’s Head from Flattening Prévenir le risque d’aplatissement de la tête de bébé Pediatricians and child health organizations agree that • Help your baby avoid resting his head in the same healthy babies should be placed on their backs to sleep for position all the time by frequently changing the direction naps and at nighttime, to reduce the risk of Sudden Infant he lies in the crib.
- Page 7 Preventing Baby’s Head from Flattening Prévenir le risque d’aplatissement de la tête de bébé Les pédiatres et les organismes de santé pour enfants • Aidez votre enfant à ne pas reposer sa tête toujours dans s’accordent sur le fait que les bébés en santé doivent la même position en changeant fréquemment sa position être placés sur le dos pendant la sieste et pendant la nuit dans le berceau.
- Page 8 AC Power Use Utilisation de l’adaptateur c.a. Adults Note: Periodically examine the AC adaptor for damage to the cord, housing or other parts that may result in the risk of fire, electric shock or injury. If the AC adaptor is damaged, do not use the product.
- Page 9 AC Power Use Utilisation de l’adaptateur c.a. • Place the product near a standard wall outlet. • Placer le siège à proximité d’une prise de courant standard. • Plug the AC adaptor cord into the auto-rock unit. • Brancher le câble de l’adaptateur sur l’unité de •...
- Page 10 Auto-Rock Use Utilisation de l’unité de bercement automatique • Appuyer sur le bouton d’alimentation pour activer le bercement automatique. Le voyant d’alimentation devient vert. Le siège s’éteint après environ 6 heures. • Appuyer à nouveau sur le bouton d’alimentation pour utiliser le siège pendant une courte période.
- Page 11 Storage To Remove the Pad Rangement Pour enlever le coussin Unfasten Retirer • The AC adaptor cord wraps around the auto-rock unit for storage. Plug the end of the adaptor into the Unbuckle auto-rock unit. Détacher • Le fil de l’adaptateur c.a. s’enroule autour de l’unité de bercement pour le rangement.
-
Page 12: Assembly Assemblage
Assembled Parts Assembly Éléments à assembler Assemblage IMPORTANT! Before assembly and each use, inspect this product for damaged hardware, loose joints, missing parts or sharp edges. Do not use the product if any parts are missing, damaged or broken. Do not use accessories or replacement parts other than those approved by Liner the manufacturer. - Page 13 Assembly Assemblage Liner Cadre • Fit the other end of the base tube into a tube on the remaining hub, as shown. • Insérer l’autre extrémité du tube de la base dans un tube de l’autre pivot, comme illustré. • Fit the liner tubes onto the hub tubes. Hub Tubes Hint: The liner is easier to assemble if the base remains in Tubes des pivots...
- Page 14 Assembly Assemblage Pad Button Holes Boutonnières du coussin Warning Label (not visible) Étiquette d’avertissement (non visible) • Fold the top of the pad up to fit it back into the liner. • Relever le haut du coussin afin de le remettre correctement sur le cadre.
- Page 15 Assembly Assemblage Straps Straps Lanière Lanière • Pull the bottom of the pad around the liner. • Buckle the straps on the pad. Make sure you hear a “click”. • Glisser le rebord inférieur du coussin autour du cadre. • Attacher la lanière du coussin. S’assurer d’entendre un clic. PRESS PRESS APPUYER...
- Page 16 ® For more cleaning information, please contact Fisher-Price de détergent liquide. Le frotter délicatement avec une Consumer Relations at service.fisher-price.com or call brosse douce. Bien rincer avec de l’eau propre.