
Related Manuals for Haier H3F-280 SAAU1 Series


Summary of Contents for Haier H3F-280 SAAU1 Series
- Page 1 User Manual Upright Freezer H3F-280*SAAU1 H3F-320*SAAU1 H3F-320*TAAU1 * - Colour code...
- Page 2 Thank You Thank you for purchasing a Haier Product. Please read these instructions carefully before using this appliance. The instructions con- tain important information which will help you get the best out of the appliance and ensure safe and proper installation, use and maintenance.
-
Page 3: Table Of Contents
Content 1 - Safety ..............................4 2 - Intended Use ............................8 3 - Product Description ........................9 4 - Control panel ..........................10 5 - Use ..............................11 6 - Energy saving ..........................11 7 - Equipment ............................. 11 8 - Care and Cleaning ........................15 9 - Troubleshooting ........................... -
Page 4: Safety
1 - Safety Before switching on the appliance for the first time, read the following safety hints!: WARNING! Before first use ▶ Make sure there is no transport damage. ▶ Remove all packaging and keep out of children´s reach. ▶ Wait at least six hours before installing the appliance in order to ensure the refrigerant circuit is fully efficient. - Page 5 1 - Safety WARNING! Daily use ▶ This appliance can be used by children aged from 8 years and above and persons with reduced physical, sensory or mental ca- pabilities or lack of experience and knowledge if they have been given supervision or instruction concerning use of the appliance in a safe way and understand the hazards involved.
- Page 6 1 - Safety WARNING! Daily use ▶ Do not touch frozen goods with wet hands (wear gloves). Espe- cially do not eat ice lollies immediately after removal from the freezer compartment. There is the risk to freeze or the formation of frost blisters.
- Page 7 1 - Safety Refrigerant gas information WARNING! The appliance contains the flammable refrigerant ISOBUTHANE (R600a). Make sure the refrigerant circuit is not damaged during transportation or installation. Leaking refrigerant may cause eye injuries or ignite. If a damage has occurred, keep away open fire sources, thoroughly ventilate the room, do not plug or unplug the power cords of the appliance or any other appliance.
-
Page 8: Intended Use
2 - Intended use 2.1 Intended Use “This appliance is intended to be used in household and similar applications such as – staff kitchen areas in shops, offices and other working environments; – farm houses and by clients in hotels, motels and other residential type environments; –... -
Page 9: Product Description
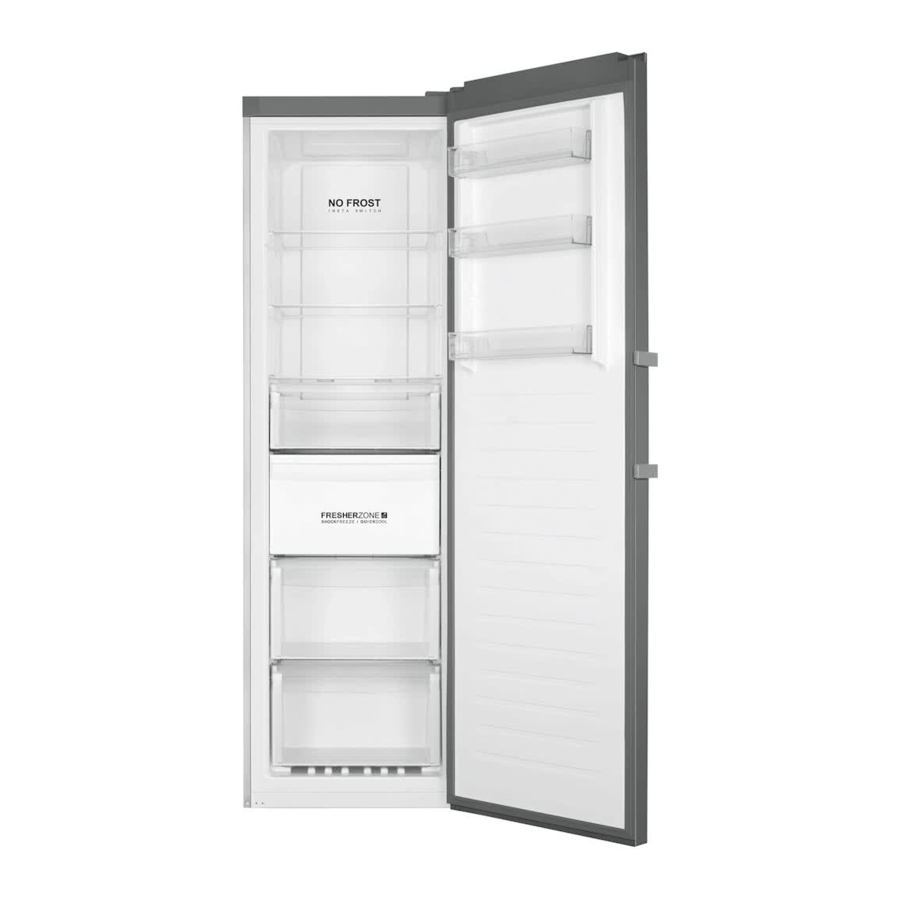
3 - Product description Notice: Differences Due to technical changes and different models, some of the illustrations in this manual may differ from your model. Picture of appliance (Fig. 3) 1 Control panel 5 Drawers 2 LED light 6 Adjustable feet 3 Multi-air flow 7 Removable door racks 4 Glass shelves... -
Page 10: Control Panel
4 - Control panel Control panel (Fig. 4) A Fridge mode B Freeze temperature - Eco C Freeze temperature D Freeze temperature E Freeze temperature and Super freeze mode F Fresher zone Child lock... -
Page 11: Use
5 - Use 5.1 Before first Use ▶ Remove all packaging materials, keep them out of childrens reach and dispose them in an environmentally friendly manner. ▶ Clean the inside and outside of the appliance with water and a mild detergent before putting any food in it. - Page 12 5 - Use Notice: Display lock When display is locked, functions such as temperature setting or super freeze are di- sabled. When above operation is attempted, Child lock indicator will blink for 3 times, to remind that the display is locked. 5.5 Temperature setting When display is unlocked, by touching different temperature buttons, different tempera- ture could be set, this process will be accompanied by beeps.
- Page 13 5 - Use In the Fridge mode, FresherZone works as QUICKCOOL, the entire zone can be quickly cooled to the freezing temperature. When temperature is set at 4°C, touch FresherZone button (F), the FresherZone indicator(f) illuminates, then the FresherZone function is activated. When activated, the functions will be automatically deactivated when temperature is reached or after 3 hours.
-
Page 14: Energy Saving
6 - Energy saving tips Energy saving tips ▶ Make sure the appliance is properly ventilated (see INSTALLATION). ▶ Do not install the appliance in direct sunlight or in the near of heat sources (e.g. stoves, heaters). ▶ Avoid unnecessarily low temperature in the appliance. The energy consumption in- creases the lower the temperature in the appliance is set. -
Page 15: Care And Cleaning
8- Care and Cleaning WARNING! Disconnect the appliance from the power supply before cleaning. 8.1 General Clean the appliance when only little or no food is stored. WARNING! ▶ Do not clean the appliance with hard brushes, wire brushes, detergent powder, petrol, amyl acetate, acetone and similar organic solutions, acid or alkaline solutions. - Page 16 8- Care and Cleaning 8.2 Non-use for a longer period If the appliance is not used for an extended period of time: ▶ Take out the food. ▶ Unplug the power cord. ▶ Clean the appliance as described above. ▶ Keep the door and freezer drawers open to prevent the creation of bad odours inside. Remove the door of the appliance (open the door and hold it before removing the screws) to avoid children entering into the appliance and getting locked in.
-
Page 17: Troubleshooting
9 - Troubleshooting Many occuring problems could be solved by yourself without specific expertise. In case of a problem please check all shown possibilities and follow below instructions before you contact an after sales service. See CUSTOMER SERVICE. WARNING! ▶ Before maintenance, deactivate the appliance and disconnect the mains plug from the mains socket. - Page 18 9 - Troubleshooting Problem Possible Cause Possible Solution The appliance • This is normal. It is caused by the • - makes a clicking refrigeration unit switching on or sound off. A slight sound is to • This is normal. •...
- Page 19 9 - Troubleshooting Problem Possible Cause Possible Solution The sides of the • This is normal. • - cabinet and door strip get warm. You hear an alarm • The door is open • Close the door or silence the signal.
-
Page 20: Installation
10 - Installation 10.1 Unpacking WARNING! ▶ The appliance is heavy. Always handle with at least two persons. ▶ Keep all packaging materials out of childrens reach and dispose them in an environ- mentally friendly manner. ▶ Take the appliance out of the packaging. ▶... - Page 21 10 - Installation 10.6 Using adjustable feet 10.6 If the freezer is unstable, the feet can be adjusted: Ro- tate the adjustable feet according to the direction of arrow (Fig. 10.6) to turn them up or down: ▶ Turning the feet clockwise raises the appliance. ▶...
- Page 22 10 - Installation 10.9 Door Reversibility Before connecting the appliance to the power supply you should check, whether the door swing must changed from right (as delivered) to left, if this is required by the installation location and the usability. WARNING! ▶...
- Page 23 10 - Installation 11. Remove screw and axe cover. Remove hinge axe and fix it into the hole next to it. 12. Take the thicker axe cover from the accessory bag. Fix it with screw from last step. 13. Fix the hinge to the opposite position of the cabinet with 4 screws.
-
Page 24: Technical Data
11 - Technical Data 11.1 Product fiche according to regulation EU No. 1060/2010 Trade mark Haier H3F- H3F- H3F- Model identifier 280*SAAU1 320*SAAU1 320*TAAU1 Category of the model Upright freezer Energy efficiency class A+++ Annual energy consumption (kWh/year) Storage volume cooling (L) -
Page 25: Customer Service
If you cannot find a solution there, please contact ▶ your local dealer or ▶ the Service & Support area at www.haier.com where you can find telephone numbers and FAQs and where you can activate the service claim. To contact our Service, ensure that you have the following data available. - Page 27 Bedienungsanleitung Tiefkühlschrank H3F-280*SAAU1 H3F-320*SAAU1 H3F-320*TAAU1 * – Farbcode...
- Page 28 Vielen Dank Vielen Dank für den Kauf eines Haier-Gerätes. Machen Sie sich gründlich mit dieser Anleitung vertraut, bevor Sie Ihr neues Gerät nutzen. In der Anleitung finden Sie wichtige Hinweise, die Ihnen helfen, von Anfang an perfekte Leistung Ihres Gerätes zu genießen. Zusätzlich zeigt Ihnen die Anleitung, wie Sie das Ge- rät richtig und sicher aufstellen, in Betrieb nehmen und richtig pflegen.
- Page 29 Inhalt 1 – Sicherheit ........................4 2 – Vorgesehene Anwendung ..................8 3 – Produktbeschreibung ....................9 4 – Bedienfeld ........................10 5 – Tägliche Verwendung ....................11 6 – Tipps zum Energiesparen ..................14 7 – Ausstattung ........................14 8 – Reinigung und Pflege ....................15 9 –...
-
Page 30: Sicherheit
1 – Sicherheit Machen Sie sich gut mit den folgenden Sicherheitshinweisen vertraut, bevor Sie das Gerät zum ersten Mal benutzen: WARNUNG! Vor dem ersten Einsatz ▶ Vergewissern Sie sich zunächst, dass das Gerät keine Schäden beim Transport erlitten hat. ▶ Entfernen Sie das gesamte Verpackungsmaterial, achten Sie da- rauf, dass Kinder nicht an das Verpackungsmaterial herankom- men. - Page 31 1 – Sicherheit WARNUNG! Installation ▶ Nur gültig im Vereinigten Königreich (England): Das Netzkabel der Maschine ist mit einem dreipoligem Stecker mit Erdungs- anschluss ausgestattet, der sich nur in eine passende geerde- te Steckdose einstecken lässt. Trennen Sie den dritten Kontakt (Erdungskontakte) niemals ab.
- Page 32 1 – Sicherheit WARNUNG! Tägliche Verwendung ▶ Lagern Sie keine Medikamente, Chemikalien oder gar Bakterien im Gerät. Ihr neues Gerät ist ein reines Haushaltsgerät. Wir raten davon ab, Dinge darin zu lagern, die unter sehr präzisen Tempera- turbedingungen aufbewahrt werden müssen. ▶...
- Page 33 1 – Sicherheit ▶ Verzichten Sie unbedingt auf mechanische Hilfsmittel und an- dere Dinge zum Beschleunigen des Abtauens, sofern diese nicht ausdrücklich vom Hersteller empfohlen werden. ▶ Sprühen Sie das Gerät bei der Reinigung nicht ein, spülen Sie es nicht aus. ▶...
-
Page 34: Vorgesehene Anwendung
2 – Vorgesehene Anwendung 2.1 Vorgesehene Anwendung Ihr neues Gerät ist zum Einsatz im Haushalt und bei ähnlichen Anwendungen vorgesehen. Wie: – Mitarbeiterküchen in Geschäften, Büros und dergleichen – Hotel- und Motelzimmer und dergleichen – Private Zimmervermietung – Verpflegung vor Ort sowie ähnliche nichtkommerzielle Zwecke. Ihr neues Gerät dient lediglich zum Einfrieren von Lebensmitteln. -
Page 35: Produktbeschreibung
3 – Produktbeschreibung Hinweis: Unterschiede Aufgrund technischer Änderungen und leicht unterschiedlicher Modelle können einige Abbildungen in dieser Anleitung ein wenig von Ihrem Gerät abweichen. Abbildung des Gerätes (Abbildung 3) 1 Bedienfeld 5 Schubladen 2 LED-Beleuchtung 6 Verstellbare Füße 3 Multi-Luftzirkulation 7 Entnehmbare Türablagen 4 Glasablagen 8 Türgriff... -
Page 36: Bedienfeld
4 – Bedienfeld Bedienfeld (Abbildung 4) A Kühlen B Öko-Gefrieren C Gefrieren D Gefrieren E Gefrieren und Supergefrieren F Fresher Zone G Kindersicherung... -
Page 37: Tägliche Verwendung
5 – Tägliche Verwendung 5.1 Vor dem ersten Einsatz ▶ Entfernen Sie das gesamte Verpackungsmaterial, halten Sie das Verpackungsma- terial von Kindern fern, entsorgen Sie alles auf umweltfreundliche Weise. ▶ Reinigen Sie das Gerät außen und innen mit Wasser und einem sanften Spülmittel, bevor Sie Lebensmittel hineingeben. - Page 38 5 – Tägliche Verwendung Hinweis: Displaysperre Bei gesperrtem Display sind Funktionen wie Temperatureinstellung oder Supergefrie- ren nicht wählbar. Sofern Sie es dennoch probieren, blinkt der Kindersicherung-Indikator dreimal, erinnert Sie damit daran, dass das Display gesperrt ist. 5.5 Temperatur einstellen Bei freigegebenem Display können Sie mit den Temperaturtasten unterschiedliche Tem- peraturen einstellen.
- Page 39 5 – Tägliche Verwendung Die Funktion schaltet sich automatisch ab, wenn die richtige Temperatur erreicht ist, spä- testens jedoch nach 24 Stunden. Wenn Sie die Funktion vorzeitig abschalten möchten, wiederholen Sie einfach die obigen Schritte. Im Kühlbetrieb können Sie die Frischzone zum Schnellkühlen benutzen: die gesamte Zone lässt sich ganz schnell auf die Kühltemperatur bringen.
-
Page 40: Tipps Zum Energiesparen
6 – Tipps zum Energiesparen Tipps zum Energiesparen ▶ Achten Sie darauf, das Gerät an einer gut belüfteten Stelle aufzustellen (lesen Sie unter „Installation“ nach). ▶ Stellen Sie das Gerät nicht im prallen Sonnenlicht, auch nicht in der Nähe von Wär- mequellen (z. -
Page 41: Reinigung Und Pflege
8 – Reinigung und Pflege WARNUNG! Ziehen Sie vor dem Reinigen den Netzstecker aus der Steckdose. 8.1 Allgemeines Reinigen Sie das Gerät am besten dann, wenn es möglichst leer ist. WARNUNG! ▶ Verzichten Sie bei der Reinigung unbedingt auf harte Bürsten, Drahtbürsten, Pul- verreiniger, Benzin, Lösungsmittel, Azeton und ähnliche Mittel, auch auf saure oder alkalische Mittel. - Page 42 8 – Reinigung und Pflege 8.2 Längere Nichtbenutzung Falls Sie das Gerät längere Zeit nicht benutzen: ▶ Nehmen Sie sämtliche Speisen heraus. ▶ Ziehen Sie den Netzstecker aus der Steckdose. ▶ Reinigen Sie das Gerät wie weiter oben beschrieben. ▶ Lassen Sie die Gerätetür und die Schubladen offen stehen, damit sich kein Schimmel im Inneren bilden kann.
-
Page 43: Problemlösung
9 – Problemlösung Viele Probleme können Sie auch selbst ohne Expertenwissen lösen. Falls einmal ein Pro- blem auftreten sollte, prüfen Sie sämtliche erwähnten Ursachen und probieren die nach- stehenden Abhilfemaßnahmen, bevor Sie sich an den Kundendienst wenden. Lesen Sie unter „Kundendienst“ nach. WARNUNG! ▶... - Page 44 9 – Problemlösung Problem Mögliche Ursache Mögliche Lösung Das Gerät gibt selt- • Das Gerät steht nicht gerade. • Stellen Sie das Gerät gerade same Geräusche • Das Gerät berührt einen Gegen- auf. von sich. stand in der Nähe. • Das Gerät steht auf einem Holz- •...
- Page 45 9 – Problemlösung Problem Mögliche Ursache Mögliche Lösung Das Kühlsystem • Der Netzstecker steckt nicht oder • Schließen Sie den Netzstecker funktioniert nicht. nicht richtig in der Steckdose. • Etwas stimmt nicht Stromversorgung. • Vergewissern Sie sich, dass die Stromversorgung im Raum richtig funktioniert.
-
Page 46: Installation
10 – Installation 10.1 Auspacken WARNUNG! ▶ Das Gerät ist schwer. Transportieren und verrücken Sie es grundsätzlich immer nur zu zweit. ▶ Halten Sie sämtliches Verpackungsmaterial von Kindern fern, entsorgen Sie alles auf umweltfreundliche Weise. ▶ Holen Sie das Gerät aus der Verpackung. ▶... - Page 47 10 – Installation 10.6 Füße verstellen 10.6 Falls Ihr Gefrierschrank nicht gerade steht, können Sie dies in den meisten Fällen durch Verstellen der Füße ausgleichen: Zum Heraus- und Hereinschrauben der Füße drehen Sie diese in Pfeilrichtung (Abbildung 10.6): ▶ Beim Drehen im Uhrzeigersinn hebt sich das Gerät. ▶...
- Page 48 10 – Installation 10.9 Türanschlag (Öffnungsrichtung) ändern Prüfen Sie vor der Inbetriebnahme, ob der Türanschlag (die Öffnungsrichtung) je nach Aufstellungsort oder Gewohnheit besser von rechts (wie bei Lieferung) nach links geän- dert werden sollte. WARNUNG! ▶ Das Gerät ist schwer. Zum Ändern des Türanschlags brauchen Sie einen Helfer. ▶...
- Page 49 10 – Installation 11. Entfernen Sie die Schraube und die Achsenabde- ckung. Entfernen Sie die Scharnierachse, setzen Sie diese in die Öffnung daneben ein. 12. Nehmen Sie die dickere Achsenabdeckung aus dem Zubehörbeutel. Fixieren Sie diese mit der Schraube aus dem letzten Schritt. 13.
-
Page 50: Technische Daten
11 – Technische Daten 11.1 Produktdatenblatt gemäß EU-Regulierung 1060/2010 Marke Haier H3F- H3F- H3F- Modellbezeichnung 280*SAAU1 320*SAAU1 320*TAAU1 Gerätekategorie Tiefkühlschrank Energieeffizienzklasse A+++ Jährlicher Energieverbrauch (kWh/Jahr) Kühlraumvolumen (L) nicht zutreffend Tiefkühlraumvolumen (L) **** Sterneinstufung **** Temperatur anderer Fächer >14 °C nicht zutreffend... -
Page 51: Kundendienst
Falls Sie dort keine Lösung finden sollten, wenden Sie sich bitte an ▶ Ihren Händler vor Ort. Alternativ ▶ besuchen den „Service & Unterstützung“-Bereich bei www.haier.com – hier finden Sie Telefonnummern, Antworten auf häufig gestellte Fragen sowie Hinweise zu Ser- vice- und Garantieleistungen. - Page 53 Manuel d'utilisateur Congélateur vertical H3F-280*SAAU1 H3F-320*SAAU1 H3F-320*TAAU1 *- Code couleur...
- Page 54 Nous vous remercions Nous vous remercions d'avoir acheté un produit Haier. Veuillez lire attentivement ces instructions avant d'utiliser l'appareil. Ces instructions sont des informations utiles vous permettant de mieux exploiter cet appareil, et vous assurer une installation, une utilisation et un entretien sécurisés et adéquats.
- Page 55 Sommaire 1 - Sécurité .......................... 4 2- Utilisation prévue ......................8 3- Description du produit ....................9 4- Panneau de commande ....................10 5- Utilisation ........................11 6- Conseils pour économiser de I‘énergie ..............14 7- Équipement ........................14 8- Entretien et nettoyage ....................15 9- Dépannage ........................17 10- Installation ........................20 11- Informations techniques ..................24...
-
Page 56: Sécurité
1 - Sécurité Avant de mettre l'appareil en marche pour la première fois, veuillez lire les con- signes de sécurité ci-après : AVERTISSEMENT ! Avant la première utilisation ▶ Vérifiez qu'aucun dommage lié au transport n'a été subi par l'ap- pareil. ▶... - Page 57 1 - Sécurité AVERTISSEMENT ! Installation ▶ Assurez-vous que le câble d’alimentation n’est pas coincé sous le congélateur. Évitez de marcher sur le câble d’alimentation. ▶ N’endommagez pas le circuit réfrigérant. Utilisation quotidienne ▶ Cet appareil peut être utilisé par des enfants âgés d’au minimum 8 ans, ainsi que par des personnes avec des capacités physiques, sensorielles ou mentales réduites ou sans expérience et connais- sances, si elles sont supervisées ou ont été...
- Page 58 1 - Sécurité AVERTISSEMENT ! Utilisation quotidienne ▶ Ne touchez pas les aliments congelés avec des mains mouillées (portez des gants). Surtout, ne mangez pas les sucettes glacées immédiatement après les avoir sorties du congélateur. Vous ris- quez une congélation de la langue ou la formation d'ampoules suite à...
- Page 59 1 - Sécurité Informations sur le gaz frigorigène AVERTISSEMENT ! Cet appareil contient du réfrigérant inflammable l'ISOBUTHANE (R600a). Assurez-vous que le système de réfrigération n'est pas endommagé pendant le transport et l'installation. Une fuite de gaz frigorigène pourrait causer des dommages oculaires ou un incen- die.
-
Page 60: 2- Utilisation Prévue
2- Utilisation prévue 2.1 Utilisation prévue Cet appareil est destiné à une utilisation domestique et à d’autres applications similaires, notamment : – espaces cuisine dans les boutiques, bureaux et autres lieux de travail; – les maisons de campagne, les chambres d'hôtel, de motel et d'autres types de rési- dence ;... -
Page 61: 3- Description Du Produit
3- Description du produit Remarque : Différences En raison des modifications techniques et des divers modèles, certaines illustrations de ce manuel peuvent être différentes de votre modèle. Images des appareils (Fig. 3) 1 Panneau de commande 5 Tiroirs 2 Lumière LED 6 Pieds ajustables 3 Ventilation multiple 7 Balconnets de porte amovibles... -
Page 62: 4- Panneau De Commande
4- Panneau de commande Panneau de commande (Fig. 4) A Mode réfrigérateur B Température de congélation - Eco C Température de congélation D Température du congélateur E Température de congélation et Mode super congélation F Fresher zone G Sécurité enfant... -
Page 63: 5- Utilisation
5- Utilisation 5.1 Avant la première utilisation ▶ Retirez tous les emballages et tenez-les hors de portée des enfants, puis mettez-les au rebut dans le respect de l'environnement. ▶ Nettoyez l'intérieur et l'extérieur de l'appareil avec de l'eau et un détergent doux avant de garder les aliments à... - Page 64 5- Utilisation Remarque : Verrou d'écran Lorsque l'affichage est verrouillé, des fonctions telles que le réglage de la température ou le super-congélation sont désactivées. Lorsque l’opération ci-dessus est tentée, le témoin de verrouillage parental clignote 3 fois pour rappeler que l’affichage est verrouil- lé.
- Page 65 5- Utilisation tivées, les fonctions seront automatiquement désactivées une fois la température atteinte ou après 24 heures. Répétez l’opération pour désactiver manuellement. En mode réfrigérateur, FresherZone fonctionne en tant que QUICKCOOL, toute la zone peut-être rapidement refroidie à la température de congélation. Lorsque la température est réglée sur 4 ...
-
Page 66: 6- Conseils Pour Économiser De I'énergie
6- Conseils pour économiser de I‘énergie Conseils pour économiser de l’énergie ▶ Assurez-vous que l'appareil est suffisamment ventilé (Voir INSTALLATION). ▶ N’exposez pas l’appareil à la lumière directe du soleil ou à proximité des sources de chaleur (par exemple, les cuisinières, chauffe-eau). ▶... -
Page 67: 8- Entretien Et Nettoyage
8- Entretien et nettoyage AVERTISSEMENT ! Débranchez l'appareil de la prise d'alimentation avant de le nettoyer. 8.1 Généralités Nettoyez l'appareil uniquement lorsqu'il y a moins d'aliments ou pas d'aliments. AVERTISSEMENT ! ▶ Évitez de nettoyer l'appareil à l'aide de brosses dures, métalliques, de détergent en poudre, d'essence, d'acétate d'amyle, d'acétone et toute autre solution similaire or- ganique, acide ou alcaline. - Page 68 8- Entretien et nettoyage 8.2 Non-utilisation pendant une longue période Si l’appareil ne sera pas utilisé pendant une longue période : ▶ Retirez les aliments. ▶ Débranchez la prise d'alimentation. ▶ Nettoyez l'appareil tel qu'indiqué ci-dessus. ▶ Laissez la porte et les tiroirs du congélateur ouverts to éviter les mauvaises odeurs à l'intérieur.
-
Page 69: 9- Dépannage
9- Dépannage Vous pouvez résoudre la plupart des problèmes qui pourraient survenir sans expertise précise. En cas de problème, veuillez vérifier toutes les solutions possibles en suivant les instructions ci-dessous avant de contacter un service après-vente. Voir SERVICE CLIEN- TÈLE. AVERTISSEMENT ! ▶... - Page 70 9- Dépannage Problème Causes probables Solutions possibles L'appareil produit • L'appareil n'est pas placé sur une • Mettez l'appareil à niveau. des sons bizarres. surface plane. • L'appareil touche un objet proche • Retirez les objets autour de l'ap- de lui. pareil.
- Page 71 9- Dépannage Problème Causes probables Solutions possibles Le système de re- • La fiche secteur n’est pas branchée • Branchez la fiche. froidissement ne sur la prise secteur. fonctionne pas. • L'alimentation électrique est • Vérifiez l'alimentation élec- anormale. trique de la pièce. Contactez la compagnie d'électricité.
-
Page 72: 10- Installation
10- Installation 10.1 Déballage AVERTISSEMENT ! ▶ L'appareil est lourd. Il faut toujours être au moins à deux pour le manœuvrer. ▶ Tenez tous les emballages hors de portée des enfants et mettez-les au rebut dans le respect de l'environnement. ▶ Sortez l'appareil de l'emballage. - Page 73 10- Installation 10.6 Utilisation des pieds ajustables 10.6 Si le congélateur est instable, les pieds peuvent être réglés : Tournez les pieds réglables dans le sens de la flèche (Fig. 10.6) pour les rallonger ou les diminuer. ▶ L’appareil se soulève lorsque vous tournez les pieds dans le sens horaire.
- Page 74 10- Installation 10.9 Réversibilité des portes Avant de raccorder l’appareil à l’alimentation électrique, vérifiez que la porte bascule de droite (tel que livré) à gauche, selon les commodités de l’emplacement d’installation et l’utilisation. AVERTISSEMENT ! ▶ L'appareil est lourd. Deux personnes doivent manœuvrer la réversibilité de la porte. ▶...
- Page 75 10- Installation 11. Retirez la vis et le cache de l’axe. Retirez l'axe de la charnière et fixez-le dans le trou à côté. 12. Prenez la couverture de l’axe plus épaisse du sac à accessoires. Fixez-le avec la vis de la dernière étape.
-
Page 76: 11- Informations Techniques
11- Informations techniques 11.1 Fiche produite conformément à la loi UE N° 1060/2010 Marque de fabrique Haier H3F- H3F- H3F- Numéro d'identification du modèle 280*SAAU1 320*SAAU1 320*TAAU1 Catégorie du modèle Congélateur vertical Classe d’efficacité énergétique A+++ Consommation énergétique annuelle (kWh/an) Volume de conservation réfrigération (L) non applicable Volume de conservation congélation (L) ****... -
Page 77: 12- Service Client
Si vous ne trouvez pas de solution, veuillez contacter ▶ votre vendeur local ou ▶ rendez-vous sur le site www.haier.com, dans la zone Service et support, vous trou- verez des numéros de téléphone et une FAQ. Vous pourrez également contacter le service de réclamation. - Page 79 Manuale per l'utente Congelatore verticale H3F-280*SAAU1 H3F-320*SAAU1 H3F-320*TAAU1 * - Codice colore...
- Page 80 Grazie Vi ringraziamo per aver deciso di acquistare un prodotto Haier. Vi invitiamo a leggere attentamente queste istruzioni prima di iniziare a usare il dispositivo. Le istruzioni contengono informazioni importanti che vi aiuteranno a trarre il meglio da questo dispositivo e vi garantiranno altresì sicurezza in fase di installazione, uso e manu- tenzione del dispositivo.
- Page 81 Indice 1 - Sicurezza ........................4 2 - Impiego preposto ......................8 3 - Descrizione del prodotto ................... 9 4 - Pannello di controllo ....................10 5 - Utilizzo ..........................11 7 - Strumentazione ......................14 8- Cura e pulizia ........................15 9- Guida alla risoluzione dei problemi .................17 10 - Installazione ......................20 11 - Dati tecnici .........................24 12 - Servizio di assistenza ....................25...
-
Page 82: Sicurezza
1 - Sicurezza Prima di accendere il dispositivo per la prima volta, leggere i seguenti suggeri- menti di sicurezza: AVVERTENZA! Prima di iniziare a usare il dispositivo ▶ Verificare che non vi siano danni verificatisi in fase di trasporto. ▶ Rimuovere completamente l’imballaggio e tenere fuori dalla por- tata dei bambini. - Page 83 1 - Sicurezza AVVERTENZA! Installazione ▶ Verificare che il cavo di alimentazione non sia intrappolato dall’ap- parecchiatura. Non inciampare sul cavo di alimentazione. ▶ Non danneggiare il circuito refrigerante. Uso quotidiano ▶ Questa apparecchiatura può essere usata da bambini a partire dagli 8 anni di età...
- Page 84 1 - Sicurezza AVVERTENZA! Uso quotidiano ▶ Non toccare alimenti congelati con le mani bagnate (indossare i guanti). In particolar modo non mangiare i ghiaccioli subito dopo averli estratti dallo scomparto del congelatore. Sussiste il rischio di congelamento o di formazione di vesciche da freddo. PRIMO soccorso: mettere immediatamente sotto acqua fredda corren- te.
- Page 85 1 - Sicurezza Informazioni sul gas refrigerante AVVERTENZA! Il dispositivo contiene il refrigerante infiammabile ISOBUTANO (R600a). Verificare che il circuito del refrigerante non si sia danneg- giato in fase di trasporto o installazione. Le perdite di refrigerante possono causare lesioni agli occhi o rischi di incendio. Qualora si siano verificati danni, tenere lontano dalle fonti libere di fuoco, ven- tilare bene la stanza, non collegare o scollegare i cavi di alimenta- zione del dispositivo o di qualsiasi altro dispositivo.
-
Page 86: Impiego Preposto
2 - Impiego preposto 2.1 Uso preposto L'apparecchiatura è destinata all'uso domestico e applicazioni simili, tra cui - cucine per il personale in negozi, uffici e altri ambienti di lavoro; - fattorie e clienti di hotel, motel e altri ambienti residenziali; - ambienti tipo bed and breakfast;... -
Page 87: Descrizione Del Prodotto
3 - Descrizione del prodotto Informativa: Differenze A causa di modifiche tecniche e modelli diversi, alcune delle illustrazioni all’interno di questo manuale potrebbero differire dal modello attuale. Immagine dell’apparecchiatura (Fig. 3) 1 Pannello di controllo 5 Cassetti 2 Luce LED 6 Piedini regolabili 3 Flusso multi-aria 7 Ripiani porta rimovibili... -
Page 88: Pannello Di Controllo
4 - Pannello di controllo Pannello di controllo (Fig. 4) A Modalità frigo B Temperatura congelatore - Eco C Temperatura congelatore D Temperatura congelatore E Temperatura congelatore modalità Super Freeze F Fresher Zone G Blocco bambini... -
Page 89: Utilizzo
5 - Utilizzo 5.1 Prima del primo uso ▶ Togliere tutti i materiali dell'imballaggio, tenerli fuori dalla portata dei bambini e smal- tirli in modo rispettoso dell'ambiente. ▶ Pulire l'interno e l'esterno del dispositivo con acqua e con un detergente delicato pri- ma di inserire alimenti all'intero. - Page 90 5 - Utilizzo Informativa: Blocco del display Quando il display è bloccato, le funzioni come l'impostazione della temperatura o il Su- per freeze sono disabilitate. Quando si tenta di eseguire l'operazione sopra descritta, l'indicatore di blocco bambini lampeggia per 3 volte, per ricordare che il display è bloc- cato.
- Page 91 5 - Utilizzo herZone; l’indicatore (f) si illuminerà e la funzione di abbattimento sarà attivata. Una volta attivate, le funzioni si disattiveranno automaticamente quando vieni raggiuna la tempe- ratura o dopo 24 ore. Ripetere l’operazione per disattivarle manualmente. In modalità Frigorifero, FresherZone funziona come REFRIGERAZIONE VELOCE, e l’intera zona può...
-
Page 92: Strumentazione
6 - Suggerimenti risparmio energia Suggerimenti per risparmiare energia ▶ Verificare che il dispositivo disponga di una ventilazione adeguata (cfr. INSTALLA- ZIONE). ▶ Non installare il dispositivo direttamente esposto alla luce del sole o vicino a sorgenti di alimentazione (ad esempio: stufe, riscaldatori). ▶... -
Page 93: 8- Cura E Pulizia
8- Cura e pulizia AVVERTENZA! Scollegare il dispositivo dalla presa di corrente prima di avviare le operazioni di pulizia. 8.1 Norme di sicurezza generali Pulire il dispositivo solamente quando all'interno vi sono pochi alimenti o quando è com- pletamente vuoto. AVVERTENZA! ▶... - Page 94 8- Cura e pulizia 8.2 Non uso per lunghi periodi di tempo Se l’apparecchiatura non verrà usata per un lungo periodo di tempo: ▶ Estrarre gli alimenti. ▶ Togliere il cavo di alimentazione. ▶ Pulire il dispositivo secondo quanto descritto più sopra. ▶...
-
Page 95: 9- Guida Alla Risoluzione Dei Problemi
9- Guida alla risoluzione dei problemi Molti dei problemi più ricorrenti possono essere risolti senza competenze specifiche. In caso di problemi controllare tutte le possibilità indicate e attenersi alle seguenti istruzioni prima di contattare il servizio post vendita. Cfr. ASSISTENZA CLIENTI. AVVERTENZA! ▶... - Page 96 9- Guida alla risoluzione dei problemi Problema Possibile causa Possibile soluzione Il dispositivo emette • Non si tratta di un'anomalia di fun- • - dei clic zionamento. Ciò è causato dall'ac- censione o spegnimento dell'unità di refrigerazione. Si sente un suo- •...
- Page 97 9- Guida alla risoluzione dei problemi Problema Possibile causa Possibile soluzione Si sente un segnale • La porta è aperta • Chiudere la porta o silenziare di allarme. • La temperatura nel congelatore è l'allarme manualmente. troppo alta La porta si apre con •...
-
Page 98: Installazione
10 - Installazione 10.1 Disimballaggio AVVERTENZA! ▶ L'apparecchiatura è pesante. Spostarlo sempre in due. ▶ Conservare tutti i materiali dell’imballaggio fuori dalla portata dei bambini e smaltirli in modo rispettoso dell’ambiente. ▶ Estrarre il dispositivo dall'imballaggio. ▶ Togliere tutti i materiali dell'imballaggio. 10.2 Condizioni ambientali La temperatura della stanza dovrebbe sempre collocarsi in un intervallo compreso fra i 10°... - Page 99 10 - Installazione 10.6 Uso dei piedini regolabili 10.6 Se il congelatore è instabile, i piedini possono essere regolati: Ruotare i piedini regolabili seguendo la direzio- ne della freccia (Fig. 10.6) per alzarli o abbassarli: ▶ La rotazione dei piedini in senso orario alza il dispo- sitivo.
- Page 100 10 - Installazione 10.9 Reversibilità della porta Prima di collegare il dispositivo alla sorgente di alimentazione, consigliamo di verificare che sia possibile invertire la porta da destra, come viene consegnato il prodotto, a sinistra, qua- lora ciò sia necessario conformemente alla posizione di installazione nonché all'uso del dispositivo.
- Page 101 10 - Installazione 11. Rimuovere la vite e il coperchio dell'asse. Rimuo- vere l'asse della cerniera e fissarlo nel foro accan- to ad esso. 12. Prendere il copri-asse più spesso dalla borsa degli accessori. Fissarlo con la vite dell'ultimo passaggio. 13.
-
Page 102: Dati Tecnici
11 - Dati tecnici 11.1 Scheda del prodotto conformemente alla normativa UE numero 1060/2010 Marchio commerciale Haier H3F- H3F- H3F- Identificatore modello 280*SAAU1 320*SAAU1 320*TAAU1 Categoria del modello Congelatore verticale Classe di efficienza energetica A+++ Consumo energetico annuo (kWh/anno) Volume di conservazione raffreddamento (L) -
Page 103: Servizio Di Assistenza
Qualora non fosse possibile trovare una soluzione, contattare ▶ il proprio rivenditore locale ▶ l’area Assistenza & Supporto su www.haier.com dove è possibile trovare numeri di telefono e Domande Frequenti e da dove è possibile attivare la richiesta di intervento. - Page 105 Manual del usuario Congelador vertical H3F-280*SAAU1 H3F-320*SAAU1 H3F-320*TAAU1 * - Código de color...
- Page 106 Gracias Gracias por comprar un producto Haier. Lea con atención todas las instrucciones antes de utilizar el aparato. Las instrucciones contienen información importante que le ayudará a aprovechar el aparato al máximo y ga- rantizar una instalación, uso y mantenimiento correctos y seguros.
- Page 107 Índice 1 - Seguridad ........................4 2- Uso previsto ........................8 3- Descripción del producto ................... 9 4 - Panel de mandos ......................10 5- Uso ..........................11 6- Sugerencias de ahorro energético .................14 7- Equipo ..........................14 8- Cuidado y limpieza ......................15 9- Solución de problemas ....................17 10- Instalación ........................20 11- Datos técnicos ......................24...
-
Page 108: Seguridad
1 - Seguridad Lea estas instrucciones de seguridad antes de encender el aparato por primera vez. ADVERTENCIA! Antes del primer uso ▶ Asegúrese de que el aparato no presente daños ocasionados du- rante el transporte. ▶ Retire todo el embalaje y mantenga fuera del alcance de los niños. ▶... - Page 109 1 - Seguridad ¡ADVERTENCIA!: Uso diario ▶ Este aparato no está destinado para el uso por personas (inclu- yendo niños menores de 8 años) que tengan capacidades físicas, sensoriales o mentales limitadas o una falta de experiencia y/o conocimientos; sólo lo podrán utilizar en caso de que haya una persona responsable de su seguridad que les vigile o les explique el uso seguro del aparado y hayan comprendido los peligros rela- cionados con el mismo.
- Page 110 1 - Seguridad ¡ADVERTENCIA!: Uso diario ▶ No toque los alimentos congelados con las manos húmedas (use guantes). En especial, no coma paletas heladas apenas los reti- ra del compartimento del congelador. Corre el riesgo de que se quede le pegado o de que se le formen ampollas por congelación. PRIMEROS auxilios: ponga de inmediato la superficie afectada bajo agua corriente.
- Page 111 1 - Seguridad Información sobre el gas refrigerante ¡ADVERTENCIA!: El aparato contiene el gas refrigerante inflamable ISOBUTANO (R600a). Asegúrese de que el circuito de refrigeración no haya su- frido daños durante el transporte o la instalación. Una pérdida de refrigerante puede ocasionar lesiones en la vista o inflamarse. Si ha habido daños, mantenga las fuentes de fuego lejos, ventilar bien la habitación, no enchufe ni desenchufe los cables de corriente del aparato ni de ningún otro aparato.
-
Page 112: 2- Uso Previsto
2- Uso previsto 2.1 Uso previsto «Este aparato está diseñado para un uso en el entorno doméstico y similares como: – Áreas de cocina para el personal en tiendas, oficinas y otros entornos de trabajo; – Casas rurales y también para ser utilizada por los clientes en hoteles, moteles y otros entornos de tipo residencial;... -
Page 113: 3- Descripción Del Producto
3- Descripción del producto Aviso: Diferencias Debido a los cambios técnicos y diferentes modelos, algunas de las ilustraciones de este manual pueden diferir de su modelo. Imagen del aparato (Il. 3) 1 Panel de control 5 Cajones 2 Luz LED 6 Patas ajustables 3 Flujo múltiple de aire 7 Estantes de la puerta extraíbles... -
Page 114: Panel De Mandos
4 - Panel de mandos Panel de control (Il. 4) A Modo frigorífico B Temperatura de congelación - Eco C Temperatura de congelación D Temperatura de congelación E Temperatura de congelación y modo de super congelación F Fresher Zone G Bloqueo infantil... -
Page 115: 5- Uso
5- Uso 5.1 Antes del primer uso ▶ Saque todos los materiales de embalaje, manténgalos fuera del alcance de los niños y deséchelos de forma ecológica. ▶ Limpie la parte interior y exterior del aparato con agua y detergente suave antes de guardar los alimentos. - Page 116 5- Uso Aviso: Bloqueo de pantalla Cuando la pantalla esté bloqueada, se desactivarán funciones como el ajuste de tem- peratura o la super congelación. Cuando se intenta la operación anterior, el indicador de bloqueo infantil parpadeará 3 veces, para recordar que la pantalla está bloqueada. 5.5 Selección de temperatura Cuando se desbloquea la pantalla, al tocar diferentes botones de temperatura, se puede configurar una temperatura diferente, este proceso se acompañará...
- Page 117 5- Uso ra correspondiente o después de 24 horas. Repita la operación para desactivar esta fun- ción manualmente. En el modo Frigorífico, FresherZone funciona como QUICKCOOL (enfriador rápido), toda la zona puede ser enfriada rápidamente a temperatura de congelación. Cuando la temperatura está ajustada a 4°C, presione el botón FresherZone (F), el indica- dor FresherZone (f) se iluminará...
-
Page 118: 6- Sugerencias De Ahorro Energético
6- Sugerencias de ahorro energético Consejos para ahorrar energía ▶ Asegúrese de que el aparato tenga la ventilación adecuada (consulte la sección INS- TALACIÓN). ▶ No instale el aparato en un lugar donde reciba luz solar de forma directa o cerca de una fuente de calor (por ejemplo, estufas, calentadores). -
Page 119: 8- Cuidado Y Limpieza
8- Cuidado y limpieza ¡ADVERTENCIA!: Desconecte el aparato de la fuente de corriente antes de limpiarlo. 8.1 General Limpie el aparato cuando haya pocos o ningún alimento almacenado. ¡ADVERTENCIA!: ▶ No limpie el aparato con cepillos duros, cepillos de alambre, detergente en polvo, ga- solina, acetato de amilo, acetona y otras soluciones orgánicas similares, soluciones ácidas o alcalinas. - Page 120 8- Cuidado y limpieza 8.2 Falta de uso durante un periodo prolongado Si el aparato no se utiliza durante un período de tiempo prolongado: ▶ Retire los alimentos. ▶ Desconecte el cable de corriente. ▶ Limpie el aparato como se describe anteriormente. ▶...
-
Page 121: 9- Solución De Problemas
9- Solución de problemas Puede solucionar muchos problemas usted mismo sin necesidad de conocimientos es- pecíficos. En caso de un problema, por favor, compruebe todas las posibilidades mostra- das y siga las instrucciones a continuación antes de ponerse en contacto con un servicio postventa. - Page 122 9- Solución de problemas Problema Causa posible Solución posible El aparato hace un • El aparato no está ubicado sobre • Nivele el aparato ruido anormal. una superficie nivelada. • La máquina toca un objeto cerca de él. • Retire los objetos ubicados al- •...
- Page 123 9- Solución de problemas Problema Causa posible Solución posible El sistema de re- • El enchufe no está conectado a la • Enchufe el aparato a la corrien- frigeración corriente. te eléctrica. funciona. • La fuente de corriente no está intacta.
-
Page 124: 10- Instalación
10- Instalación 10.1 Desempaque ADVERTENCIA! ▶ El aparato es pesado. Siempre mueva el aparato con al menos dos personas. ▶ Mantenga todos los materiales de embalaje fuera del alcance de los niños y deséche- los de forma ecológica. ▶ Saque el aparato del embalaje. ▶... - Page 125 10- Instalación 10.6 Uso de las patas ajustables 10.6 Puede ajustar las patas en caso de que el congelador sea inestable. Gire los pies ajustables de acuerdo con la dirección de la flecha (Il. 10.6) para subir o bajarlos: ▶ Girando los pies en el sentido de las agujas del reloj aumenta el aparato.
- Page 126 10- Instalación 10.9 Reversibilidad de la puerta Antes de enchufar el aparato a la corriente, compruebe si es necesario cambiar la orienta- ción de la apertura de la puerta de derecha (como se entrega) a izquierda, en función del lugar donde instala el aparato y su uso. ¡ADVERTENCIA!: ▶...
- Page 127 10- Instalación 11. Quite el tornillo y el embellecedor de la bisagra. Retire el eje de bisagra y colóquelo en el orificio anexo. 12. Saque de la bolsa de accesorios el embellecedor de bisagra más grueso. Fijarlo con el tornillo del último paso.
-
Page 128: 11- Datos Técnicos
11- Datos técnicos 11.1 Ficha del producto de acuerdo con la regulación EU No. 1060/2010 Marca Haier H3F- H3F- H3F- Identificador del modelo 280*SAAU1 320*SAAU1 320*TAAU1 Categoría del modelo Congelador vertical Clasificación energética A+++ Consumo anual de energía (kWh/año) Capacidad de almacenamiento del frigorífico... -
Page 129: 12- Atención Al Cliente
12- Atención al cliente Recomendamos recurrir al centro de atención al cliente de Haier y utilizar repuestos ori- ginales. Si tiene un problema con su aparato, consulte primero la sección SOLUCIÓN DE PROBLEMAS. Si no puede encontrar una solución en esta sección, contacte con ▶... - Page 131 Gebruikershandleiding Staande diepvriezer H3F-280*SAAU1 H3F-320*SAAU1 H3F-320*TAAU1 * - Kleurcode...
- Page 132 Dank u Dank u voor uw aankoop van dit Haier product. Lees deze handleiding grondig voor u het apparaat in gebruik neemt. De handleiding bevat belangrijke informatie die u zal helpen uw apparaat optimaal te gebruiken en het veilig en correct te installeren, gebruiken en onderhouden.
- Page 133 Inhoud 1 - Veiligheid ........................4 2 - Beoogd gebruik ......................8 3 - Productbeschrijving ....................9 4 - Bedieningspaneel ......................10 5 - Gebruik .........................11 6 - Energiebesparing tips ....................14 7- Apparatuur ........................14 8- Zorg en reiniging ......................15 9 - Probleemoplossen ....................17 10 - Installatie ........................20 11 - Technische gegevens ....................24 12- Klantendienst ......................25...
-
Page 134: Veiligheid
1 - Veiligheid Voor u het apparaat de eerste maal inschakelt, moet u het veiligheidsadvies le- zen!: WAARSCHUWING! Voor de eerste ingebruikname ▶ Zorg ervoor dat er geen schade is opgetreden tijdens het trans- port. ▶ Verwijder alle verpakking en buiten de buurt van kinderen bewa- ren. - Page 135 1 - Veiligheid WAARSCHUWING! Dagelijks gebruik ▶ Dit apparaat mag worden gebruikt door kinderen van 8 jaar en ou- der en personen met een verminderde fysiek, gevoelsmatig en mentaal vermogen of een gebrek aan ervaring en kennis als ze onder toezicht staan of instructies krijgen met betrekking tot het veilige gebruik van het apparaat en de betrokken risico’s.
- Page 136 1 - Veiligheid WAARSCHUWING! Dagelijks gebruik ▶ Raak geen ingevroren etenswaren aan met natte handen (draag handschoenen). Eet zeker nooit ijslolly's onmiddellijk uit het vries- vak. Het risico bestaat dat u uw tong bevriest of vorstblaren ge- vormd worden. EHBO: onmiddellijk onder stromend water hou- den.
- Page 137 1 - Veiligheid Koelgasinformatie WAARSCHUWING! Het apparaat bevat het ontvlambare koelmiddel ISOBUTHAAN (R600a). Zorg ervoor dat het koelcircuit niet beschadigd is tijdens het transport of de installatie. Lekkend koelmiddel kan letsels ver- oorzaken aan de ogen of ontvlammen. Als er schade optreedt, moet u het uit de buurt van open vlammen houden, de ruimte grondig ventileren, de netsnoeren niet verwijderen uit of invoeren in stopcontact.
-
Page 138: Beoogd Gebruik
2 - Beoogd gebruik 2.1 Beoogd gebruik "Dit apparaat is bedoeld voor huishoudelijk gebruik en gelijkaardige toepassingen zoals - personeelskeuken in winkels, kantoren en andere professionele omgevingen, - boerderijen en door klanten in hotels, motels en andere residentiële omgevingen - bed and breakfast omgevingen; - catering en gelijkaardige niet-kleinhandel toepassingen. -
Page 139: Productbeschrijving
3 - Productbeschrijving Opgelet: Verschillen Omwille van technische wijzigingen en uiteenlopende modellen kunnen de illustraties in deze handleiding verschillen van uw model. Afbeeldingen van apparaten (Afb. 3) 1 Bedieningspaneel 5 Lade 2 Led lamp 6 Instelbare voetjes 3 Meervoudige luchtstroom 7 Verwijderbare deurrekken 4 Glazen platen 8 Portier handvat... -
Page 140: Bedieningspaneel
4 - Bedieningspaneel Bedieningspaneel (Afb. 4) A Koelkastmodus B Vriestemperatuur - Eco C Vriestemperatuur D Vriestemperatuur E Vriestemperatuur en Super-vriesmodus F Fresher Zone G Kinderslot... -
Page 141: Gebruik
5 - Gebruik 5.1 Voor de eerste ingebruikname ▶ Verwijder alle verpakking, houd ze uit de buurt van kinderen en verwijder ze op een milieuvriendelijke wijze. ▶ Reinig de binnen- en buitenzijde van het apparaat met water en een zacht reini- gingsmiddel voor u er etenswaren in plaatst. - Page 142 5 - Gebruik Opgelet: Schermvergrendeling Als het scherm vergrendeld is, zijn de functies zoals de temperatuurinstelling of de super-freeze uitgeschakeld. Wanneer de bovenstaande bewerking wordt uitgevoerd, knippert de kinderslot indicator 3 maal ter herinnering dat het scherm vergrendeld is. 5.5 Temperatuur instelling Als het scherm ontgrendeld is, kunt u een andere temperatuur instellen door andere temperatuurknoppen aan te raken.
- Page 143 5 - Gebruik In de Koelkastmodus werkt de FresherZone als QUICKCOOL, de volledige zone kan snel worden afgekoeld tot de vriestemperatuur. Als de temperatuur ingesteld is op 4°C en u de FresherZone knop (F) aanraakt, licht de FresherZone indicator (f) op en daarna is de FresherZone ingeschakeld. Indien ingescha- keld, zullen de functies automatisch worden uitgeschakeld wanneer de temperatuur wordt bereikt of na 3 uur.
-
Page 144: Energiebesparing Tips
6 - Energiebesparing tips Energiebesparing tips ▶ Zorg ervoor dat het apparaat correct geventileerd is (zie INSTALLATIE). ▶ U mag het apparaat niet installeren in direct zonlicht of in de buurt van warmtebron- nen (bijv. fornuizen, verwarming). ▶ Vermijd onnodig lage temperaturen in het apparaat. Het energieverbruik verhoogt hoe lager de temperatuur van het apparaat wordt ingesteld. -
Page 145: 8- Zorg En Reiniging
8- Zorg en reiniging WAARSCHUWING! Ontkoppel het apparaat van het elektrisch net voor de reiniging. 8.1 Algemeen Reinig het apparaat als er slechts een kleine hoeveelheid of geen etenswaren opgeborgen zijn. WAARSCHUWING! ▶ Reinig het apparaat niet met harde borstels, draadborstels, oplospoeder, petroleum, amylacetaat, aceton en gelijkaardige organische oplossingen, zuur of alkalische op- lossingen. - Page 146 8- Zorg en reiniging 8.2 Niet gebruikt gedurende een lange periode Als het apparaat niet wordt gebruikt gedurende een lange periode: ▶ Verwijder de etenswaren. ▶ Ontkoppel het netsnoer. ▶ Reinig het apparaat zoals hierboven beschreven. ▶ Houd de deur en diepvriesladen open om de onaangename geurtjes te voorkomen. Verwijder de deur van het apparaat (open de deur en houd ze vast terwijl u de schroeven verwijdert) om te voorkomen dat kinderen vastgeklemd raken in het apparaat en ongeluk- ken voorkomen.
-
Page 147: Probleemoplossen
9 - Probleemoplossen Veel van de voorkomende problemen kunt u zelf oplossen zonder specifieke expertise. In het geval van een probleem moet u alle weergegeven mogelijkheden controleren en de onderstaande instructies volgen voor u contact opneemt met de dienst na verkoop. Zie KLANTENDIENST. - Page 148 9 - Probleemoplossen Probleem Mogelijke oorzaak Mogelijke oplossing Het apparaat maakt • Dit is normaal. Dit wordt veroor- • - een klikkend lawaai. zaakt door het in- of uitschakelen van de koeleenheid. U moet een licht • Dit is normaal. •...
- Page 149 9 - Probleemoplossen Probleem Mogelijke oorzaak Mogelijke oplossing deur opent • Zodra het apparaat ingeschakeld • Open de afdichting van de deur moeilijk. is, wordt een intern vacuüm gecre- om lucht in het apparaat te la- eerd. ten. De deur kan niet •...
-
Page 150: Installatie
10 - Installatie 10.1 Uitpakken WAARSCHUWING! ▶ Het apparaat is zwaar. Draag het altijd met twee personen. ▶ Houd alle verpakking buiten het bereik van kinderen en gooi ze weg op een milieuvri- endelijke wijze. ▶ Verwijder het apparaat uit de verpakking. ▶... - Page 151 10 - Installatie 10.6.Instelbare voetjes gebruiken 10.6 Als de diepvriezer onstabiel is, kunnen de voetjes wor- den aangepast: Draai de instelbare voet in de richting van de pijl (Afb. 10.6) om de voet omhoog of omlaag in te stellen: ▶ Als u de voet rechtsom draait, verhoogt u het ap- paraat.
- Page 152 10 - Installatie 10.9 Deur omkeerbaarheid Voor u het apparaat aansluit op het elektrisch net moet u controleren of de zwaairichting van de deur moet gewijzigd worden van rechts (zoals geleverd) naar links als dit vereist is voor de locatie en het gebruik van de installatie. WAARSCHUWING! ▶...
- Page 153 10 - Installatie 11. Verwijder de schroef en de as afdekking. Verwij- der de scharnier as en bevestig hem in de aanpa- lende opening. 12. Verwijder het dikkere as afdekking uit de acces- soire zak. Bevestig ze met een schroef van de laatste stap.
-
Page 154: Technische Gegevens
11 - Technische gegevens 11.1 Productfiche conform regel EU Nr. 1060/2010 Handelsmerk Haier H3F- H3F- H3F- Modelidentificatie 280*SAAU1 320*SAAU1 320*TAAU1 Categorie van het model Staande diepvriezer Energie efficiëntieklasse A+++ Jaarlijks energieverbruik (kWu/jaar) Opslagvolume koelen (L) niet van toepassing Opslagvolume vriezen (L) -
Page 155: 12- Klantendienst
12- Klantendienst We raden onze Haier klantendienst aan en het gebruik van originele reserveonderdelen. Als u een probleem ondervindt met uw apparaat moet u eerst de sectie PROBLEEMOPLOSSEN controleren. Als u daar geen oplossing vindt, kunt u contact opnemen met ▶... - Page 157 Podręcznik Użytkownika Zamrażarka stojąca H3F-280*SAAU1 H3F-320*SAAU1 H3F-320*TAAU1 * - Kod koloru...
- Page 158 Dziękujemy Dziękujemy za zakup produktu Haier. Przed użyciem urządzenia prosimy o dokładne zapoznanie się z instrukcją. Instrukcja za- wiera ważne informacje, które pomogą Ci uzyskać jak najlepszą pracę urządzenia i zapew- nić bezpieczną i prawidłową instalację, użytkowanie i konserwację. Instrukcję należy przechowywać w dogodnym miejscu, aby zawsze można było znaleźć w niej informacje dotyczące bezpiecznego i prawidłowego korzystania z urządzenia.
- Page 159 Zawartość 1 - Bezpieczeństwo ......................4 2 - Przeznaczenie ....................... 8 3 - Opis produktu ....................... 9 4 - Panel kontrolny ......................10 5 - Użytkowanie ........................11 6- Porady dotyczące oszczędzania energii ...............14 7- Wyposażenie........................14 8- Konserwacja i czyszczenie ..................15 9 - Rozwiązywanie problemów ..................17 10 - Instalacja ........................20 11 - Dane techniczne ......................24 12- Obsługa klienta ......................25...
-
Page 160: Bezpieczeństwo
1 - Bezpieczeństwo Przed włączeniem urządzenia po raz pierwszy, przeczytaj poniższe wskazówki dotyczące bezpieczeństwa: OSTRZEŻENIE Przed pierwszym użyciem ▶ Upewnij się, że nie ma uszkodzeń transportowych. ▶ Usuń wszelkie opakowania i trzymaj je poza zasięgiem dzieci. ▶ Odczekaj co najmniej sześć godzin przed zainstalowaniem urzą- dzenia, aby upewnić... - Page 161 1 - Bezpieczeństwo OSTRZEŻENIE! Codzienne używanie ▶ Urządzenie to może być używane przez dzieci w wieku lat 8 lub starsze, osoby z obniżoną sprawnością fizyczną, zmysłową lub umysłową, osoby z brakiem doświadczenia i wiedzy, jeśli są one nadzorowane lub gdy je poinstruowano, jak korzystać z tego urzą- dzenia w bezpieczny sposób i gdy zdają...
- Page 162 1 - Bezpieczeństwo OSTRZEŻENIE! Codzienne używanie ▶ Nie dotykaj zamrożonych rzeczy wilgotnymi rękami (załóż ręka- wiczki). Szczególnie nie jeść lizaków lodowych natychmiast po wyjęciu z zamrażalnika. Istnieje ryzyko przymarznięcia języka lub utworzenia się pęcherzy. Pierwsza pomoc: włóż natychmiast pod bieżącą zimną wodę. Nie odrywaj! ▶...
- Page 163 1 - Bezpieczeństwo Informacje o gazie chłodzącym OSTRZEŻENIE! Urządzenie zawiera łatwopalny czynnik chłodniczy IZOBUTAN (R600a). Upewnij się, że układ chłodniczy nie został uszkodzony podczas transportu lub instalacji. Wyciek czynnika może spowodo- wać uszkodzenie wzroku lub zapalenie. Jeśli wystąpiło uszkodze- nie, trzymaj urządzenie z dala od otwartych źródeł ognia, dokładnie przewietrz pomieszczenie, nie podłączaj lub odłączaj kabli zasilają- cych tego lub innego urządzenia.
-
Page 164: Przeznaczenie
2 - Przeznaczenie 2.1 Przeznaczenie Urządzenie to jest przeznaczone do użytku domowego lub w podobnych miejscach, np.: - w kuchniach personelu sklepu, biur i innych środowisk pracy; - gospodarstwa rolne, przez klientów hoteli, moteli i innych miejsc typu mieszkalnego - pensjonaty; - catering i podobne aplikacje niehandlowe Urządzenie jest przeznaczone do zamrażania żywności. -
Page 165: Opis Produktu
3 - Opis produktu Uwaga: Różnice Z powodu zmian technicznych i różnych modeli, niektóre ilustracje w tej instrukcji mogą się różnić od Twojego modelu. Zdjęcia urządzenia (rys. 3) 1 Panel kontrolny 5 Szuflady 2 Światło LED 6 Regulowane nóżki 3 Wielobiegowy przepływ powietrza 7 Zdejmowane półki na drzwiach 4 Półki szklane 8 Rączka drzwiczek... -
Page 166: Panel Kontrolny
4 - Panel kontrolny Panel kontrolny (Rys. 4) A Tryb lodówki B Temperatura zamrażania - Eko C Temperatura zamrażania D Temperatura zamrażania E Temperatura zamarzania i tryb Super Freeze F Fresher Zone G Blokada klawiszy... -
Page 167: Użytkowanie
5 - Użytkowanie 5.1 Przed pierwszym użyciem ▶ Usuń całe opakowanie, trzymaj je poza dostępem dzieci i usuń je w sposób przyjazny dla środowiska. ▶ Wyczyść wnętrze i obudowę urządzenia wodą z dodatkiem łagodnego detergentu. ▶ Po wypoziomowaniu i oczyszczeniu urządzenia, odczekaj co najmniej 6 godziny przed podłączeniem go do zasilania. - Page 168 5 - Użytkowanie Uwaga: Blokada wyświetlacza Gdy wyświetlacz jest zablokowany, funkcje takie jak ustawienie temperatury lub Super Freeze są wyłączone. Gdy zostanie podjęta próba włączenia jednej z powyższych funkcji, wskaźnik blokady zamiga 3 razy, aby przypomnieć, że wyświetlacz jest zablokowany. 5.5 Ustawianie temperatury Gdy wyświetlacz zostanie odblokowany, poprzez dotknięcie różnych przycisków tem- peratury, można ustawić...
- Page 169 5 - Użytkowanie W trybie Fridge FresherZone działa jako QUICKCOOL, cała strefa może być szybko schłodzona do temperatury zamarzania. Gdy temperatura jest ustawiona na 4°C, dotknij przycisku FresherZone (F), zaświeci się wskaźnik FresherZone (f), po czym aktywowana zostanie funkcja FresherZone. Po włączeniu funkcje zostaną...
-
Page 170: 6- Porady Dotyczące Oszczędzania Energii
6- Porady dotyczące oszczędzania energii Porady dotyczące oszczędzania energii ▶ Upewnij się, że urządzenie jest odpowiednio wentylowane (patrz: INSTALACJA). ▶ Nie instaluj urządzenia w miejscu narażonym na bezpośrednie działanie promieni słonecznych lub w pobliżu źródeł ciepła (np.: pieców, grzejników). ▶ Nie ustawiaj niepotrzebnie niskiej temperatury w urządzeniu. -
Page 171: 8- Konserwacja I Czyszczenie
8- Konserwacja i czyszczenie OSTRZEŻENIE! Przed czyszczeniem odłącz urządzenie od sieci. 8.1 Ogólne Czyść urządzenie, gdy jest w niej niewiele produktów lub żadna żywność nie jest przecho- wywana. OSTRZEŻENIE! ▶ Nie czyść urządzenia za pomocą twardych szczotek, szczotek drucianych, detergen- tów proszkowych, benzyny, octanu amylu, acetonu i podobnych roztworów organicz- nych, kwasu lub roztworów alkalicznych. - Page 172 8- Konserwacja i czyszczenie 8.2 Nieużytkowanie przez dłuższy okres Jeśli urządzenie nie jest używane przez dłuższy czas: ▶ Wyjmij jedzenie. ▶ Odłącz urządzenie od zasilania. ▶ Wyczyść urządzenie, jak to opisano powyżej. ▶ Otwórz drzwi i szuflady zamrażarki, aby zapobiec tworzeniu się wewnątrz nieprzyjem- nych zapachów.
-
Page 173: Rozwiązywanie Problemów
9 - Rozwiązywanie problemów Wiele problemów można rozwiązać samodzielnie, bez specjalistycznej wiedzy. W przy- padku problemów prosimy sprawdzić wszystkie pokazane możliwości i postępować zgod- nie z poniższymi instrukcjami przed skontaktowaniem się z obsługi posprzedażnej. Patrz: OBSŁUGA KLIENTA. OSTRZEŻENIE! ▶ Przed przystąpieniem do konserwacji, wyłącz urządzenie i wyjmij wtyczkę z gniazdka sieciowego. - Page 174 9 - Rozwiązywanie problemów Problem Możliwa przyczyna Możliwe rozwiązanie Urządzenie wydaje • Urządzenie nie znajduje się na wy- • Wypoziomuj urządzenie. dziwne dźwięki. poziomowanym podłożu. • Urządzenie dotyka jakiegoś obiek- • Usuń przedmioty znajdujące się w pobliżu urządzenia. • Urządzenie stoi na drewnianej pod- •...
- Page 175 9 - Rozwiązywanie problemów Problem Możliwa przyczyna Możliwe rozwiązanie System chłodzenia • Wtyczka nie jest włożona do • Podłącz wtyczkę sieciową. działa. gniazdka. • Wystąpił problem z zasilaniem. • Sprawdź zasilanie elektryczne w pomieszczeniu. Skontaktuj się z lokalnym dostawcą energii elek- trycznej! Boki obudowy i li- •...
-
Page 176: Instalacja
10 - Instalacja 10.1 Rozpakowanie OSTRZEŻENIE ▶ Urządzenie jest ciężkie. Zawsze przenoś urządzenie z pomocą co najmniej dwóch osób. ▶ Trzymaj wszystkie materiały opakowania poza zasięgiem dzieci i wyrzucić je w sposób przyjazny dla środowiska. ▶ Wyjmij urządzenie z opakowania. ▶... - Page 177 10 - Instalacja 10.6 Użycie regulowanych stopek 10.6 Jeśli zamrażarka jest niestabilna, stopki można regulo- wać: Obróć stopkę zgodnie z kierunkiem strzałki (rys. 10.6), aby ją podnieść lub obniżyć: ▶ Przekręcenie stopki w prawo podnosi urządzenie. ▶ Przekręcenie stopki w lewo obniża urządzenie. 10.7 10.7 Czas oczekiwania W kapsułce sprężarki znajduje się...
- Page 178 10 - Instalacja 10.9 Odwracalność drzwi Przed podłączeniem urządzenia do zasilania należy sprawdzić, czy nie trzeba zmienić kie- runku otwierania drzwi z prawego (ustawienie przy odbiorze) na lewy, jeśli jest to konieczne ze względu na miejsce instalacji i użytkowania. OSTRZEŻENIE! ▶...
- Page 179 10 - Instalacja 11. Usuń śrubę i osłonę sworznia. Wyjmij zawias i za- mocuj go w otworze obok. 12. Wyjmij grubszą osłonę sworznia z woreczka z akcesoriami. Przymocuj za pomocą śruby z ostatniego kroku. 13. Przymocuj zawias po przeciwległej stronie za pomocą...
-
Page 180: Dane Techniczne
11 - Dane techniczne arta produktu, zgodnie z 11.1 K Zarządzeniem UE Nr 1060/2010 Znak towarowy Haier H3F- H3F- H3F- Identyfikator modelu 280*SAAU1 320*SAAU1 320*TAAU1 Kategoria modelu Zamrażarka stojąca Klasa efektywności energetycznej A+++ Roczne zużycie energii (kWh/rok) Objętość komory chłodzenia (l) Nie dotyczy Objętość... -
Page 181: 12- Obsługa Klienta
12- Obsługa klienta Polecamy nasz system Obsługi Klienta Haier i stosowanie oryginalnych części zamien- nych. Jeśli masz problem z urządzeniem, najpierw sprawdź sekcję ROZWIĄZYWANIE PROBLEMÓW. Jeżeli nie możesz znaleźć rozwiązania, prosimy o kontakt ▶ z twoim lokalnym sprzedawcą lub ▶ miejscowym Serwisem na www.haier.com, gdzie można znaleźć numery telefonów i FAQ i gdzie można aktywować... - Page 183 Návod k použití Vertikální mraznička H3F-280*SAAU1 H3F-320*SAAU1 H3F-320*TAAU1 * - Barevní kód...
- Page 184 Děkujeme Děkujeme Vám, že jste si zakoupili spotřebič Haier. Před použitím spotřebiče si prosím pečlivě pročtěte tento návod. V návodu najdete dů- ležité informace, díky nimž budete svůj spotřebič využívat naplno, zajistíte bezpečnou a správnou instalaci, použití a údržbu. Uchovávejte tento návod na vhodném místě, abyste ho měli vždy po ruce a mohli tak spo- třebič...
- Page 185 Obsah 1 - Bezpečnost ........................4 2 - Běžný účel použití ......................8 3 - Popis spotřebiče ......................9 4 - Ovládací panel ......................10 5 - Použití ...........................11 6 - Tipy na ušetření energie ...................14 7 - Zařízení .........................14 8 - Péče a čištění ......................15 9 - Řešení...
-
Page 186: Bezpečnost
1 - Bezpečnost Před zapnutím spotřebiče si nejprve přečtěte následující bezpečnostní rady: UPOZORNĚNÍ! Před prvním použitím ▶ Zkontrolujte, že nedošlo k poškození spotřebiče během přepravy. ▶ Odstraňte všechny obaly a držte mimo dosah dětí. ▶ Před instalací spotřebiče vyčkejte alespoň šest hodin, aby byla za- jištěna plná... - Page 187 1 - Bezpečnost UPOZORNĚNÍ! Každodenní používání ▶ Spotřebič mohou používat děti od 8 let a osoby se sníženými fy- zickými, smyslovými nebo mentálními schopnostmi, nebo osoby s nedostatečnými zkušenostmi a znalostmi, pokud mají nad se- bou dohled nebo pokud byly vyškoleny ohledně bezpečného po- užívání...
- Page 188 1 - Bezpečnost UPOZORNĚNÍ! Každodenní používání ▶ Nedotýkejte se zmrazených potravin mokrýma rukama (noste rukavice). Zejména se vyvarujte jedení nanuků ihned po vyjmutí z mrazničky. Je zde nebezpečí omrzlin nebo tvorby puchýřů z mra- zu. První pomoc: okamžitě dejte pod tekoucí studenou vodu. V žádném případě...
- Page 189 1 - Bezpečnost Informace o chladicím plynu UPOZORNĚNÍ! Spotřebič obsahuje hořlavé chladivo ISOBUTAN (R600a). Zkontro- lujte, že během přepravy a instalace nedošlo k poškození chladicího okruhu. Prosakující chladivo může způsobit poranění očí nebo se vznítit. Pokud se objeví závada, držte všechny zdroje otevřeného ohně...
-
Page 190: Běžný Účel Použití
2 - Běžný účel použití 2.1 Běžný účel použití Toto zařízení je určeno pro použití v domácnosti a v podobných podmínkách, jako jsou na- příklad – kuchyně pro zaměstnance v obchodech, kancelářích a jiných pracovních prostředích; – farmářské domy a klienty v hotelech, motelech a jiných typech ubytovacích zařízení.; –... -
Page 191: Popis Spotřebiče
3 - Popis spotřebiče Poznámka: Rozdíly Některé ilustrace v tomto manuálu se mohou v důsledku technických změn a rozdílnosti modelů lišit od Vašeho spotřebiče. Obrázky spotřebiče (Obr.. 3) 1 Ovládací panel 5 Zásuvky 2 LED světlo 6 Nastavitelné nožičky 3 Více-proudové chlazení 7 Snímatelné... -
Page 192: Ovládací Panel
4 - Ovládací panel Ovládací panel (obr. č. 4) A Režim chladničky B Teplota mražení- Eco C Teplota mražení D Teplota mražení E Teplota mražení a režim Super mražení F Fresher zone G Dětský zámek... -
Page 193: Použití
5 - Použití 5.1 Před prvním použitím ▶ Odstraňte všechny obalové materiály, udržujte je mimo dosah dětí a zlikvidujte je v souladu s ochranou životního prostředí. ▶ Než vložíte do spotřebiče potraviny, očistěte ho uvnitř i zvenku vodou a jemným čisti- cím prostředkem. - Page 194 5 - Použití Poznámka: Uzamčení displeje Pokud je displej zablokován, funkce jako je nastavení teploty nebo Super mražení jsou vypnuty. Pokud se pokoušíte o provedení výše uvedené operace, indikátor dětské po- jistky třikrát blikne, aby připomněl, že displej je uzamčen. 5.5 Nastavení...
- Page 195 5 - Použití V režimu mrazák působí FresherZone jako RYCHLÉ OCHLAZENÍ, celá oblast může být rychle ochlazena na teplotu tuhnutí. Pokud je teplota nastavena na 4 °C nebo nižší, stiskněte tlačítko FresherZone (F), rozsvítí se kontrolka FresherZone (f) a funkce FresherZone se aktivuje. Při aktivaci se funkce au- tomaticky deaktivují, pokud je dosaženo dané...
-
Page 196: Tipy Na Ušetření Energie
6 - Tipy na ušetření energie Tipy na ušetření energie ▶ Zkontrolujte, zda spotřebič správně větrá (viz INSTALACE). ▶ Neinstalujte spotřebič na přímé sluneční světlo nebo do blízkosti tepelných zdrojů (např. sporák, radiátory). ▶ Nenastavujte na spotřebiči zbytečně nízké teploty. Čím nižší teplota je na spotřebiči nastavená, tím vyšší... -
Page 197: Péče A Čištění
8 - Péče a čištění UPOZORNĚNÍ! Než začnete s čištěním spotřebiče, odpojte ho od elektrické sítě. 8.1 Obecně Spotřebič čistěte, pouze když je prázdný nebo když je v něm jen malé množství uskladně- ných potravin. UPOZORNĚNÍ! ▶ Spotřebič nečistěte tvrdými kartáči, drátěnými kartáči, čisticími prášky, benzínem, amyloacetáty, acetony a podobnými organickými prostředky, kyselinami nebo alka- lickými čistidly. - Page 198 8 - Péče a čištění 8.2 Nepoužívání spotřebiče po delší dobu V případě, že přístroj není používán po delší časové období: ▶ Vyjměte potraviny. ▶ Odpojte síťový kabel. ▶ Očistěte spotřebič podle výše uvedeného návodu. ▶ Dveře a zásuvky mrazničky nechte otevřené, abyste zabránili vzniku nežádoucích pa- chů...
-
Page 199: Řešení Problémů
9 - Řešení problémů Hodně vzniklých problémů můžete vyřešit sami bez zvláštní kvalifikace. Vyskytne-li se ně- jaký problém, dříve než se obrátíte na prodejce, zkontrolujte všechny uvedené možnosti a postupujte podle níže uvedených pokynů. Viz ZÁKAZNICKÝ SERVIS. UPOZORNĚNÍ! ▶ Před prováděním údržby spotřebič vypněte a odpojte ho od elektrické sítě. ▶... - Page 200 9 - Řešení problémů Problém Možná příčina Možné řešení Zařízení vydává • To je normální. Způsobuje to za- • - zvuk kliknutí pnutí nebo vypnutí chladící jednot- Měl by být slyšet • To je normální. • - tenký zvuk podobný zvuku tekoucí...
- Page 201 9 - Řešení problémů Problém Možná příčina Možné řešení Boky skříně a pásy • To je normální. • - dveří se mohou za- hřát. Slyšet signál alarmu. • Dveře jsou otevřeny. • Zavřete dveře nebo alarm vy- • Teplota uvnitř výrobku je příliš vy- pněte ručně.
-
Page 202: Instalace
10 - Instalace 10.1 Vybalení UPOZORNĚNÍ! ▶ Spotřebič je těžký. Se spotřebičem manipulujte vždy nejméně ve dvou. ▶ Všechny obalové materiály udržujte mimo dosah dětí a zlikvidujte je způsobem, který je šetrný k životnímu prostředí. ▶ Vyjměte spotřebič z obalu. ▶... - Page 203 10 - Instalace 10.6. Použití nastavovacích nožiček 10.6 Pokud je mraznička nestabilní, je možné nastavit její nohy: Otočte nastavitelné nožičky ve směru šipky (ob- rázek 10.6), abyste je otočili nahoru nebo dolů: ▶ Otočení nožiček ve směru hodinových ručiček spotřebič zvedne. ▶...
- Page 204 10 - Instalace 10,9 Obrácení dveří Než připojíte spotřebič do elektrické sítě, měli byste zkontrolovat, zda není potřeba pře- místit otevírání dveří z pravé strany (při dodání) na levou v závislosti na místě instalace spo- třebiče. UPOZORNĚNÍ! ▶ Spotřebič je těžký. Na obrácení dveří jsou potřeba 2 osoby. ▶...
- Page 205 10 - Instalace 11. Odstraňte šroub a kryt rohu. Odstraňte závěsný roh a připevněte ho do otvoru vedle něj. 12. Vezměte silnější kryt rohu z kapsy na příslušen- ství. Připevněte ho šroubem z posledního kroku. 13. Připevněte závěs na opačnou polohu skříně pomocí...
-
Page 206: Technické Údaje
11 - Technické údaje 11.1 List výrobku podle nařízení EU č. 1060/2010 Obchodní značka Haier H3F- H3F- H3F- Identifikační značka modelu 280*SAAU1 320*SAAU1 320*TAAU1 Kategorie modelu Vertikální mraznička Třída energetické účinnosti A+++ Roční spotřeba energie (kWh/rok) Objem chladicího prostoru (L) nepoužitelné... -
Page 207: Zákaznický Servis
Pokud tam nenajdete řešení, kontaktujte prosím ▶ místního prodejce nebo ▶ oddíl Service & Support na stránkách www.haier.com, kde můžete najít telefonní čísla a můžete aktivovat váš servisní požadavek. Ještě, než budete kontaktovat naše Servisní centrum, zkontrolujte, zda máte níže uvede- né... - Page 209 Manual do Utilizador Congelador vertical H3F-280*SAAU1 H3F-320*SAAU1 H3F-320*TAAU1 * - Código de cor...
- Page 210 Obrigado Obrigado por comprar um produto Haier. Deve ler estas instruções cuidadosamente antes de usar o aparelho. As instruções con- tém informação importante que o ajudará a obter o melhor do aparelho e assegurar a ins- talação segura, utilização e manutenção adequada.
- Page 211 Conteúdo 1 - Segurança ........................4 2- Utilização prevista......................8 3- Descrição do produto ....................9 4- Painel de controlo .......................10 5- Uso ..........................11 6- Dicas para poupar energia ..................14 7 - Equipamento .......................14 8 - Cuidado e Limpeza ....................16 9 - Resolução de problemas ..................17 10 - Instalação ........................20 11- Dados técnicos ......................24...
-
Page 212: Segurança
1 - Segurança Antes de ligar o aparelho pela primeira vez ler as seguintes dicas de segurança!: ADVERTÊNCIA! Antes da primeira utilização ▶ Assegurar que não há danos de transporte. ▶ Remover toda a embalagem e mantê-la foras do alcance das crianças. - Page 213 1 - Segurança ADVERTÊNCIA! Uso diário ▶ Este equipamento pode ser usado por crianças a partir de 8 anos e mais e por pessoas com capacidades físicas, sensoriais ou mentais reduzidas ou com falta de experiência e conhecimento se lhes tiver sido dada a supervisão ou instrução relativamente ao uso do equipamento de uma forma segura e entender os riscos envolvidos.
- Page 214 1 - Segurança ADVERTÊNCIA! Uso diário ▶ Não tocar em alimentos congelado com as mãos molhadas (usar luvas). Especialmente não comer sorvetes imediatamente de- pois de os retirar do compartimento congelador. Há o risco de congelar ou a formação de bolhas por gelo. PRIMEIROS socorros: pôr imediatamente sob água corrente fria.
- Page 215 1 - Segurança Informação do gás refrigerante ADVERTÊNCIA! O aparelho contém o refrigerante inflamável ISOBUTANO (R600a). Assegurar que o circuito refrigerante não foi danificado durante o transporte ou instalação. Libertação de refrigerante pode causar danos nos olhos ou detonação. Se ocorreu um dano, manter afas- tado de fontes de fogo abertas, ventilar bem a divisão, não ligar ou desligar os cabos de alimentação do aparelho ou de qualquer outro aparelho.
-
Page 216: 2- Utilização Prevista
2 - Utilização prevista 2.1 Utilização prevista Este aparelho é destinado a ser usado em aplicações domésticas e similares tais como - zonas de cozinha em estabelecimentos comerciais, escritórios ou outros ambientes laborais; - casas rurais e pelos clientes em hotéis, motéis e outros ambientes de tipo residencial; - ambientes de tipo alojamento com pequeno-almoço;... -
Page 217: 3- Descrição Do Produto
3 - Descrição do produto Observação: Diferenças Devido a alterações técnicas e modelos diferentes, as ilustrações neste manual podem diferir do seu modelo. Imagem do aparelho (Fig. 3) 1 Painel de controlo 5 Gavetas 2 Luz LED 6 Pés ajustáveis 3 Fluxo de ar múltiplo 7 Prateleiras da porta amovíveis 4 Prateleiras de vidro... -
Page 218: 4- Painel De Controlo
4 - Painel de controlo Painel de controlo (Fig. 4) A Modo frigorífico B Temperatura do congelador - Ecológica C Temperatura do congelador D Temperatura do congelador E Temperatura do congelador e Modo congelação intensa F Fresher Zone G Bloqueio crianças... - Page 219 5 - Uso 5.1 Antes da primeira utilização ▶ Remover todos os materiais de embalagem, mantê-los foras do alcance das crian- ças e eliminá-los de forma ecológica. ▶ Limpar o interior e exterior do aparelho com água e um detergente suave antes de lá...
- Page 220 5 - Uso Observação: Bloqueio do visor Quando o visor estiver bloqueado, funções tais como definição de temperatura ou con- gelação intensa estão desativadas. Quando a operação acima for tentada, o indicador de Bloqueio crianças piscará durante 3 vezes, para lembrar que o visor está bloqueado. 5.5 Definição da temperatura Quando o visor estiver desbloqueado, ao tocar em botões de temperatura diferentes, podem ser definidas temperaturas diferentes, este processo será...
- Page 221 5 - Uso No modo de Frigorífico, a Zona de Frescos funciona como REFRIGERAÇÃO RÁPIDA, todo o compartimento pode ser arrefecido de forma rápida até à temperatura de congelação. Quando a temperatura é definida em 4oC ou inferior, tocar o botão (F) da Zona de Fres- cos, o indicador (f) da mesma acende, seguidamente é...
-
Page 222: 6- Dicas Para Poupar Energia
6 - Dicas para poupar energia Dicas para poupar energia ▶ Assegurar que o aparelho está devidamente ventilado (consultar INSTALAÇÃO). ▶ Não instalar o aparelho à luz solar direta ou perto de superfícies quentes (p.ex. fo- gões, aquecedores). ▶ Evitar temperatura baixa desnecessariamente no aparelho. O consumo de energia aumenta se é... -
Page 223: Cuidado E Limpeza
8 - Cuidado e Limpeza ADVERTÊNCIA! Desligar o aparelho da fonte de alimentação antes de proceder à limpeza. 8.1 Generalidades Limpar o aparelho apenas quando pouco ou nenhum alimento esteja guardado. ADVERTÊNCIA! ▶ Não limpar o aparelho com escovas duras, escovas de aço, detergente em pó, gaso- lina, acetato de amilo, acetona e soluções orgânicas semelhantes, ácido ou soluções alcalinas. - Page 224 8 - Cuidado e Limpeza 8.2 Não utilização por período mais longo Se o aparelho não for utilizado durante um período de tempo prolongado: ▶ Retirar os alimentos. ▶ Desligar o cabo de alimentação. ▶ Limpar o aparelho como descrito acima. ▶...
-
Page 225: Resolução De Problemas
9 - Resolução de problemas Muitos problemas ocorridos podem ser resolvidos por si sem conhecimento específico. No caso de um problema verificar todas as possibilidades mostradas e seguir as instru- ções abaixo antes de contatar um serviço pós-venda. Consultar SERVIÇO AO CLIENTE. ADVERTÊNCIA! ▶... - Page 226 9 - Resolução de problemas Problema Causa Possível Solução Possível O aparelho faz sons • O aparelho não está colocado num • Nivelar o aparelho. anormais. piso nivelado. • O aparelho está a tocar em algum • Remover objetos à volta do objeto próximo dele.
- Page 227 9 - Resolução de problemas Problema Causa Possível Solução Possível O sistema de ar- • A ficha de alimentação não está li- • Ligar a ficha de alimentação. refecimento não gada à tomada elétrica. funciona. • A fonte de alimentação não está •...
-
Page 228: Instalação
10 - Instalação 10.1 Desembalar ADVERTÊNCIA! ▶ O aparelho é pesado. Manusear sempre com pelo menos duas pessoas. ▶ Manter todos os materiais de embalagem fora do alcance das crianças e eliminá-los de forma ecológica. ▶ Retirar o aparelho da embalagem. ▶... - Page 229 10 - Instalação 10.6 Usar o pé ajustável 10.6 Se o congelador estiver instável, o pé pode ser ajus- tado: Rodar o pé ajustável de acordo com a direção da seta (Fig. 10.6) para subir ou descer o pé: ▶ Rodar o pé...
- Page 230 10 - Instalação 10.9 Reversibilidade da porta Antes de ligar o aparelho à fonte de alimentação deve verificar, se a rotação da porta deve ser alterada da direita (como entregue) para a esquerda, se isto é necessário pela localiza- ção da instalação e a funcionalidade. ADVERTÊNCIA! ▶...
- Page 231 10 - Instalação 11. Retirar parafuso e tampa do eixo. Retirar o eixo da dobradiça e fixá-lo no orifício ao lado dele. 12. Tirar a tampa do eixo mais grosso do saco dos acessórios. Fixá-lo com o parafuso do último passo.
-
Page 232: 11- Dados Técnicos
11 - Dados técnicos 11.1 Ficha de produto em conformidade com o regulamento UE No. 1060/2010 Marca Registada Haier H3F- H3F- H3F- Identificador do modelo 280*SAAU1 320*SAAU1 320*TAAU1 Categoria do modelo Congelador vertical Classe de eficiência energética A+++ Consumo de energia anual (kWh/ano) Volume de armazenagem frigorífico (L) -
Page 233: 12- Serviço Ao Cliente
12 - Serviço ao cliente Recomendamos o nosso Serviço ao Cliente Haier e a utilização de peças de substituição originais. Se tiver um problema com o seu aparelho, deve verificar primeiro a secção RESOLUÇÃO DE PROBLEMAS. Se não conseguir encontrar uma solução lá, deve contatar ▶...