
Related Manuals for Acer DC 300


Summary of Contents for Acer DC 300
-
Page 1: Table Of Contents
Acer Digital Camera 300 Electronic User’s Manual Introduction to Acer Digital Camera 300 1 Touring Your Camera 2 Preparing the Camera for Using 4 Installing batteries and neck strap 4 Installing digital camera software 5 Using Your Camera 6 The digital camera mode 6 The PC camera mode 18 The video camera mode 25 Using the cradle 30... -
Page 2: Taking Care Of Your Camera
Copyright Copyright (c) 2001 by Acer Communictions & Multimedia Inc. (Acer CM). All rights reserved. No part of this publication may be repro- duced, transmitted, transcribed, stored in a retrieval system or translated into any language or computer language, in any form or by any means, electronic, mechanical, magnetic, optical, chemical, manual or otherwise, without prior written permission from Acer CM. -
Page 3: Introduction To Acer Digital Camera 300
Introduction to Acer Digital Camera 300 Acer Digital Camera 300 is equipped with the following features: • Small size for easy carriage and convenience of use • High resolution: 640 x 480 pixels in digital camera mode; selectable 640 x 480, 352 x 288, 320 x 240 or 176 x 144 pixels in PC camera mode •... -
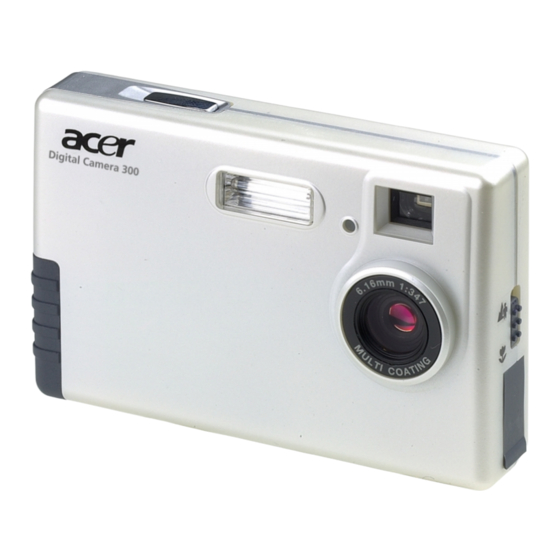
Page 4: Touring Your Camera
Touring Your Camera Front Shutter Flash light Self-timer activation indicator Rear MACRO indicator BUSY indicator POWER button SELECT button Touring Your Camera Viewfinder Lens Macro switch USB connector Status display MODE button Neck strap holder Battery compartment cover... -
Page 5: The Status Display
The status display Image counter elete all images in memory Delete the last image Enter self-timer mode Battery status Touring Your Camera Enter auto flash mode Turn off flash... -
Page 6: Preparing The Camera For Using
Preparing the Camera for Using Preparing the Camera for Using Installing batteries and neck strap Open the battery compartment cover and insert two AAA alkaline batteries into the compartment. Note the polarity of the batteries when you install. Refer to the illustration below to install the neck strap. Now you are ready to use your camera! -
Page 7: Installing Digital Camera Software
Installing digital camera software Insert the digital camera software CD-ROM into your CD-ROM drive. The following software installation menu will appear on computer screen automatically. Click this item to install digital camera software Click this item to install Presto! Mr.Photo Gold Click this item to install Presto! Image Folio Click this item to install Presto! VideoWorks Click this item to open Electronic user guide... -
Page 8: Using Your Camera
Using Your Camera Acer Digital Camera 300 provides 3 different operation modes: Digital camera mode, PC camera mode, and video camera mode. With these modes, you can not only use Digital Camera 300 to take photos, but capture and show images in various ways. The digital camera mode In digital camera mode, you can take photos, view and download them from your cam- era and save them as files. - Page 9 : Indicates the battery status. If the battery power becomes low, the battery icon will become empty. Look through the viewfinder to determine the object to be taken. Make the object appear in the center of the viewfinder. Make the object appear in the center of the viewfinder.
- Page 10 Using Your Camera Managing photos in camera Deleting the last photo taken Press the MODE button 4 times. The icon flashes on the status display. Press and hold the shutter for 1 second. The last photo taken will be deleted. Deleting all photos Press the MODE button 5 times.
- Page 11 Power on your computer. Click the Start button on Windows Taskbar, and choose Pro- grams > Acer DC 300 > DC300 Digital Camera. Or, right-click on the icon Windows Taskbar and select “Digital Camera” in the submenu that appears.
- Page 12 Using Your Camera The image preview window will appear on your computer screen and start creating thumbnails of the photos in the camera. If there are more than 20 photos in the camera, the image thumbnails will appear on different pages. Click on the tab on top of each page to switch among the pages. Choose the thumbnail of the photo you want to download.
- Page 13 Using Your Camera Deleting photos in camera in the image preview window Select the photo(s) you want to delete in the image preview window. Click on the Delete button. The photo(s) will be deleted from your camera.
- Page 14 Using the image browser Click on the Browser button in the image preview window. The Image Browser win- dow shown below will appear. You can use it to browse the photos in your camera. In the Image Browser window, you can: Click the button to go to the previous photo.
- Page 15 Using Your Camera Options Using the flash light Your camera is equipped with a flash light. It is recommended that you use the flash within the best working range as illustrated below. Turning on/off the flash light Press the MODE button. The icon appears and flashes on the status display.
- Page 16 Press the SELECT button to select from the following. The one selected will flash. Auto flash light Now you are ready to take pictures. Note: If the macro function is turned on, the flash light will be disabled. It takes about 11 seconds for the flash light to recharge for the next shot. During charging, the FLASH indicator blinks.
- Page 17 Using the macro function If you need to shoot objects at a very close distance (from 8 inches to 2 feet), turn on the macro function before shooting. To turn on, slide the Macro switch to the “macro on” tor will be on. Slide the switch to the position marked Note: If the macro function is turned on, the flash light will be disabled.
- Page 18 View picture counter The picture counter provides 2 display modes. You can view picture counter by the number of pictures taken or by the number of photos allowed in the remaining mem- ory space. View picture counter by the number of pictures taken Normally, the picture counter shows the number of pictures taken (or the number of pictures in camera memory).
- Page 19 Enabling self-timer The self-timer function allows you to let the camera take pictures 10 seconds after the shutter is pressed. To enable self-timer: Press the MODE button 3 times. The self-timer icon Press the shutter and the camera will start generating beep sound.
-
Page 20: The Pc Camera Mode
Using Your Camera The PC camera mode In PC camera mode, you can use Digital Camera 300 as a motion image capturing device for your PC. You can use it for video conferencing, capturing snapshots and so Using Digital Camera 300 as a PC camera Refer to the illustration below to connect the camera to PC using the USB cable. - Page 21 Using Your Camera The PC Camera window will appear showing the video. Taking snapshots In the PC Camera window, click the Snapshot button. The image will be captured and a Snapshot Browser window will appear showing the captured image. If you want to capture multiple images, click the Snapshot button several times. Click the button to save current snapshot in the Snapshot Browser window, or the button...
- Page 22 Using Your Camera Rotating video In the PC Camera window, click the Rotate button. The video will be rotated 90 degrees counter-clockwise. This is convenient for you to place the camera in different angles and maintain the correct orientation of video.
- Page 23 Video settings Video format Click the Video Format button in the PC Camera window. The following Video For- mat window will appear. Items Resolution Click in the drop-down listbox to select different resolution for viewing in the PC Camera window. Pixel depth and compression Selects the pixel depth and compression of the image in the PC Camera window.
- Page 24 Using Your Camera Video source Click the Video Source button in the PC Camera window. The following Video Source window will appear. Options in the Capture Source tab This tab allows you to select a video input source. If you have multiple devices installed in your system, device names will appear in the drop-down listbox and you can click to choose one of them to use with the digital camera driver.
- Page 25 Using Your Camera Options on the Device Settings tab On this tab, you can adjust the saturation, brightness, contrast and sharpness..., etc. of the image in PC mode. Drag the slider of each item to adjust. Click Default button to reset the settings to default values.
- Page 26 Using Your Camera Options in the Camera Controls tab On this tab, you are able to access other advanced video settings of your digital cam- era. Drag the slider of each item to adjust.
-
Page 27: The Video Camera Mode
Using Your Camera The video camera mode The video camera mode allows you to capture motion video and save it as a video file. Note: Make sure the Presto! VideoWorks software is installed. If not, please install it first. Using Digital Camera 300 as a video camera Refer to the illustration below to connect the camera to PC using the USB cable. - Page 28 Using Your Camera Click Capture and select Select image source in the submenu that appears. The Select Source dialogue box will appear. Click to highlight Acer DC300 Video Camera and click Select.
- Page 29 Using Your Camera Click Capture Video. The video capturing window will appear on the center of the screen. Click the icon to continue.
- Page 30 Using Your Camera The following dialogue box will appear. Click in the Frame rate box to specify the number of frame rate. The larger the num- ber of frame rate is set, the smoother the video is captured and played back. However, the file size also becomes larger if you set higher frame rate.
- Page 31 Using Your Camera When capturing is in progress, the status will appear on the bottom of the screen. The Capture window will appear after video capturing is done. You can click the but- to playback the video clip. Now you are ready to use VideoWorks to work on the video clip (such as adding special effects to the clip..., etc.) and share it with your friends and family.
-
Page 32: Using The Cradle
Using the cradle Using the cradle The cradle that comes with your digital camera allows you to fix the camera on various surfaces for different applications. Installing the cradle Insert the screw on the cradle into cradle the installation hole on the bottom of the camera. - Page 33 Placing the camera on top of computer monitor Placing the camera on a notebook computer Using the cradle Pull the metal ring outward. Clip the cradle on the LCD screen of notebook computer.
- Page 34 Using the cradle...
-
Page 35: Troubleshooting Tips
Troubleshooting Tips Troubleshooting Tips The LCD panel remains blank when I press the POWER button and can't take pictures. Check that the battery is correctly inserted. If it is old, replace it. The camera can not take a picture. When the FLASH indicator is on, it takes up about 15 seconds to charge the flash light for the next shot. - Page 36 Troubleshooting Tips In Windows 2000, when I unplug the camera from my computer while run- ning Acer Dgitial Camera 300 driver, the computer freezes. Unplugging the camera from your computer while running the Digital Camera 300 driver will cause the computer to become unstable. Do not unplug the camera from your computer when the camera or driver is in use.
-
Page 37: Service Information
Service Information Service Information Technical support If you encountered problems using Digital Camera 300 and the camera driver program, please send an E-mail (containing detailed descriptions of the problem you came upon, the hardware and software environment of your system) to the following addresses: USA: support-sc@apa.acer.com Europe: service@acerperipherals.nl Taiwan: service-tw@acercm.com.tw...