Table of Contents
Advertisement
Advertisement
Table of Contents

Related Manuals for Acer Holo360


Summary of Contents for Acer Holo360
- Page 1 User’s Manual...
- Page 2 This revision: September 2017 Sign up for an Acer ID and enjoy great benefits There are three great reasons for you to get an Acer ID: • Create your own connected world. • Get the latest offers and product information.
-
Page 3: Table Of Contents
Table of contents - 3 A B L E O F C O N T E N T S Setting up Direct dial widget ........31 The voice call screen ......31 Unpacking your camera......4 Answering or declining a call ....31 Getting to know your camera.... -
Page 4: Setting Up
Your new camera comes packed in a protective box. Carefully unpack the box and remove the contents. If any of the following items is missing or damaged, contact your dealer immediately: • Your new Acer smart camera • USB cable • AC adapter •... -
Page 5: Getting To Know Your Camera
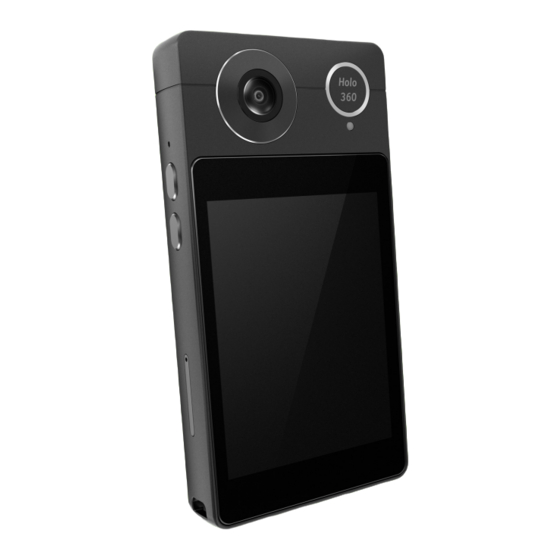
Setting up - 5 Getting to know your camera Views 9 10 1. Pressure opening Equalizes pressure inside and outside the camera. 2. Microphone For capturing audio. 3. Volume up/down buttons Increase or decrease the audio volume. Camera app: Adjusts EV. 4. -
Page 6: Charging The Battery
6 - Setting up 8. Touchscreen For viewing content from your camera or entering data. 9. 3.5 mm headphone jack Connects to stereo headphones. 10.Micro USB port For connecting to a PC or a charger. 11.Power button Suspends or wakes the camera (long press to turn the camera on or off). 12.Camera button Opens the Camera app (long press to open the Camera app from suspend). -
Page 7: Setting Up For The First Time
Setting up - 7 Setting up for the first time Inserting a microSD card (and optional SIM card) 1. Turn off the camera by pressing and holding the power button. 2. Using the supplied tool, remove the card tray by pressing the tip of the tool into the release hole on the tray. -
Page 8: Using Your Smart Camera
Using the Camera on page Turning on for the first time To turn on your camera, press and hold the power button until you see the Acer logo. Wait a moment for your camera to start. You will then be asked some questions before you can use your camera. -
Page 9: Choose Your Mode
Using your smart camera - 9 If you have multiple Google accounts, such as separate accounts for personal and business contacts, you can access and synchronize them from the Accounts settings section. See Synchronization on page Choose your Mode As you finish the set up process, you may choose to use either Camera or Default mode. -
Page 10: The Lock Screen
10 - Using your smart camera Scroll: To scroll up or down the screen, simply drag your finger up or down the screen in the direction that you want to scroll. The Lock screen If you will not use your camera for a while, briefly press the power button to lock access. -
Page 11: Camera Mode
Using your smart camera - 11 Camera mode Camera mode provides quick access to camera features. Each screen shows four options; swipe the screen left to see the next screen. Tap an icon to open use your camera. For more information about the camera app see Using the Camera on page First screen:... -
Page 12: Default Mode - Android Os
12 - Using your smart camera Settings Tap the Settings icon to change the wallpaper, or to switch the Startup screen. Select HoloLauncher for Camera mode or Launcher3 for Default mode. Status and notifications Swipe down from the top of the screen to display Quick Settings shortcuts, and notification details. -
Page 13: Using The Camera
Using the Camera - 13 S I N G T H E A M E R A Your smart camera features two 187° cameras mounted on the front and on the rear, which can combine to create a 360° image of your surroundings. -
Page 14: Icons And Indicators
14 - Using the Camera Icons and indicators The camera window provides multiple controls on the image screen. Options and Settings Switch primary camera Mode selector Camera / Camcorder select Last picture thumbnail Picture options Center view Shutter button Tap the Shutter button or press the Camera button to take a picture. Tap the thumbnail image to open the gallery. -
Page 15: Camcorder Mode
Using the Camera - 15 Camcorder mode Tap the Camera / Camcorder switch to enter camcorder mode. Tap the shutter to begin filming. While filming, you are unable to access most settings. Mode selector Shutter button Switch primary camera Picture options Options and Settings Last picture thumbnail Camera /... -
Page 16: Mode Selector
16 - Using the Camera Press and hold the camera button to switch between camera and camcorder modes. Mode Selector Tap the Mode selector icon to open a list of modes. Tap an icon to select a mode. Modes 360° - Take a 360° image, using both camera lenses. -
Page 17: More And Settings Menu
Using the Camera - 17 More and Settings menu Note Some options or settings are not available in all camera or video modes. Tap the More icon to view some image options and Settings. Tap an icon to turn that feature on or off (described below), or tap the Settings icon for more settings. -
Page 18: Taking A Photo
18 - Using the Camera Taking a photo 1. If necessary, adjust the settings described above. 2. Frame your subject and steady your camera. 3. Tap the Shutter button to take a picture. Shooting a video 1. Tap the Camcorder button to switch camcorder mode. 2. - Page 19 Using the Camera - 19 Tap the Thumbnail or Filmstrip view to change how the images are displayed. Tap an image to open it, or tap and hold to select it; once an image is selected, tap other images to add them to the selection. After selecting images, you may choose to share them with another app, or delete them.
-
Page 20: 20 - Using The Android Os
20 - Using the Android OS S I N G T H E N D R O I D If you are not familiar with the Android OS, then you can find some information about using the Home screen and apps. The Home screen When you start your camera, or wake it from power saving, it will display the Home screen. -
Page 21: Navigation
Using the Android OS - 21 Navigation To navigate through menus and options, there are three touch-sensitive buttons Back Home Overview beneath the screen. Back Tap this button to go to the previous page, or to go up one level in a menu. -
Page 22: The Apps List
22 - Using the Android OS The Apps list To access the Apps list, on the Home screen tap the arrow above the center of the Favorites tray. Apps are displayed in alphabetical order, with the four most-recently used apps at the top of the menu. -
Page 23: Access Requests
Using the Android OS - 23 • open HoloCamera from the Apps list or the Favorites tray, or • swipe right from the Home screen. Access requests When you first open some apps, or use certain functions, your camera will ask for permission to access some features or information. - Page 24 24 - Using the Android OS • A previous search you performed on any device while you were logged into your Google account and performed a Google search; • A new internet search suggesting what you might be looking for; •...
-
Page 25: Status And Notification Area
Using the Android OS - 25 Status and notification area Status and notification icons are shown at the top of the screen. The top-right corner displays status information such as the time, battery status, and connectivity. The top-left corner displays event notifications, such as new message alerts. - Page 26 26 - Using the Android OS Quick Settings tiles Icon Name Description Brightness Slide to adjust the screen’s brightness. Tap to toggle Wi-Fi and display Wi-Fi settings. Wi-Fi Small "up" and "down" arrows mean information is being transmitted. SIM (LTE Tap to toggle phone and data connections and models only) display SIM settings.
-
Page 27: The Virtual Keyboard
Using the Android OS - 27 The virtual keyboard When you tap a text box to enter text, an virtual keyboard will appear. Simply tap on keys to enter text. Note The keyboard layout varies slightly, depending on the application and information that is required. - Page 28 28 - Using the Android OS Removing apps from a Home screen To remove a downloaded app from the Home screen, tap and hold the item until the Uninstall option appears at the top of the screen. Simply drag the item to the Uninstall option and tap OK. Note You may only uninstall downloaded apps.
-
Page 29: Making Calls
Making calls - 29 A K I N G C A L L S Certain models of the smart camera may make phone calls. Other models may use messaging services that provide calls over the internet; see the messaging app’s help for more information. Note Cellular calls are only available on LTE models with an installed SIM card. -
Page 30: Viewing Missed Calls
30 - Making calls Viewing missed calls Missed call notifications are displayed in the following three areas: 1. The Notification area with the missed call icon. Open the Notification area and tap the missed call notification to display the missed call details. 2. -
Page 31: Direct Dial Widget
Making calls - 31 Direct dial widget You may add a direct dial widget for a contact on your Home screen. Open the Apps list, then tap the Widgets tab. Find Contacts, then tap and hold Direct dial and you will be able to place the widget on your Home screen. -
Page 32: Conference Calls
32 - Making calls Conference calls If you have one call on hold and another on line, you can combine both calls to create a conference call. After the first call is established, tap to add a second call. Tap to start the conference call. -
Page 33: Getting More Apps
Getting more apps - 33 E T T IN G M O R E A P P S Play Store Important see FAQ and troubleshooting For connection issues with Play Store, on page 44 Tap Play Store to open the Google Play app. Here you can obtain a variety of apps to enhance your camera. - Page 34 34 - Getting more apps Using downloaded apps Once you’ve downloaded and installed an app, you may find it in the Apps list or Widgets list. Certain apps provide both an App and widget, or only provide a widget (with no app icon). See Personalizing the Home screen on page Uninstalling downloaded apps...
-
Page 35: Advanced Settings
Advanced settings - 35 D V A N C E D S E T T I N G S To access Settings, open the Apps list and tap Settings. To quickly navigate with a list of main categories, swipe in from the left of the screen. - Page 36 36 - Advanced settings Bluetooth connections For all Bluetooth settings, open the Apps list and tap Settings > Bluetooth. Tap the toggle switch next to turn Bluetooth on or off. When you turn Bluetooth on, your camera will automatically search for any nearby devices that are discoverable.
-
Page 37: Network Settings
Advanced settings - 37 Network settings In the Apps list tap Settings > More... > Cellular networks to adjust your network settings. You can turn data connection on or off when roaming, choose a preferred network type, specify a network operator and define access point names. -
Page 38: Display
38 - Advanced settings Saver will only be able to access to a data connection when you’re actively using the app. Note Blocking background data may cause some apps to stop working correctly. For example, background data is required to make regular checks for updates, useful for email or messenger apps. -
Page 39: Setting Alarms
Advanced settings - 39 Setting alarms There are two predefined alarms on your camera by default. Open Clock from the Apps list, and then tap to view the alarms. Tap and hold an alarm to change its settings. You may: •... -
Page 40: Synchronization
40 - Advanced settings Synchronization You can sync your calendar, email and contacts on your camera and never worry about losing them again. Sync in real time or adjust it as you please. Open Settings > Accounts > [account name] to access the synchronization settings. To add a new account, tap Add account. - Page 41 Advanced settings - 41 not locked. Press any button or tap the screen to see if the camera responds. Important You should only perform a clean boot when all other options have failed to restore your camera to an operational state. This will erase all your personal information, any contacts stored on your camera and any programs you installed.
-
Page 42: 42 - Accessories And Tips
42 - Accessories and tips C C E S S O R I E S A N D T I P S This chapter shows you how to use accessories with your camera, as well as provide useful tips for when you are using your camera. Using the headset Your camera is compatible with headsets with built-in microphone for handsfree use when making calls. -
Page 43: Restarting Your Camera
Accessories and tips - 43 Restarting your camera You can restart (’reboot’) your camera if you find apps are not responding. 1. Press and hold the power button until you get the camera options menu. 2. Tap Reboot. -
Page 44: 44 - Appendix
44 - Appendix P P E N D I X FAQ and troubleshooting This section lists frequently asked questions that may arise during the use of your camera, and gives easy answers and solutions to these questions. Audio Question Suggestions If the headset is plugged into the device, the speaker is automatically shut off. -
Page 45: Google Play Store
Appendix - 45 Google Play Store Question Suggestions 1. First check that you have a Wi-Fi or data connection (some Wi-Fi "hotspots" require you to log in before accessing the internet) and then try again. Why can’t I connect to 2. -
Page 46: Internal Storage
It is also normal for the camera to heat up calls. during long periods of use, such as watching a video or a long phone conversation. Other sources of help For information on Refer to ... Up-to-date information regarding www.acer.com your camera mobile.acer.com Service enquiries www.acer.com/support... -
Page 47: Warnings And Precautions
Warnings and precautions - 47 A R N I N G S A N D P R E C A U T I O N S • Do not use this product near water. • Do not place this product on an unstable cart, stand or table. If the product falls, it could be seriously damaged. -
Page 48: Medical Devices
48 - Warnings and precautions Operating environment Important For safety reasons, turn off all wireless or radio transmitting devices when using your camera device under the following conditions. These devices may include, but are not limited to: Wireless LAN (WLAN), Bluetooth and/or cellular. -
Page 49: Vehicles
Warnings and precautions - 49 • Always keep the device more than 15.3 cm (6") from the pacemaker. • Not carry the device near your pacemaker when the device is switched on. If you suspect interference, switch off your device, and move it. -
Page 50: Emergency Calls
50 - Warnings and precautions device at refueling points such as near gas pumps at service stations. Observe restrictions on the use of radio equipment in fuel depots, storage, and distribution areas; chemical plants; or where blasting operations are in progress. Areas with a potentially explosive atmospheres are often, but not always, clearly marked. - Page 51 Warnings and precautions - 51 3. DO be careful not to drop your camera or subject it to any strong impact. Do not place your camera in your back pocket. 4. DO NOT expose your camera to extreme temperatures. For example, do not leave your camera on the dashboard of a car on a hot day or when temperatures are below freezing point.
-
Page 52: 52 - Specifications
The battery must only be removed or replaced by an authorized Acer service center. Should the device become unresponsive, hold down the power button for 10 seconds to switch off the device. -
Page 53: Dimensions
Specifications - 53 • 370 nits (before touch panel) Dimensions Height 110 mm Width 57.6 mm Thickness 13.6 mm Weight 139 g (with battery) Connectivity • Bluetooth 4.1 + LE • IEEE 802.11a/b/g/n/ac (2.4 GHz and 5 GHz) • GPS, with aGPS support and SUPL Cellular connectivity (C01 model only) Nano SIM slot •... -
Page 54: Cameras
54 - Specifications • Micro USB connector Cameras • 16 MP front & rear cameras • 187-degree viewing angle each • 4K video recording Power • Adapter • AC input: 100 to 240 V, 50 or 60 Hz • DC output: 5 V, 1 A •... -
Page 55: End User License Agreement
6. Sublicense or otherwise make the Software available to third parties, except that you may, after prior written notification to Acer, transfer the Software as a whole to a third party so long as you do not retain any copies of the Software and such third party accepts the terms of this Agreement. - Page 56 Title, ownership rights and intellectual property rights in and to the Software and all copies thereof shall remain with Acer or Acer's licensors or suppliers (as applicable). You do not have or shall not gain any proprietary interest in the Software (including any modifications or copies made by or for you) or any related intellectual property rights.
- Page 57 Privacy policy During registration you will be asked to submit some information to Acer. Please refer to Acer’s privacy policy at www.acer.com or your local Acer website.