
Related Manuals for Vivotek AM-21A

Summary of Contents for Vivotek AM-21A
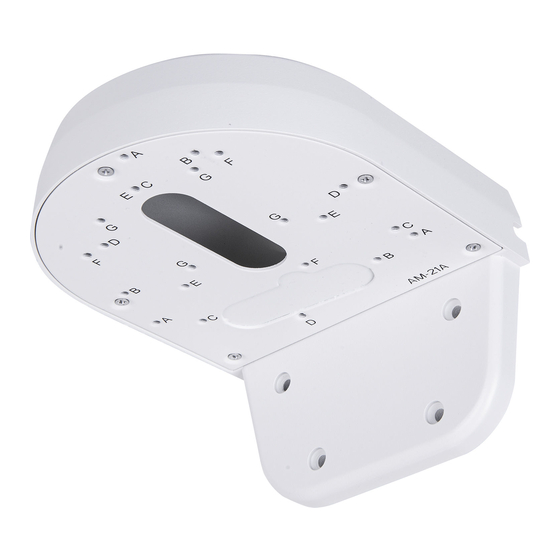
- Page 1 VIVOTEK Fixed Dome Series Wall-mount Bracket Installation Guide Using AM-21A wall-mount bracket and compatible accessories Corresponding part number: AM-21A: 909009301G AM-21A_V02 Rev. 1.1 IP Sur veillance...
-
Page 2: Installation
FD9371-(E)HTV, FD9381-(E)HTV, FD9365-(E)HTV, FD9365-HTVL, FD9367-(E)H(T)V, FD8377-(E) HTV, FD9391-EHTV, FD9387-(E)H(T)V, FD9389-(E)H(M)(T)V, FD9360-H, IT9360-H, FD9368-HTV, FD9380-H, IT9380-H, FD9388-HTV, IT9388-HT You may also refer to VIVOTEK's website for the list of supported models. Support for other models can be available through time. Installation... - Page 3 Hole Type Applicable Cameras Screw No. of screws IT9388-HT FD9360-H, FD9380-H M4x10 IT9360-H, IT9380-H For cabling and configuration details with each network camera, please refer to their documentation. Refer to the table below for the description of the included screws: Screw Description Quantity Applies to...
-
Page 4: Wall Mount Installation
Wall Mount Installation - FD9371-(E)HTV, FD9381-(E)HTV, FD9365-(E)HTV, FD9365-HTVL, FD9367-(E)H(T)V, FD8377-(E)HTV, FD9391-EHTV, FD9387-(E)H(T)V Below is a general, sample procedure using a wall mount bracket: 1. Locate the position where you want to install the wall mount bracket and camera. Drill holes on the wall for securing the bracket and for routing the cables. 2. - Page 5 NOTE: Use the correct type of screws when installing cameras to the mounting cap. Refer to page 3 for the screw type. You will need to pass the cables through the waterproof connectors, and then use a crimping tool to connect the cable wires to an RJ45 connector. o: white/orange stripe O: orange solid g: white/green stripe...
- Page 6 Wall Mount Installation - FD9171-HT, FD9181-HT, FD9165-HT, FD9167-H(T), FD8177-HT, FD9187-H(T)V Below is a sample procedure using the wall mount bracket and an FD9171: 1. Determine a hard surface wall location, and use the four mounting holes on the wall mount bracket to mark the positions where holes will be drilled to secure the bracket. Aligned with B holes 2.
- Page 7 Wall Mount Installation - FD8367A, FD8369A, FD8377-HV, FD8379-HV, FD9389- (E)H(M)(T)V, FD9368-HTV, FD9388-HTV Below is a sample procedure using wall mount bracket and an FD8369A: 1. Determine a hard surface wall location, and use the four mounting holes on the bracket to mark the positions where holes will be drilled to secure the bracket.
- Page 9 Wall Mount Installation - FD8167A, FD8169A, FD8177-H, FD8179-H, FD9189- H(M)(T) Below is a general, sample procedure using a wall mount bracket with the FD8169A camera: 1. Locate the position where you want to install the wall mount bracket and camera. Drill holes on the wall for securing the bracket and for routing cables.
- Page 10 7. Attach dome cover to the camera.
- Page 11 Wall Mount Installation - IT9388-HT; FD9360-H, FD9380-H; IT9360-H, IT9380-H Aligned with E / F / G...
- Page 12 This page is intentionally left blank.