Chapters
Table of Contents

Related Manuals for KitchenAid 5KSM5


Summary of Contents for KitchenAid 5KSM5
- Page 1 ® EBRUIKSAANWIJZING AN DE EUKENROBOT IXER NSTRUCTIONS ’ OBOTS DE CUISINE ODE D EMPLOI EBRAUCHSENLEITUNG ÜCHENMASCHINE – I IXER STRUZIONI NSTRUCCIONES PARA ATIDORA 9705170B...
-
Page 2: Table Of Contents
Inhoudsopgave Belangrijke veiligheidsvoorschriften ................3 Wat U moet weten over uw keukenrobot:: Kenmerken van de keukenrobotten model 5K45SS, 5KSM90 ......4, 5 Kenmerken van de keukenrobot 5KSM5 ............6, 7 Het gebruik van de KitchenAid hulpstukken ............8 ® Speling tussen draadgarde en kom ..............8 Onderhoud en reiniging ..................8... -
Page 3: Belangrijke Veiligheidsvoorschriften
5K45SS – 1,0 kg (8 koppen) bloem of 840 g onderdelen bevestigt of verwijdert, en (6 koppen) volkorenbloem. Model 5KSM5 – voordat u het apparaat reinigt. 1,2 kg (10 koppen) bloem of 1000 g 7. -
Page 4: Kenmerken Van De Keukenrobotten Model 5K45Ss, 5Ksm90
Kenmerken van de Keukenrobotten 5K45SS en 5KSM90 Hulpstuknaaf Motorkop Hulpstukknop Hendel voor vergrendeling van motorkop (niet afgebeeld) Snelheids- regelaar As van garde Bijstellings- Platte schroef voor de menghaak hoogte van de draadgarde Roestvrij- stalen kom van 4,3 liter Klemplaat voor kom Draadgarde Kneedhaak... - Page 5 Lock Unlock VERGRENDELEN VAN DE MOTORKOP IN DE OMHOOG GEBRACHTE STAND BEVESTIGEN VAN DE KOM • Duw de hendel omhoog naar de stand • Controleer of de snelheidsregelaar op OFF UNLOCK [ONTGRENDELEN] en houd [UIT] staat. hem daar. • Zet de hendel in de stand UNLOCK •...
-
Page 6: Kenmerken Van De Keukenrobot 5Ksm5
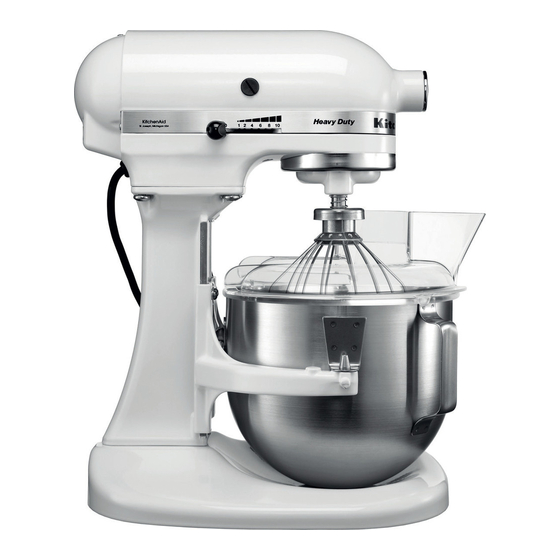
Kenmerken van de Keukenrobot 5KSM5 Motorkop Hulpstuknaaf Hulpstukknop Snelheids- regelaar Handgreep om kom op te tillen Bijstellingsschroef voor (niet afgebeeld) de hoogte van de draadgarde (niet afgebeeld) As van Veervergrendeling en pen garde voor kom (niet afgebeeld) Fixeerpennen Roestvrijstalen kom... - Page 7 • Breng de kom omhoog alvorens te mixen. BEVESTIGEN VAN DE PLATTE N.B.: Controleer of de kom en het schenkschild MENGHAAK, DRAADGARDE OF zich in de juiste plaats bevinden (5KSM5 modellen). KNEEDHAAK • Zet de snelheidsregelaar op OFF [UIT] en VERWIJDEREN VAN DE KOM trek de stekker uit het stopcontact.
-
Page 8: Het Gebruik Van De Kitchenaid ® Hulpstukken
Het gebruik van de KitchenAid hulpstukken ® Zie de Gebruiks- en Onderhoudshandleiding voor de Hulpstukken van de Staande Mixer voor de snelheidsinstellingen en de gebruikstijden. Platte menghaak voor normale tot dikke Draadgarde voor mengsels die luchtig moeten worden gemaakt, zoals... -
Page 9: Planetaire Mixbeweging
Planetaire mixbeweging Uw KitchenAid mixer mixt sneller en ® Tijdens het mixen maakt de grondiger dan de meeste andere elektrische platte menghaak mixers. Daarom moet de mixingtijd in de ronddraaiende bewegingen in meeste recepten aangepast worden om over- de kom die op zijn vaste mixen te voorkomen. -
Page 10: Tips Voor Het Mengen
2. Bevestig kom en deeghaak. Vergrendel de kop van 5K45SS, 5KSM90 of breng de kom van 5KSM5 omhoog. Zet de mixer op snelheid 2 en meng gedurende ongeveer 15 seconden of totdat de ingrediënten vermengd zijn. -
Page 11: Eiwitten
6. Ontgrendel en breng de kop van 5KSM90 omhoog en verwijder het deeg van de haak. Ontgrendel en breng de kop van 5K45SS omhoog of laat de kom van 5KSM5 neer en verwijder het deeg van de haak. N.B.: Deze aanwijzingen geven een voorbeeld van het maken van brood met de snelle mixmethode. -
Page 12: Wanneer U Service Nodig Heeft
KITCHENAID IS NIET AANSPRAKELIJK VOOR INCIDENTELE SCHADE EN GEVOLGSCHADE. Technische gegevens kunnen zonder voorafgaande kennisgeving gewijzigd worden. KitchenAid Europa, Inc. Nijverheidslaan 3 Box 5 1853 Strombeek-Bever (Brussels) BELGIË... - Page 13 ® EBRUIKSAANWIJZING IXERS IXER NSTRUCTIONS ’ OBOTS DE CUISINE ODE D EMPLOI EBRAUCHSENLEITUNG ÜCHENMASCHINE IXER STRUZIONI NSTRUCCIONES PARA ATIDORA 9705170B...
- Page 14 Table of Contents Important Safety Instructions..................3 About Your Mixer Model 5K45SS, 5KSM90 Mixer Features ............4, 5 Model 5KSM5 Mixer Features................6, 7 Using Your KitchenAid Attachments ..............8 ® Beater To Bowl Clearance..................8 Care and Cleaning ....................8 Planetary Mixing Action ..................9 Mixer Use......................9 Speed Control Guide.....................9...
-
Page 15: Important Safety Instructions
Do all-purpose flour or 840 gr (6 cups) of not leave mixer unattended while it is whole wheat flour. Model 5KSM5 – operating. 1.2 kg (10 cups) of all-purpose flour or 6. Unplug mixer from outlet when not in use, 1000 gr (8 cups) of whole wheat flour. - Page 16 5K45SS, 5KSM90 Mixer Features Attachment Hub Motor Head Attachment Knob Motor Head Locking Lever Speed (not shown) Control Beater Shaft Lever Beater Height Adjustment Flat Beater Screw ⁄ (4.3 L) Stainless Steel Bowl Bowl Clamping Plate Wire Whip Dough Hook...
- Page 17 Lock Unlock TO LOCK MOTOR HEAD IN RAISED POSITION TO ATTACH BOWL • Push locking lever up into UNLOCK • Be sure speed control is OFF. position and hold. • Hold the locking lever in the UNLOCK • Tilt motor head back. position and tilt motor head back.
- Page 18 5KSM5 Mixer Features Motor Head Attachment Hub Attachment Knob Speed Control Lever Bowl Lift Handle Beater Height (not shown) Adjustment Screw (not shown) Beater Spring Latch and Bowl Pin Shaft (not shown) Locating Pins 5 Qt (4.8 L) Flat Beater...
- Page 19 • Sit pouring shield on bowl. • Raise bowl before mixing. NOTE: Check that bowl and pouring shield TO ATTACH FLAT BEATER, WIRE are properly in place (5KSM5 models). WHIP, OR DOUGH HOOK • Turn speed control to OFF and unplug. TO REMOVE BOWL •...
-
Page 20: Using Your Kitchenaid ® Attachments
Using Your KitchenAid Attachments ® See the Stand Mixer Attachments Use and Care Guide for speed settings and operating times. Wire Whip for mixtures which need Flat Beater for normal to heavy to incorporate air, such as: mixtures, such as:... -
Page 21: Planetary Mixing Action
Planetary Mixing Action Your KitchenAid Mixer will mix faster and ® During operation, the flat more thoroughly than most other electric beater moves around the mixers. Therefore, the mixing time in most stationary bowl, at the recipes must be adjusted to avoid same time turning in the overbeating. -
Page 22: Mixing Tips
2. Attach bowl and dough hook. Lock 5K45SS, 5KSM90 head or raise 5KSM5 bowl. Turn to Speed 2 and mix about 15 seconds or until ingredients are combined. -
Page 23: Egg Whites
6. Unlock and raise head on 5KSM90 and remove dough from hook. Unlock and raise head on 5K45SS or lower bowl on 5KSM5 and remove dough from hook. NOTE: These instructions illustrate bread making with the Rapid Mix method. When using the conventional method, dissolve yeast in warm water in warmed bowl. -
Page 24: When You Need Service
Service Center. misuse, abuse, or installation/operation not in accordance with local electrical codes. KITCHENAID DOES NOT ASSUME ANY RESPONSIBILITY FOR INCIDENTAL OR CONSEQUENTIAL DAMAGES. Specifications subject to change without notice. KitchenAid Europa, Inc. Nijverheidslaan 3 Box 5 1853 Strombeek-Bever (Brussels) BELGIUM ®Registered trademark/... - Page 25 ® EBRUIKSAANWIJZING IXERS IXER NSTRUCTIONS ’ OBOTS DE CUISINE ODE D EMPLOI EBRAUCHSENLEITUNG ÜCHENMASCHINE IXER STRUZIONI NSTRUCCIONES PARA ATIDORA 9705170B...
- Page 26 Table des matières Mesures de sécurité importantes ................3 Votre robot Caractéristiques des robots modèles 5K45SS et 5KSM90........4, 5 Caractéristiques des robots modèle 5KSM5 .............6, 7 Utilisation de vos accessoires KitchenAid ............8 ® Distance batteur/bol....................8 Entretien et nettoyage de votre robot ..............8 Mouvement planétaire...................9...
-
Page 27: Mesures De Sécurité Importantes
à utiles sur l’utilisation de l’appareil. une utilisation incorrecte de l’appareil. ATTENTION POUR RÉDUIRE LES RISQUES D’INCENDIE, pas recommandés par KitchenAid peut entraîner des risques d’incendie, D’ÉLECTROCUTION, DE BLESSURE ET d’électrocution ou de blessure. D’ENDOMMAGEMENT DE L’APPAREIL, 12. -
Page 28: Caractéristiques Des Robots Modèles 5K45Ss Et 5Ksm90
Caractéristiques des robots modèles 5K45SS et 5KSM90 Moyeu de fixation des accessoires Vis de fixation des Tête accessoires Levier de verrouillage de la Levier de tête (non illustré) contrôle Axe de batteur de la vitesse Vis de réglage de la hauteur Batteur plat du batteur Bol en acier... - Page 29 Lock Unlock VERROUILLER LE COMPARTIMENT MOTEUR EN POSITION LEVÉE POUR ATTACHER LE BOL • Poussez le levier de verrouillage dans la • Assurez-vous que le levier de contrôle de position UNLOCK et le maintenir dans la vitesse est sur OFF. cette position.
-
Page 30: Caractéristiques Des Robots Modèle 5Ksm5
Caractéristiques du robot modèle 5KSM5 Tête Moyeu de fixation des accessoires Vis de fixation des accessoires Levier de contrôle de la vitesse Manette pour Vis de réglage de la soulever le bol hauteur du batteur (non illustrés) (non illustrée) Axe du Crochet à... - Page 31 OFF et débranchez l’appareil. verseur/protecteur soient bien en place • Faites descendre le bol en tournant la (modèles 5KSM5). manette pour soulever le bol vers le bas. • Placez le batteur sur l’axe d’entraînement et poussez jusqu’en haut autant que possible.
-
Page 32: Utilisation De Vos Accessoires Kitchenaid
Utilisation de vos accessoires KitchenAid ® Voir le Guide d’utilisation et d’entretien des accessoires du batteur sur socle pour les réglages de vitesse et les durées de fonctionnement. Le fouet pour les mélanges légers Le batteur plat pour les mélanges comme : normaux ou épais comme :... -
Page 33: Mouvement Planétaire
Mouvement planétaire Votre robot KitchenAid mélange plus ® Lorsqu’il est en mouvement, rapidement et plus complètement que la le batteur tourne autour du plupart des autres robots. La durée de bol fixe tout en tournant malaxage de la plupart des recettes doit autour de son axe propre être donc ajustée pour éviter de trop battre. -
Page 34: Conseils
Verrouillez la tête du 5KSM90 et du 5K45SS du crochet pétrisseur et ralentissent le mélange. ou relever le bol du 5KSM5. Réglez à la vitesse 2 et battez pendant environ 15 secondes ou jusqu’à ce que les ingrédients soient bien mélangés. -
Page 35: Les Blancs En Neige
6. Déverrouillez et levez la tête du 5KSM90 et décollez la pâte du crochet. Déverrouillez et levez la tête du 5K45SS ou descendez le bol du 5KSM5 et décollez la pâte du crochet. N.B. : Ces instructions illustrent la fabrication de la pâte à pain selon la méthode rapide. -
Page 36: Service Après-Vente
2. Le fusible du circuit électrique du robot dehors de Paris, consultez votre revendeur fonctionne-t-il normalement ? Si vous avez KitchenAid local ou le magasin où vous acheté l’appareil. Garantie sur les robots FRAIS NON DURÉE DE LA... - Page 37 ® EBRUIKSAANWIJZING IXERS IXER NSTRUCTIONS ’ OBOTS DE CUISINE ODE D EMPLOI EBRAUCHSENLEITUNG ÜCHENMASCHINE IXER STRUZIONI NSTRUCCIONES PARA ATIDORA 9705170B...
- Page 38 Inhaltsverzeichnis Wichtige Sicherheitshinweise...................3 Über Ihre Küchenmaschine Ausstattung Ihrer Küchenmaschine (Modelle 5K45SS und 5KSM90) .....4, 5 Ausstattung Ihrer Küchenmaschine (Modell 5KSM5) ........6, 7 Benutzung Ihrer KitchenAid -Zusatzgeräte............8 ® Abstand vom Schläger zur Schüssel ..............8 Pflege und Säuberung ...................8 Planetmischverfahren....................9 Küchenmaschinenbenutzung ................9 Geschwindigkeitsteinstellungen................9...
-
Page 39: Wichtige Sicherheitshinweise
Küchenmaschine nie unbeaufsichtigt laufen. Modell 5K45SS – 1,0 kg Allzweckmehl oder 6. Ziehen Sie den Stecker der Küchenmaschine 840 g Vollkornweizenmehl. Modell 5KSM5 – aus der Steckdose heraus, wenn sie nicht in 1,2 kg Allzweckmehl oder 1000 g Gebrauch ist, bevor Sie Teile einschieben oder Vollkornweizenmehl. -
Page 40: Ausstattung Ihrer Küchenmaschine (Modelle 5K45Ss Und 5Ksm90)
Ausstattung Ihrer Küchenmaschine (Modelle 5K5SS/5KSM90) Zusatzgerätenabe Motorkopf Zusatzgeräteknopf Motorkopfver- riegelungshebel (nicht abgebildet) Geschwindig- keitskontroll- Schlägerwelle hebel Mixerhöhen- Flach- einstellungsschraube schläger 4,3-Liter- Edelstahl- schüssel Schüsselverriegelungsplatte Drahtschläger Teighaken... - Page 41 ZUR ENTFERNUNG DES FLACH- SCHLÄGERS, DES DRAHTSCHLÄGERS ODER DES TEIGHAKENS • Schalten Sie die Motorkontrolle auf AUS und ziehen Sie den Stecker heraus. • Halten Sie den Verriegelungshebel in der ENTRIEGELN-Position und heben Sie den Motorkopf an. • Drücken Sie den Schläger so weit wie möglich nach oben und drehen ihn nach links.
-
Page 42: Ausstattung Ihrer Küchenmaschine (Modell 5Ksm5)
Ausstattung Ihrer Küchenmaschine (Modell 5KSM5) Motorkopf Zusatzgerätenabe Zusatz- geräteknopf Geschwindigkeits- kontrollhebel Schüsselhe- begriff (nicht Mixerhöhen- abgebildet) einstellungsschraube (nicht abgebildet) Schläger- Schnappverschluss und welle Schüsselstift (nicht abgebildet) Passstifte 4,3-Liter- Flachschläger Drahtschläger Edelstahl- Teighaken schüssel Schüsselhalter... - Page 43 HINWEIS: Prüfen Sie, dass die Schüssel und SCHLÄGERS, DES DRAHTSCHLÄGERS der Schüttschutz ordnungsgemäß festsitzen ODER DES TEIGHAKENS (Modell 5KSM5). • Schalten Sie die Motorkontrolle auf AUS und ZUR ENTFERNUNG DER SCHÜSSEL ziehen Sie den Stecker heraus. • Stellen Sie den Schüsselhebegriff nach unten.
-
Page 44: Benutzung Ihrer Kitchenaid ® -Zusatzgeräte
Benutzung Ihrer KitchenAid -Zusatzgeräte ® Hinweise zu Geschwindigkeitseinstellungen und Zubereitungsdauer finden Sie in der Gebrauchsanleitung für die Aufsätze der Küchenmaschine. Drahtschläger für Mischungen, welche Luft Flachschläger für normale bis schwere Mischungen, wie z.B.: enthalten müssen, wie z.B.: Eier Biskuitteig Kuchen... -
Page 45: Planetmischverfahren
Planetmischverfahren Ihre KitchenAid -Küchenmaschine kann ® Während des Betriebes bewegt schneller und gründlicher rühren, als die meisten sich der Flachschläger in der anderen elektrischen Küchenmaschinen. Deshalb feststehenden Schüssel, muss die Rührzeit bei den meisten Rezepten während er sich gleichzeitig verringert werden, um übertriebenes Rühren zu in entgegengesetzter Richtung vermeiden. -
Page 46: Mischen Und Kneten Von Hefeteig
Lache Verriegeln Sie das 5K45SS- bzw. 5KSM90- um den Teighaken herum und verlangsamen den Kopfteil oder heben Sie die 5KSM5 Schüssel Rührvorgang. an. Schalten Sie auf Geschwindigkeit 2 und rühren Sie etwa 15 Sekunden oder bis die Zutaten miteinander vermischt sind. -
Page 47: Eiweiß
5KSM90 und entfernen Sie den Teig vom Haken. Entriegeln und heben Sie den Kopf der 5K45SS oder senken Sie die Schüssel der 5KSM5 und entfernen Sie den Teig vom Haken. HINWEIS: Diese Illustrationen zeigen Brotherstellung nach der Rapid-Mix-Methode. Wenn die konventionelle Methode benutzt wird, lösen Sie die Hefe in warmem Wasser in einer... -
Page 48: Inanspruchnahme Des Kundendiensts
Änderungen, Missbrauch, geführt werden. falsche Benutzung oder dadurch entstand, dass der Einbau/Betrieb nicht den örtlichen elektrischen Normen entsprach. KITCHENAID HAFTET NICHT FÜR BEILÄUFIG ENTSTANDENE ODER FOLGESCHÄDEN. Änderungen vorbehalten. KitchenAid Europa, Inc. Nijverheidslaan 3 Box 5 1853 Strombeek-Bever (Brüssel) BELGIEN 9705170B ®Die Marke sowie die Silhouette der... - Page 49 ® EBRUIKSAANWIJZING IXERS IXER NSTRUCTIONS ’ OBOTS DE CUISINE ODE D EMPLOI EBRAUCHSENLEITUNG ÜCHENMASCHINE – I IXER STRUZIONI NSTRUCCIONES PARA ATIDORA 9705170B...
- Page 50 Indice Importanti precauzioni di sicurezza................3 Il vostro Mixer Caratteristiche del Mixer Modello 5K45SS, 5KSM90........4,5 Caratteristiche del Mixer Modello 5KSM5............6,7 Uso degli accessori KitchenAid ................8 ® Spazio tra fruste e ciotola..................8 Cura e pulizia......................8 Moto planetario .....................9 Uso del Mixer......................9 Guida alla regolazione della velocità ..............10 Suggerimenti sull’uso del mixer................10...
-
Page 51: Importanti Precauzioni Di Sicurezza
1,0 kg (8 tazze) di farina 00 oppure 840g 6. Scollegare il mixer dalla presa di corrente (6 tazze) di farina integrale. Modello 5KSM5 – quando lo stesso non è in uso, prima di 1,2 kg (10 tazze) di farina 00 oppure inserire o di rimuovere le parti e prima 1000g (8 tazze) di farina integrale. - Page 52 Caratteristiche del Mixer 5K45SS, 5KSM90 Alloggiamento Accessori Testa del Manopola di sicurezza motore per accessori Leva per il blocco del Leva di motore regolazione (non visibile) della Albero dello velocità sbattitore Vite di Frusta regolazione piatta dell’altezza dello sbattitore Ciotola in acciaio inox da 4,3 litri...
- Page 53 • Mantenere la leva di blocco motore nella posizione UNLOCK (APERTO) e sollevare la testa del motore. • Spingere la frusta il più possibile verso l’alto e ruotarla verso sinistra. • Sfilare la frusta dall’albero dello sbattitore. COME MONTARE LA CIOTOLA Lock Unlock •...
- Page 54 Caratteristiche del Mixer 5KSM5 Testa del motore Alloggiamento Accessori Manopola di sicurezza per accessori Leva di regolazione della velocità Leva di solle- vamento della ciotola Vite di regolazione (non visibile) dell’altezza dello sbattitore (non visibile) Albero dello Fermo a molla e perno...
- Page 55 NOTA: controllare che la ciotola ed il versatore presa di corrente. paraspruzzi siano nella posizione corretta • Abbassare la ciotola abbassando la leva di (modelli 5KSM5). sollevamento. COME RIMUOVERE LA CIOTOLA • Introdurre la frusta piatta nell’albero dello • Abbassare la leva di sollevamento della sbattitore, spingendola il più...
-
Page 56: Uso Degli Accessori Kitchenaid
Uso degli accessori KitchenAid ® Consultare la Guida di utilizzo e manutenzione degli accessori del mixer per le impostazioni della velocità e i tempi di funzionamento. Frusta per montare: per preparati che Frusta piatta per preparati normali o pesanti, quali:... -
Page 57: Moto Planetario
Moto Planetario Il Mixer KitchenAid mescolerà più ® Durante il funzionamento, rapidamente e in modo più completo di altri la frusta piatta si muove mixer elettrici. Di conseguenza, i tempi all’interno della ciotola, che necessari alla preparazione di molte ricette... -
Page 58: Come Mescolare Ed Impastare Paste Lievitate
5KSM90, oppure alzare la ciotola del Mixer terà il processo di preparazione dell'impasto. 5KSM5. Mescolare a velocità 2 per circa 15 secondi o fino a quando tutti gli ingredienti si saranno amalgamati. -
Page 59: Albumi
Sbloccare e sollevare la testa del motore nel modello 5K45SS, oppure abbassare la ciotola nel modello 5KSM5 ed asportare l’impasto dalla frusta per impastare. NOTA: queste istruzioni illustrano la prepara- zione del pane con il metodo Rapid Mix. Scio-... -
Page 60: Quando Rivolgersi Al Servizio Assistenza Tecnica
LA KITCHENAID NON SI ASSUME ALCUNA RESPONSABILITÀ PER DANNI ACCIDENTALI O CONSEQUENZIALI. Le specifiche sono soggette a modifiche senza preavviso. KitchenAid Europa, Inc. Nijverheidslaan 3 Box 5... - Page 61 ® EBRUIKSAANWIJZING IXERS IXER NSTRUCTIONS ’ OBOTS DE CUISINE ODE D EMPLOI EBRAUCHSENLEITUNG ÜCHENMASCHINE IXER STRUZIONI NSTRUCCIONES PARA ATIDORA 9705170B...
- Page 62 Índice Instrucciones importantes de seguridad ..............3 Acerca de su batidora Características de la batidora modelo 5K45SS, 5KSM90.........4, 5 Características de la batidora modelo 5KSM5..........6, 7 Uso de los accesorios KitchenAid ...............8 ® Distancia entre el batidor y el recipiente..............8 Cuidado y limpieza ....................8 Movimiento planetario del batidor ................9...
-
Page 63: Instrucciones Importantes De Seguridad
(8 tazas) de harina común u 840 gr (6 tazas) funcionamiento. de harina integral de trigo. Modelo 5KSM5 – 6. Desconecte la batidora de la red cuando 1,2 kg (10 tazas) de harina común o 1000 gr no esté... - Page 64 Características de la batidora 5K45SS, 5KSM90 Toma de accesorios Botón de Cabezal con motor accesorios Palanca de bloqueo del cabezal con motor Palanca de (no mostrada) control de Eje del batidor velocidad Tornillo de Batidor ajuste de altura plano del batidor Recipiente de acero inoxidable...
- Page 65 Lock Unlock • Sitúe la palanca de fijación en la posición UNLOCK (soltar) y levante el cabezal del PARA ENGANCHAR EL RECIPIENTE motor. • Asegúrese de que el control de velocidad • Presione el batidor hacia arriba hasta el tope está...
- Page 66 Características de la batidora 5KSM5 Cabezal con motor Toma de accesorios Botón de accesorios Palanca de control de Asa para velocidad levantar el Tornillo de ajuste recipiente de altura del batidor (no mostrado) (no mostrado) Eje del Enganche elástico y pasador...
- Page 67 PLANO, EL BATIDOR DE ALAMBRE NOTA: Compruebe que el recipiente y la tapa O EL GANCHO DE AMASAR están colocados correctamente (modelos 5KSM5). • Gire el control de velocidad a OFF (apagado) y desconecte la batidora de la red. • Baje el recipiente girando el asa hacia abajo.
-
Page 68: Uso De Los Accesorios Kitchenaid
Uso de los accesorios KitchenAid ® Consulte el Manual de uso y cuidado para ver los ajustes de velocidad y tiempos de funcionamiento de los aditamentos de la batidora con base. Batidor plano para mezcas normales a Batidor de alambre para masas que necesitan la incorporación de aire, tales... -
Page 69: Uso De La Batidora
Movimiento Planetario del mezclado La batidora KitchenAid con mayor rapidez y ® Durante el funcionamiento, con una cobertura mayor que la mayoría de las el batidor plano se mueve batidoras eléctricas. Por consiguiente, ajuste la alrededor del recipiente fijo duración del mezclado en la mayor parte de las y, al mismo tiempo gira en recetas para no batir los ingredientes en exceso. - Page 70 2. Fije el recipiente y coloque el gancho de amasar. laborioso el proceso de mezclado. Sujete el cabezal 5K45SS, 5KSM90 o levante el recipiente 5KSM5. Seleccione la velocidad 2 y mezcle aproximadamente 15 segundos o hasta que los ingredientes estén bien amalgamados.
-
Page 71: Clara De Huevo
6. Suelte y eleve el cabezal en el modelo 5KSM90 y despegue la masa del gancho. Desbloquee y levante el cabezal en el modelo 5K45SS o baje el recipiente en 5KSM5 y limpie la masa del gancho. NOTA: estas instrucciones ilustran la elaboración de pan con el método Mezcla rápida... -
Page 72: Cuando Se Requiera Servicio
KITCHENAID NO SE HACE RESPONSABLE DE DAÑOS ACCIDENTALES O EMERGENTES. Especificaciones sujetas a cambios sin previo aviso. KitchenAid Europa, Inc. Nijverheidslaan 3 Box 5...