Advertisement
Available languages
Available languages
Quick Links
Advertisement

Related Manuals for Motorola Noise-com ENMN4010


Summary of Contents for Motorola Noise-com ENMN4010
- Page 1 ENMN4010...
-
Page 2: Installation
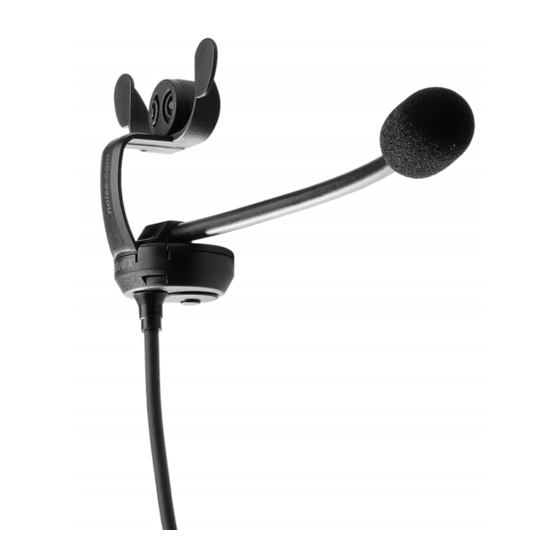
DESCRIPTION The noise-com ENMN4010 is designed to fit most types of passive ear protectors. Figure 1 noise-com assembly The noise-com consists of the following parts: • Speaker (1) • Fixing flanges (2) • Noise cancelling microphone fitted with a protective wind shield (3) •... - Page 3 Ensure the noise-com flanges, Fig. 1 (2), fit behind the solid washer which is located behind the soft cushions inside the ear protector cup. Do not use excessive force! 3. Turn the noise-com clockwise in the cup as shown. 4. Pull the cups outward and position the combined noise-com and ear...
-
Page 4: Operation
OPERATION There are two modes of noise-com operation: • VOX or Hands Free Operation - to communicate the user simply speaks into the noise-com microphone, Fig. 1 (3), the noise-com push-to-talk (PTT) button, Fig. 1 (4) is not used. • Push To Talk (PTT) Operation - to communicate the user presses the noise-com push-to-talk (PTT) button,... - Page 5 Note: Pressing the radio Push-To-Talk button will temporarily disable VOX operation. Communication can continue using the radio microphone and the radio Push-To-Talk button. 8. To re-select VOX operation, turn the radio OFF and repeat the set up procedure Steps 1 to 6. Push To Talk (PTT) Operation: 1.
- Page 6 Clean the connector with high-quality Vaseline spray or a similar type of lubricant. SERVICE This product contains no serviceable parts. Replacement noise-com, microphone wind shields 2604002K01 (pack of five) are available, please contact your local Motorola representative or Dealer for details.
- Page 7 NOTES...
- Page 8 BESCHREIBUNG Die noise-com ENMN4010 Kopfhörer-Garnitur wurde speziell für die Verwendung mit allen gängigen Arten von Ohrenschützern entwickelt. Abbildung 1 Die in Abb. 1 dargestellte noise-com Kopfhörer- Garnitur besteht aus den folgenden Komponenten • Lautsprecher (1) • Befestigungsflansche (2) • Geräuschkompensiertes Mikrofon mit Windschutz (3) •...
- Page 9 Ohrenschützer ein. Achten Sie darauf, dass die Flansche, Abb. 1 (2), hinter dem Rahmen sitzen, der sich zwischen den Ohrpolstern und der Muschel des Ohrenschützers befindet. Wenden Sie beim Zusammenbauen keine Gewalt an! 3. Drehen Sie die noise-com Kopfhörer- Garnitur in der Muschel des Ohrenschützers wie in Abb.
- Page 10 Hinweis: Wenn Sie die noise-com Kopfhörer- Garnitur in der anderen Muschel des Ohrenschützers tragen möchten, biegen Sie den Mikrofonbügel wie in Abb. 4 dargestellt an der Geräteseite um 180° nach hinten (Schritt 1) und ändern Sie die Neigung des Mikrofons entsprechend (Schritt 2).
- Page 11 4. Halten Sie die Sendetaste der noise-com Kopfhörer-Garnitur gedrückt, bis die grüne LED-Anzeige des Funkgeräts erloschen ist, lassen Sie dann die Sendetaste der noise-com Kopfhörer-Garnitur los. Sie finden die grüne LED-Anzeige auf der Oberseite des Funkgeräts. 5. Sprechen Sie in das Mikrofon der noise-com Kopfhörer-Garnitur, Abb.
- Page 12 5. Stellen Sie die Wiedergabelautstärke des noise-com Lautsprechers mit Hilfe des Lautstärkereglers am Funkgerät ein. 6. Schalten Sie das Funkgerät immer AUS, bevor Sie die noise-com Kopfhörer-Garnitur entfernen. Entfernen der noise-com Kopfhörer-Garnitur aus dem Ohrenschütze 1. Schalten Sie das Funkgerät immer AUS, bevor Sie die noise-com Kopfhörer-Garnitur entfernen.
-
Page 13: Wartung
Vaselinespray oder einem ähnlichen Schmiermittel. WARTUNG Dieses Produkt enthält keine vom Benutzer zu wartenden Teile. noise-com Ersatzgarnituren und Ersatz-Windschutz für das Mikrofon (2604002K01, Fünferpack) sind erhältlich. Bitte setzen Sie sich gegebenenfalls mit Ihrem lokalen Motorola Vertriebspartner oder Händler in Verbindung. - Page 14 DESCRIPTION L'unité noise-com (ENMN4010) est conçue pour être utilisée sur la plupart des protecteurs auditifs passifs. Figure 1 noise-com Le noise-com (fig. 1) comprend les pièces suivantes: • Haut-parleur (1) • Coupelles de montage (2) • Microphone à annulation de bruit avec son coupe-vent (3) •...
- Page 15 2. Insérez le noise- com dans le protecteur auditif comme indiqué à la fig.2. Vérifiez que les coupelles du noise-com fig. 1 (2) sont bien placées derrière la rondelle qui se trouve sous le Figure 2 rembourrage interne du protecteur. Mais ne forcez pas ! 3.
- Page 16 ˚ Figure 4 Revenez à l'étape 1 de la section Installation pour terminer l'installation du noise-com dans le protecteur auditif. Fonctionnement: Le noise-com offre deux modes de fonctionnement: • VOX ou mains-libres - pour communiquer, il suffit à l'utilisateur de parler dans le microphone du noise-com fig.
- Page 17 2. Branchez le connecteur d’accessoire audio du noise-com au poste en prenant garde de ne pas trop serrer la vis de fixation. 3. Appuyez sur l'alternat du noise-com, fig. 1 (4), et maintenez-le enfoncé, puis allumez le poste. Veillez à ce que le volume ne soit pas réglé...
- Page 18 4. Appuyez sur le bouton d'alternat du noise-com et parlez dans le microphone du noise-com, fig. 1 (3), pour vérifier que l'émission et la réception fonctionnent. 5. Réglez le niveau audio du haut-parleur du noise-com avec le bouton de volume du poste. 6.
-
Page 19: Maintenance
MAINTENANCE Ces produits ne contiennent aucune pièce réparable. Pour commander un noise-com de remplacement et un coupe-vent de microphone 2604002K01 (lot de cinq), veuillez contacter votre représentant ou revendeur Motorola local qui vous donnera d'autres renseignements. -
Page 20: Instalación
DESCRIPCIÓN El noise-com (ENMN4010) está diseñado para acoplarse a la mayoría de los auriculares pasivos. Figura 1 noise-com El noise-com consta de las piezas que se indican a continuación y que se muestran en la fig. 1: • Audífono (1) •... - Page 21 2. Introduzca el noise-com en el auricular, tal como se muestra en la fig.2. Compruebe que las pestañas del noise-com fig. 1 (2) quedan encajadas detrás de la arandela rígida Figura 2 situada detrás de las almohadillas suaves que se encuentran dentro del auricular.
- Page 22 Nota: si desea situar el noise-com al otro lado de los auriculares (p. ej., cambiarlo del lado izquierdo al derecho), gire suavemente el altavoz del micrófono 180 , tal como se muestra en la fig. 4 (paso 1) y el extremo del micrófono, como en la fig.
- Page 23 Modo de funcionamiento VOX o "manos libres": Asegúrese de que la radio se ha programado previamente para el modo de funcionamiento VOX utilizando el software de programación de la radio suministrado por el distribuidor. 1. Apague siempre la radio antes de conectar la unidad noise-com.
- Page 24 Modo de funcionamiento con el botón PTT (presionar para hablar): 1. Apague siempre la radio antes de conectar la unidad noise-com. 2. Acople el conector de audio a la radio con cuidado de no ajustar demasiado el tornillo de sujeción. 3.
-
Page 25: Servicio Técnico
Este producto contiene piezas que no se pueden reparar. Existe la posibilidad de sustituir el noise- com y la pantalla del micrófono que protege del viento 2604002K01 (paquete de cinco unidades). Póngase en contacto con su representante o distribuidor local de Motorola para obtener más información. - Page 26 ŒÔËÒaÌË —ËÒÚÂχ noise-com (ENMN4010) Ô‰̇Á̇˜Â̇ ‰Îˇ ÛÒÚ‡ÌÓ‚ÍË Ì‡ ·Óθ¯ËÌÒÚ‚Â ÒÛ˘ÂÒÚ‚Û˛˘Ëı Ò‰ÒÚ‚ Ô‡ÒÒË‚ÌÓÈ Á‡˘ËÚ˚ Ó„‡ÌÓ‚ ÒÎÛıa. –ËÒ.1 noise-com —ËÒÚÂχ noise-com, ÔÓ͇Á‡Ì̇ˇ ̇ ËÒ.1, ÒÓÒÚÓËÚ ËÁ ÒÎÂ‰Û˛˘Ëı ˜‡ÒÚÂÈ: ï ƒË̇ÏËÍ 1 ï ÂÔÂÊÌ˚ Ù·̈˚ 2 ï ÿÛÏÓ·ÎÓÍËÛ˛˘ËÈ ÏËÍÓÙÓÌ 3 Ò ‚ÂÚÓÁ‡˘ËÚÌ˚Ï ˘ËÚÍÓÏ ï...
- Page 27 2. ¬ÒÚ‡‚¸Ú ·ÎÓÍ noise-com ‚ Á‡˘ËÚÌ˚È Ì‡Û¯ÌËÍ Í‡Í ÔÓ͇Á‡ÌÓ Ì‡ ËÒ. 2. Œ·ÂÒÔ˜¸Ú ÛÒÚ‡ÌÓ‚ÍÛ Ù·̈‚ noise- com 2 (ËÒ. 1) Á‡ ÊÂÒÚÍËÏË –ËÒ. 2 ÔÓÍ·‰Í‡ÏË, ‡ÒÔÓÎÓÊÂÌÌ˚ÏË Á‡ Ïˇ„ÍËÏË ‚ÒÚ‡‚͇ÏË ‚ÌÛÚË Ì‡Û¯ÌË͇. Õ ÔËÍ·‰˚‚‡ÈÚ ÔË ˝ÚÓÏ ˜ÂÁÏÂÌ˚ı ÛÒËÎËÈ! 3. œÓ‚ÂÌËÚ ·ÎÓÍ noise-com ̇ 90 ‚ÌÛÚË...
- Page 28 ËÒ. 4 (˝Ú‡Ô 1) Ú‡Í, ˜ÚÓ·˚ ÏËÍÓÙÓÌ Ó͇Á‡ÎÒˇ ‚ ÔÓÎÓÊÂÌËË, ÔÓ͇Á‡ÌÌÓÏ Ì‡ ËÒ. 4 (˝Ú‡Ô 2). ¬˚ÔÓÎÌËÚ ËÌÒÚÛ͈ËË ‡Á‰Â· "”ÒÚ‡Ìӂ͇", ̇˜Ë̇ˇ Ò Ô. 1, ‰Îˇ ÛÒÚ‡ÌÓ‚ÍË ·ÎÓ͇ noise-com ‚ ‰Û„ÓÏ Ì‡Û¯ÌËÍÂ. ˚ –ËÒ. 4 ›ÍÒÔÎÛ‡Ú‡ˆËˇ ≈ÒÚ¸ ‰‚‡ ÂÊËχ ‡·ÓÚ˚ ·ÎÓ͇ noise-com: ï...
- Page 29 1. œÂ‰ ÔÓ‰ÒÓ‰ËÌÂÌËÂÏ ·ÎÓ͇ noise-com Ó·ˇÁ‡ÚÂθÌÓ ‚˚Íβ˜ËÚ ‡‰ËÓÒÚ‡ÌˆË˛. 2. œËÒÓ‰ËÌËÚÂ Í ‡‰ËÓÒڇ̈ËË ‡Û‰ËÓ‡Á˙ÂÏ, Ì Á‡Úˇ„Ë‚‡ˇ ˜ÂÁÏÂÌÓ ÍÂÔÂÊÌ˚ ‚ËÌÚ˚. 3. Õ‡ÊÏËÚÂ Ë ‰ÂÊËÚ ̇ʇÚÓÈ ÍÌÓÔÍÛ –““ ̇ ·ÎÓÍ noise-com, Í‡Í ÔÓ͇Á‡ÌÓ Ì‡ ËÒ 1 (˝Ú‡Ô 4) Ë ‚Íβ˜ËÚ ‡‰ËÓÒÚ‡ÌˆË˛ ñ Ì ‰ÓÔÛÒ͇ÈÚÂ...
- Page 30 –‡·ÓÚ‡ c ڇ̄ÂÌÚÓÈ –““: 1. ¬Ò„‰‡ ‚˚Íβ˜‡ÈÚ ‡‰ËÓÒÚ‡ÌˆË˛ Ô‰ ÔËÒÓ‰ËÌÂÌËÂÏ ·ÎÓ͇ noise-com. 2. œËÒÓ‰ËÌËÚÂ Í ‡‰ËÓÒڇ̈ËË ‡Û‰ËÓ‡Á˙ÂÏ, Ì Á‡Úˇ„Ë‚‡ˇ ˜ÂÁÏÂÌÓ ÍÂÔÂÊÌ˚ ‚ËÌÚ˚. 3. ¬Íβ˜ËÚ ‡‰ËÓÒÚ‡ÌˆË˛ ñ Ì ‰ÓÔÛÒ͇ÈÚ ÛÒÚ‡ÌÓ‚ÍË ÒÎ˯ÍÓÏ ‚˚ÒÓÍÓÈ „ÓÏÍÓÒÚË. 4. Õ‡ÊÏËÚ ڇ̄ÂÌÚÛ Ì‡ noise-com Ë „Ó‚ÓËÚ ‚ ÏËÍÓÙÓÌ noise-com, Í‡Í ÔÓ͇Á‡ÌÓ Ì‡ ËÒ...
- Page 31 ÚÂıÌ˘ÂÒÍÓ„Ó Ó·ÒÎÛÊË‚‡Ìˡ. ÃÓÊÌÓ ÔËÓ·ÂÒÚË ·ÎÓÍ noise-com Ë Ô‰̇Á̇˜ÂÌÌ˚ ‰Îˇ ÌÂ„Ó ‚ÂÚÓÁ‡˘ËÚÌ˚ ˘ËÚÍË ÏËÍÓÙÓ̇ 2604002K01, ÔÓ ÔˇÚ¸ ‚ ÍÓÏÔÎÂÍÚÂ; ÔÓÍÛÔ͇ ˜ÂÂÁ ÏÂÒÚÌÓ„Ó Ô‰ÒÚ‡‚ËÚÂΡ ËÎË ‰Ë· ÙËÏ˚ Motorola. ƒ‡ÌÌ˚ ‡‰ËÓÒڇ̈ËË Ò‰Â·Ì˚ ‚ ≈—. œÂ‰ÒÚ‡‚ËÚÂθÒÚ‚Ó ÓÏÔ‡ÌËË ´ÃÓÚÓÓ· √á’ª ‚ –ÓÒÒËË —ÂÍÚÓ —uÒÚÂÏÌ˚ı »ÌÚ„uÓ‚‡ÌÌ˚ı –¯ÂÌuÈ...
- Page 32 © 2000 by Motorola, Inc. and Motorola are registered trademarks of Motorola, Inc. Professional Radio and GP are trademarks of Motorola, Inc. All Rights Reserved. noise-com™ is a trademark of SAVOX Communications Ltd/KITEK Oy AB. 6864119B14...