
Related Manuals for Audiovox GMRS-2000


Summary of Contents for Audiovox GMRS-2000
- Page 1 GMRS/Weather Model: GMRS-2000 General Mobile Radio Service Base Station With NOAA Weather Alert Owner’s Manual Customer Service/Service 1-800-290-6650...
- Page 2 CAUTION NEVER ATTEMPT TO CHARGE ALKALINE OR DRY CELL BATTERIES. WHEN RECHARGING, USE ONLY AUDIOVOX APPROVED RECHARGEABLE BATTERIES AND CHARGER. USE OF THE CHARGER WITH OTHER BATTERIES WILL CAUSE DAMAGE TO YOUR GMRS-2000 TRANSCEIVER. OTHER TYPES OF BATTERIES MAY BURST CAUSING PERSONAL INJURY.
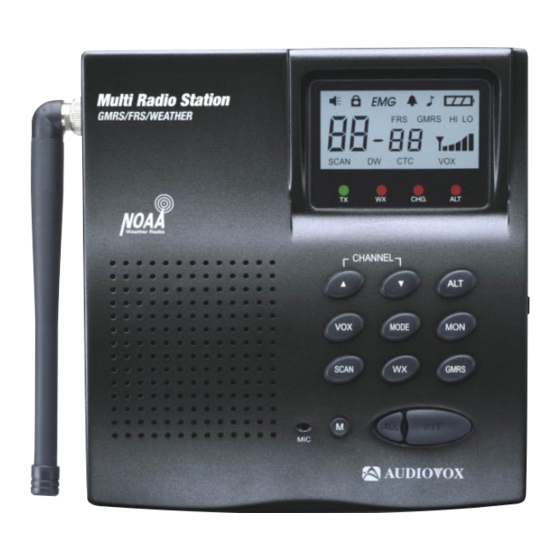
- Page 3 Model GMRS-2000 1. Battery Door (Right Rear Side) 2. Battery Charging On/Off Switch 3. Liquid Crystal Display (LCD) 4. Weather Mode (WX) LED (Red) 5. Antenna (Removable) 6. Receive(Green)/Transmit (Red) LED 7. MODE Button 8. Voice-Operated Transmission (VOX) Button 9. Weather (WX) Mode Button 10.
- Page 4 Model GMRS-2000 DISPLAY 1. Button (Key) Tone Beep On/Off Indicator: This icon appears when the beep key tone is on, and disappears when tone is not in use. 2. Monitor Indicator: Icon appears when the Monitor (L/MON) button is pressed and the channel monitor function is activated. 3.
- Page 5 10. GMRS Mode Indicator: Icon appears steady when GMRS mode is active; it disappears from display when weather mode is active. 11. HI/LO Indicators: Appropriate icon appears to identify the current transmit power level. 12. Signal Strength Indicator: Icon appears when a signal is being received.
- Page 6 BATTERY INSTALLATION POLARITY The following guidelines will improve performance and provide longer operating times for the GMRS-2000: 1. Do not mix old and new batteries. 2. Do not mix alkaline, standard (carbon-zinc) or rechargeable (Ni-MH) batteries. 3. If the unit is not to be used for an extended period of time, remove the batteries.
- Page 7 The battery charge indicator icon displays the battery charge level when the AC adapter is unplugged. When the AC adapter is connected and in use, the indicator icon will indicate a full charge as shown below. Full Battery - three segments are illuminated. Low Battery - one segment is illuminated.
- Page 8 Controls: Power On/Off Volume Control (22) At the right side of the unit, rotate the VOL control counterclockwise (CCW) from the off detent position; you will hear a confirming melody to indicate the unit is on and the LCD display will perform a 2-second power-on self- test and then revert to the GMRS standby mode.
- Page 9 the button allows the unit to revert to standby mode. When receiving an incoming signal, the received signal strength indicator ( ) will display the relative strength of the signal, and the TX/RX LED indicator will light steady green when a signal is being received, or will flash when in standby receive mode.
-
Page 10: Vox Selection
External Speaker (SPK)/Microphone (MIC) Jacks (6) This set of jacks accepts an Audiovox headset/microphone connector. Refer to GMRS Operational Modes. Scan/Lock Mode Button (12) Press this Button momentarily to enable or disable the scan mode. Press and hold Button for more than 1 second to lock or unlock keypad functions, except PTT and Monitor (L/MON). -
Page 11: Scan Operation
- At the right side of the unit, select the desired VOX sensitivity level by setting the VOX switch to LO, MID or HI position. - Momentarily press the VOX button to discontinue the VOX mode. NOTE: When the unit is transmitting in the VOX mode, no functions on the unit will operate. - Page 12 - To unlock the Key Pad, press and hold the SCAN button for at least 2 seconds; the ( ) icon disappears from the display. The PTT and Monitor Buttons are not effected. Weather Band Operation Channel Selection This feature provides access to 10 receive only channels within the weather band (7 NOAA channels and 3 Canadian marine channels).
- Page 13 In GMRS mode, after approximately 10 seconds, the RX/TX and WX indica- tors begin to flash sequentially, indicating that the weather alert mode is active and is sampling the selected channel. - Momentarily press the ALT button again to exit the weather alert func- tion.
- Page 14 GMRS-2000 OPERATIONAL MODES GMRS BAND MODE SWITCH NOTE: To switch between GMRS and Weather Band modes, momentarily press the WX button (for weather operation), or the GMRS button (for GMRS op- eration). To differentiate between operating modes, look for the GMRS indicator.
-
Page 15: Dual Watch Mode
NOTE: To communicate with other FRS or GMRS units, they must be switched to the same channel and CTCSS subcode. To commu- nicate with other FRS units that do not have subcodes, switch your unit to the same channel with the subcode set to 00. The CTCSS subcodes do not prevent others from hearing your transmission. - Page 16 To set the Dual Watch Mode: - From the GMRS standby mode, press the MODE button 3 times; the DW icon flashes on the display, together with the channel number currently selected. - To enable the dual watch mode, press the Up or Down button; the dual watch channel number will flash and start to increment up or down as the Up or Down button is pressed.
-
Page 17: Roger Beep Tone
When the battery ( ) icon appear(s) flashing on the LCD panel, re- charge unit or install new Audiovox approved rechargeable batteries. The unit will also provide an audible warning of low battery voltage. If this icon continues to flash on the LCD, please contact your authorized service center. -
Page 18: Notes For Good Communication
NOTES FOR GOOD COMMUNICATION 1 . The GMRS-2000 15 channels are shared on a ‘take turns’ basis. This means other groups may be talking on any of the channels. A common code of ethics/courtesy is to switch to another vacant channel and not to attempt to talk over someone who is already using the channel you first selected. -
Page 19: Troubleshooting
CTCSS privacy mode unwanted signals not on Interference from electronic devices such as computers or TVs Charge light Batteries are not installed and Install Audiovox approved flashes CHARGE switch (2) in the ON position Correction Charge or replace batteries Install the batteries... - Page 20 Technical Specifications: General Frequency Range: GMRS Refer to chart on next page Weather Refer to chart on next page Privacy Codes 38 for each main channel Dimensions (W x H x D) 6.7 in x 7.0 in x 2.6 in (Without Antenna) 170.0 mm x 177.0 mm x 66 mm Power Supply...
-
Page 21: Gmrs Channel Frequencies
This transceiver complies with FCC regulations for use in the United States of America. Use in other countries may be prohibited or restricted by local regulation. Please check with the local regulating agency be- fore using this device outside the United States of America. GMRS Channel Frequencies: Channel Freq. -
Page 22: Continuous Tone Coded Squelch System Tone Frequencies (In Hz)
Continuous Tone Coded Squelch System Tone Frequencies (in Hz) CTCSS Freq. Hz 67.0 71.9 74.4 77.0 79.7 82.5 85.4 88.5 91.5 94.8 97.4 100.0 103.5 107.2 110.9 114.8 118.8 123.0 127.3 00 = No Tone CTCSS Freq. Hz 131.8 136.5 141.3 146.2 151.4... -
Page 23: 90-Day Limited Warranty
90 DAY LIMITED WARRANTY Applies to Audiovox Family Radio and General Mobile Service Products. AUDIOVOX CORPORATION (the Company) warrants to the original retail purchaser of this product that should this product or any part thereof, under normal use and conditions, be proven defective in material or workmanship within 90 days... - Page 24 © 2001 Audiovox Electronics Corp., Hauppauge, NY 11788 Printed in Korea 128-6037...