Table of Contents
Advertisement
Quick Links
Advertisement
Table of Contents

Related Manuals for Audiovox VOD80


Summary of Contents for Audiovox VOD80
- Page 1 Owner/ Installation Manual VOD80 8" LCD MONITOR & DVD PLAYER...
- Page 2 Note: This Product incorporates copyright protection technology that is pro- tected by method claims of certain patents and other intellectual prop- erty rights owned by Macrovision Corporation and other rights owners. Use of this copyright protection technology must be authorized by Macrovision Corporation, and is intended for home and other limited view- ing uses only unless authorized by Macrovision Corporation.
-
Page 3: Important Notice
Important Notice An LCD panel and/or video monitor may be installed in a motor vehicle and visible to the driver if the LCD panel or video monitor is used for vehicle information, system control, rear or side observation or naviga- tion. -
Page 4: Cautions And Warnings
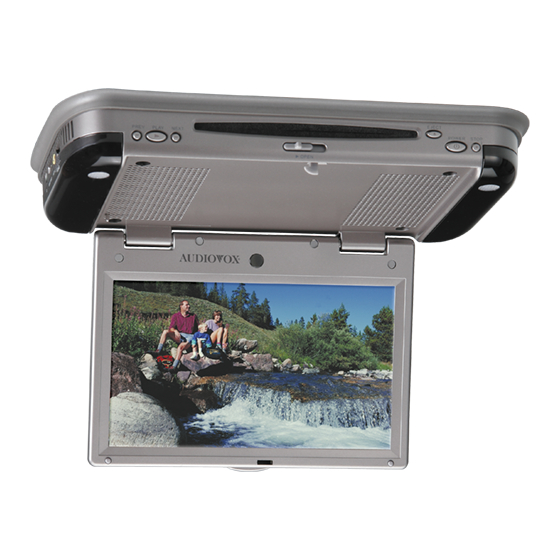
A. Introduction Thank you for selecting the VOD80. The main features include a 8" Wide Screen (16:9 Aspect Ratio) Liquid Crystal Display (LCD) monitor and a built-in DVD player. The unit applies the latest state of the art electronics. The unit is constructed to provide years of reli- able, trouble-free service. - Page 5 5. Disc Do not use irregularly shaped discs such as heart or star-shaped discs as they may cause the unit to malfunction. Do not stick pa- per, tape or glue on the disc. Do not expose the disc to direct sun- light or heat sources such as hot air ducts.
-
Page 6: Tools Required
D. Installation and Powering TOOLS REQUIRED: #2 Philips Screwdriver #1 Philips Screwdriver Utility or Razor Knife or Shears Wire Strippers Upholstery hook tool (for removal of panels as necessary) Electrical Tape Masking Tape Multimeter (to verify 12 volt DC and continuity: Do not use a test light or logic probe) Marker pen –... - Page 7 GENERAL INSTALLATION APPROACH: 1) Decide upon system configuration and options that will be installed (i.e.: what components, VCP, Tuner, RF Modulator/external amp, re- mote headphones, DVD, etc.). 2) Review all manuals to become familiar with electrical requirements and hook ups. 3) Decide upon mounting locations of all components and method of mounting.
-
Page 8: Vehicle Preparation
Notes :The VOD80 video system is only intended for an overhead, drop down installation. It is not intended for seat back or any other type of mounting. The hinging mechanism is designed for horizon- tal, drop down use only. VEHICLE PREPARATION: 1) Locate an accessory power source (+12v when key is in the ACC. - Page 9 MOUNTING THE VOD80 Figure 2 NOTE: Two of the mounting holes are located under the domelight cov- ers.
-
Page 10: Trim Ring Installation
The Trim Ring Installation is accomplished using the four (4) 2 X 8mm screws supplied. Please refer to the illustration below. 1. Place the VOD80 on a soft surface with the rubber gasket facing up. Use care to avoid scratching the unit’s exterior surface. - Page 11 7. Attach the four (4) post extensions to the bracket. 8. Attach the four (4) rubber spacers on the post extensions 9. Refer to the Owner/Install Manual for the VOD80 to complete the installation.
- Page 12 VOD80 1) Make the connections to the vehicle with the 5 pin wiring harness. 2) Connect the 5 pin harness to the mating connector on the Video Monitor. 3) Connect power harness to vehicle's electrical system by tapping into an accessory hot line.
-
Page 13: Connecting The Dome Lights
CONNECTING THE DOME LIGHTS The dome lights in the video monitor require three connections to the vehicle's wiring. There are two common types of dome light circuits used, positive or negative switched. Positive systems supply voltage to the interior lights to turn them on, negative switched systems apply ground to illuminate the bulbs. - Page 14 Positive Switched Dome lighting To 3 pin connector on Monitor Factory Dome light circuit constant +12vdc Negative Switched Dome lighting To 3 pin connector Factory Dome light circuit Factory Door ajar switch or Body Red / black - Lamp on Black / red - Lamp common Violet / brown - Lamp Auto Factory Door ajar...
- Page 15 E. Controls, Indicators, and Connectors 1. Unit View (Refer to Figure 6) 1) FM Modulator Switch 2) AV 2 In Jack 3) Game Port 4) Headphone Jack 5) Power and Dome Light Connector 6) 6pin connector 7) FM Antenna 8) Previous Button 9) Play Button 10) Next Button 11) Disc Insertion Slot...
- Page 16 2. Remote Control View (Refer to Figure 7) 1) Power Button 2) Display Button 3) Angle Button 4) Subtitle Button 5) A-B Button 6) Slow Button 7) Pause Button 8) Reverse Scan Button 9) Stop Button 10) Picture Button 11) DVD /AV1 /AV2 12) Zoom Button 13) Eject Button 14) Numeric Buttons...
-
Page 17: Basic Operation
G. BASIC OPERATION POWER PLAY SLOW PAUSE STOP FORWARD REVERSE UP/DOWN/LEFT /RIGHT ENTER NUMBERS RETURN MENU REPEAT DISPLAY ANGLE SUBTITLE AUDIO ZOOM SETUP DVD/AV1/AV2 EJECT PICTURE VOLUME- VOLUME+ SKIP- SKIP+ Turn the unit on/off Start Playback Play at 1/2,1/4,1/8, or 1/16 normal speed Still Picture (1 time) Stop at the present playing point / (2 times) Stop playing... -
Page 18: Display Mode
H. MENU A DVD is divided into sections called titles and chapters. When you play a DVD, a root menu of the disc will appear on the screen of your Monitor. The contents of the menu will vary depending on the disc content. -
Page 19: Playing Audio Cds
3) SUBTITLE During disc playback press SUBTITLE* to select the desired subtitle language. (You can see item 12 and 15 in Picture 1 change) 4) AUDIO During disc playback press AUDIO* to select the desired audio lan- guage. (You can see item 10 and 17 change at the same time in Picture 1 change) *NOTE: Some DVD’s only allow access to these functions through the DVD menu. -
Page 20: Using The Repeat Feature
USING THE REPEAT FEATURE The default mode for the Repeat feature is OFF. Pressing REPEAT consecutively changes the repeat options: • Repeat Single - repeats the track that is playing. • Repeat All - repeats the disc that is playing. •... -
Page 21: Playing A Jpeg File
4. Use the ( NEXT ) button to move to the next song. Press the (PREVIOUS) button to move to the beginning of the song. USING THE REPEAT FEATURE The default mode for the Repeat feature is OFF. Pressing REPEAT consecutively changes the repeat options: •... - Page 22 M. SETUP Press ‘SETUP’ to display the Main screen of the SETUP Menu. Press ‘SETUP’ again to exit the SETUP Menu and the unit will resume it’s last playback mode. 1) Select the ‘LANGUAGE’ page using the LEFT/RIGHT button. a. Select ‘OSD Menu’ using the UP/DOWN button, then press ENTER to enter the submenu.
- Page 23 b. Select ‘Subtitle’ using the UP/DOWN button, then press ENTER to enter the submenu. Select the ‘Subtitle’ language you desire using the UP/DOWN button, then press ENTER/LEFT to confirm the setting and exit. c. Select “Audio” using the UP/DOWN button, then press ENTER to enter the submenu.
- Page 24 2) Select the ‘Video’ Page by using the LEFT/RIGHT button. a. Select ‘TV Display’* using the UP/DOWN button, then press ENTER to enter the submenu. Select the TV display you desire using the UP/DOWN button, then press ENTER/LEFT to confirm the setting and exit.
- Page 25 b. Select ‘TV Type’ using the UP/DOWN button, then press ENTER to enter the submenu. Select the TV type you desire using the UP/DOWN button, then press ENTER/LEFT to confirm the setting and exit . c. Select ‘Angle Mark’ using the UP/DOWN button and then press ENTER to enter the submenu.
- Page 26 d. Select ‘Last Memory’ using the UP/DOWN button and then press ENTER to enter the submenu. Choose Last Memory on or off using the UP/DOWN button, then press ENTER/LEFT to confirm the setting and exit. *On: The unit will return to the last position on the disc. *Off: The unit will not return to the last position on the disc.
- Page 27 3) Select ‘Rating’ by using the LEFT/RIGHT button. ‘Rating’ Display Select ‘Password’ using the UP/DOWN button. Input the password (For the first time use the default password 3308) and press ENTER to unlock the unit. Select ‘Rating’ using the UP/DOWN button and press ENTER repeatedly to change the rating level.
- Page 28 N. Playing a Video Game (Refer to Figure 8) Change the source by pressing the DVD/AV1/AV2 button on the remote. The AV2 input jack is located on the left side of the unit. The AV1 input is the RCA connectors located on the top of the unit. A V 2 I N FM(MHZ) Connect the A/V output from your game system to the RCA inputs...
- Page 29 P.Wireless FM Modulator The VOD80 is equipped with built-in wireless FM Modulator*, that al- lows you to listen to the VOD80 audio signal by tuning your vehicle’s radio to the selected frequency, (88.3, 88.5, or 88.7MHz). This fea- ture is accessed by using the FM Select switch on the left side of the unit.
- Page 30 Game Controller Function Description Reset Button Direction Joystick Directional Keypad 1. Slide the power switch to the ON position. A list of the first ten games will be displayed. 2. Use the A button (page up) or B button (page down) to display the three pages of games (1-10), 11-20, 21-30).
-
Page 31: Specification
Q. Specification Disc format: DVD/CD/MP3 Color system: NTSC/PAL Screen size: 8” Resolution: 1440 x 234 Frequency response: 20 Hz to 20 kHz Video output: 1 Vp-p/75 Ohm, unbalanced Audio output: 1.4Vrms/10kOhm Audio S/N: Better than 60 dB Dynamic range : Better than 85 dB Laser: Semiconductor Laser, Wave Length: 650 nm/790 nm Power source: DC 12V Power consumption: 2.5 Amps... -
Page 32: 12 Month Limited Warranty
AUDIOVOX ELECTRONICS CORP. (the Company) warrants to the original retail purchaser of this product that should this product or any part thereof, under normal use and conditions, be proven defective in material or workmanship within 12 months from the date of original purchase, such defect(s) will be repaired or replaced with reconditioned product (at the Company's option) without charge for parts and repair labor. - Page 33 © 2006 AUDIOVOX Electronics Corp., Hauppauge, NY 11788 128-7744...