Table of Contents

Related Manuals for Dukane Camera 250


Summary of Contents for Dukane Camera 250
- Page 1 Dukane AV Camera 250 and Camera Software Guide Version V1.1 DUKANE Audio Visual Products 2900 Dukane Drive, St. Charles, Illinois 60174 Toll-free: 888-245-1966 Fax: 630-584-5156 E-mail: avsales@dukane.com www.dukaneav.com 1 of 14...
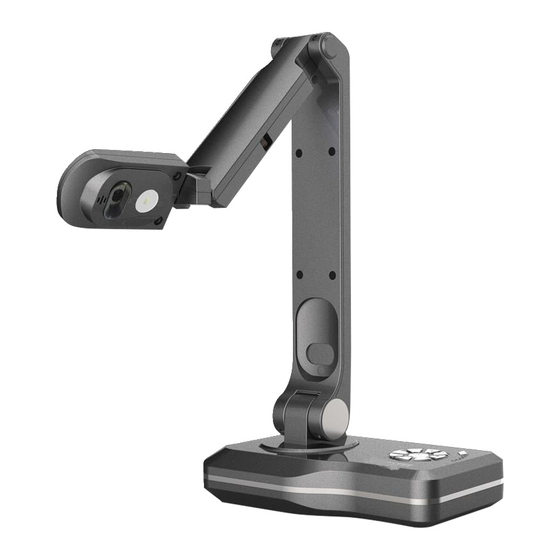
- Page 2 Dukane AV Contents 1. Camera 250 Properties 2. Camera 250, Operating alone ( No computer) Just HDMI or VGA out. 3. Camera Software on the computer ( Using the USB connection to camera ) 4. Troubleshooting and operating tips 1.0 Camera 250 Properties 1 5.0M pixels 1/4"CMOS Sensor...
- Page 3 Dukane AV Side Panel Ports Push Button Controls on base 3 of 14...
-
Page 4: Technical Properties
100X Operating modes 1. Camera 250 Operating alone ( No computer) Just HDMI or VGA out. a. Connect camera with the HDMI cable to projector or display panel. b. Connect camera with the VGA (out ) cable to projector or display panel. - Page 5 Dukane AV Camera 250 Operating alone ( No computer) Just HDMI or VGA PC less ( No Computer Connected Operation ) 1. Plug in the power adapter and power cable to camera. 2. Connect the HDMI or VGA (out) cable from Camera to Display.
-
Page 6: Using The Sd Card
Dukane AV Using the SD Card 1. Insert SD card in slot. 2. When SD card is correctly inserted, images and videos will be saved automatically to the card. 3. Remove the card by pushing inward and releasing. Card will spring outward. -
Page 7: Control Settings
Dukane AV Annotation Click on the pencil icon to get the annotation menu. Annotation Menu tools Main Menu 1 Back to main interface 2 Save interface 3 Empty interface annotation 4 Cancel last operation 5 Brush Annotation tool Menu 6 Clean... -
Page 8: Install The Software
5. Final image can be displayed on the computer screen and also by a projector or panel. 3.1. Install the Software Install the Visualizer program from the CD or the Dukane web site. For the website; See the Downloads on the website product page, or the Downloads on the SUPPORT section. - Page 9 Dukane AV Presenter Mode ( Camera image and operation ) Presenter For startup, use the Presenter mode to view the camera image. The Presenter window has menus on the right side for annotation and a tray menu to control the image properties.
- Page 10 Dukane AV Annotatiom menu continued Sub menu for annotation Choice, select Rectangle Circle Ellipse Triangle Text Eraser Delete Line, curve, dash Color Line thickness Opacity Type Other camera Image Menu ( at the bottom ) Use image menu to control properties like the focus, contrast, brightness, saturation, size, resolution, and rotation.
- Page 11 Dukane AV Desktop on the circular menu Desktop One added icon in the tool-bar for the Desktop. It is for the desktop operations . Layout options. Other tools have the same functions. You can annotate, clean, snap and other operations on the pre-prepared document.
- Page 12 Dukane AV Single frame image Two images compared 4 images compared 12 of 14...
- Page 13 Dukane AV Scan on the circular menu Use for file management and advanced image processing. Scan File management window. Image capture window. Image processing window. Toolbar options Cancel Revert Brightness Saturation Contrast ratio Correct black edge Flip horizontal Flip vertical...
-
Page 14: Troubleshooting And Operating Tips
3. If removing camera from the computer, please close the camera software first, then turn off the camera power, and finally disconnect the HDMI , VGA, or USB cable. 4. For other issues try to restart your computer. TROUBLESHOOTING CAMERA 250 DUKANE CORP AV SERVICE DEPT 2900 Dukane Drive St Charles, IL 60174 800-676-2487 / 630-762-4032...