
Related Manuals for Biostar TB360-BTC D+


Summary of Contents for Biostar TB360-BTC D+
- Page 1 TB360-BTC D+ TB360-BTC D+ Quick Installation Guide 1. Package Checklist • Serial ATA Cable x1 • SATA Power Cable x1 • Quick Installation Guide x1 • Fully Setup Driver DVD x1...
- Page 2 TB360-BTC D+ 2. Install Central Processing Unit (CPU) Socket 1151 for 8th/9th Intel® Core i7 / i5 / i3 / Pentium / Celeron processor Maximum CPU TDP (Thermal Design Power): 95Watt * Please refer to www.biostar.com.tw for CPU support list 3. Connect Cooling Fans...
- Page 3 TB360-BTC D+ 4. Install System Memory 3 |...
- Page 4 TB360-BTC D+ 5. Headers & Connectors Note 1. It is recommended to use a single 12V output Server PSU, Because the motherboard does not have any PSU 24pin power connect. 2. Before you power on the system, please make sure that ATXPWR1~8 connectors have been plugged-in.
- Page 5 TB360-BTC D+ 6. PCIe Power Source Connector 5 |...
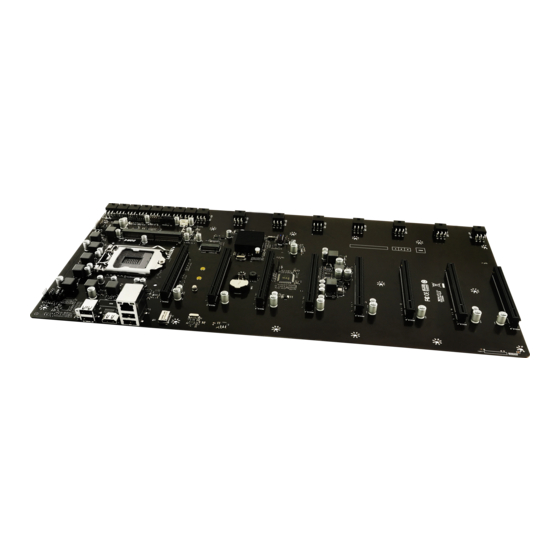
- Page 6 TB360-BTC D+ 7. Expansion Slots Note Please make sure to connect the screen output to Onboard HDMI. The default display output of TB360-BTC D+ is Onboard HDMI. If the screen output is connected to the graphics card, the screen will not be displayed.
- Page 7 TB360-BTC D+ 8. Solid-State-Disk Connectors & Front Panel Header Solid-State-Disk Connectors: Front Panel Header: This connector includes Power-on, Reset, HDD LED and Power LED connections. It allows user to connect the PC case’s front panel switch functions. 7 |...
- Page 8 TB360-BTC D+ Q1: If it is difficult to get the Server PSU, how to install without Server PSU? A1: We would recommend using ATX PSU instead, you can use the following steps to install. 1. Please make sure that the ATX PSU power supply is connected to the motherboard. The power supply connector has 8sets of 6pin 12V output lines. Such as pictures. 8 |...
- Page 9 TB360-BTC D+ 2. Short-circuit the switch of the power supply, as the picture below: Insert the metal wire into the 24 pin power cord of the main PSU, Short-circuit the green power cord and the black power cord. If the power cord is completely black and illegible, please buckle up the plug and insert the metal wire into the fourth and fifth holes on the left. 3. It is recommended to start the system test first, make sure the power supply can work normally and then perform BIOS settings Note Use multiple sets of 6 pin / 6 + 2 pin 12V output cables. *It is recommended to use a High wattage ATX PSU (above 1000W) Please do not use two sets of ATX PSU to connect to the motherboard at the same time.
- Page 10 TB360-BTC D+ Q2: How to connect the PSU line of the graphics card? A2: Please refer to the following instructions 1. Please prepare a 6 pin to 8 pin computer graphics power cord x8 group first. As picture below 2. If the installed graphics card with 6 pin & 8 pin power supply slot, please make sure to use 6 pin to 6 pin + 8 pin/ 6pin to dual 6+2 pin power cord. Q3: How to overclock the graphics card? A3: Overclocking the graphics card is an act of individuals who want to increase the mining power, please contact the store where you purchased the product or local dealer.
- Page 11 TB360-BTC D+ Q4: If the system has been installed, but it can’t boot? Or there is no display screen when booting up? A4: Please refer the following instructions: Before you power on the system, please make sure power cord has been plugged-in. 1. Please first check whether the CPU/DDR/hard disk is installed correctly. 2. Please disassemble the graphics card to reduce system power consumption. Use the CPU internal display to output the system screen to confirm that the system is turned on normally. 3. If the system can be turned on, try installing the graphics card. If it cannot be turned on, the power supply may have insufficient wattage.
- Page 12 TB360-BTC D+ Q5: How to set BIOS if using Intel CPU without display? A5: The TB360-BTC D+'s original BIOS Primary Display is set to "IGFX", please install the Intel CPU with built-in display and set the BIOS first. After this step, the Intel CPU without display also can work with this setting.