Breville Bambino BES450 Instruction Book
Hide thumbs
Also See for Bambino BES450:
- Instruction book (65 pages) ,
- Instruction book (64 pages) ,
- Instruction book (24 pages)
Advertisement
Advertisement

Related Manuals for Breville Bambino BES450


Summary of Contents for Breville Bambino BES450
- Page 1 Bambino ™ Instruction Book - BES450...
-
Page 2: Table Of Contents
RECOMMENDS appliance. SAFETY FIRST • Do not touch hot surfaces. Use handles or knobs as At Breville we are very safety advised in this instruction conscious. We design and manufacture consumer book. products with the safety of you, •... - Page 3 8 years. or has been damaged in • Appliances can be used by any way. Immediately stop persons with reduced use and call Breville physical, sensory or mental Consumer Support. capabilities or lack of • The use of accessory experience and knowledge...
- Page 4 Ensure the should be performed at an surface is level, clean and authorised Breville Service free of water and other Centre. substances. • The installation of • Do not let the power cord...
- Page 5 STORAGE regarding the memory storage chip, please • Please note that in order to contact us at privacy@ better serve our customers, breville.com internal memory storage has been imbedded into SPECIFIC your appliance. This INSTRUCTIONS FOR memory storage consists...
- Page 6 is inserted. Refer to ‘Care & • Ensure the product is Cleaning’ for further properly assembled instructions. before first use. Ensure the portafilter is • Do not use any other firmly inserted and secured liquid apart from cold into the group head before mains/tap water.
- Page 7 SHORT CORD 2. the cord should be INSTRUCTIONS arranged so that it will not drape over the • Your Breville appliance is counter-top or table fitted with a short power where it can be pulled on cord to reduce personal...
-
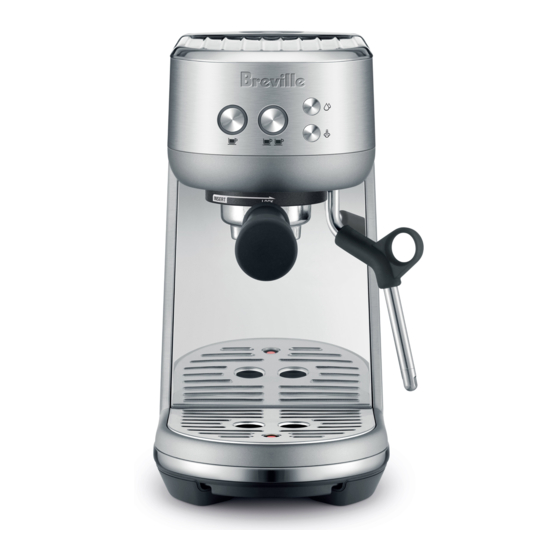
Page 8: Components
Components A. 1.4L (47 fl.oz) removable water tank E. Steam wand grip B. Control panel F. Steam wand 1 CUP, 2 CUP, hot water, steam buttons G. Removable drip tray grid C. Group head H. Removable drip tray with full indicator D. - Page 9 ACCESSORIES A. 54mm tamper (Note: Do not submerge in water or any liquid) B. Steam tip and basket cleaning tool (Located under the water tank) C. Dual wall filter baskets (1 cup & 2 cup) D. Descaling powder...
-
Page 10: Features
Bambino ™ Assembly Features COMPACT FOOTPRINT BEFORE FIRST USE Cafe quality coffee in a compact machine. Machine Preparation MANUAL MILK TEXTURING Remove and discard all labels and packaging materials attached to your machine. Ensure Manually textures milk from silky smooth latté you have removed all parts and accessories to creamy cappuccino. -
Page 11: Functions
Functions FILLLING THE WATER TANK FIRST USE Lift the water tank from the machine. Remove 1. Remove the water tank and fill it with potable water to the indicated MAX line. the water tank lid and add potable water to Place the water tank back firmly onto the the water tank, filling to the MAX marking indicated. - Page 12 THE GRIND NOTE When grinding coffee beans, the grind size We recommend quality 100% Arabica beans should be fine but not too fine. The grind size with a ‘Roasted On’ date stamped on the bag, will affect the rate at which the water flows not a ‘Best Before’...
- Page 13 PRE-PROGRAMMED SHOT VOLUME PROGRAMMING COFFEE VOLUME - 1 CUP Press and hold the 1 Cup and 2 Cup buttons for 2 seconds, the buttons will illuminate and flash. Press the 1 Cup button for less than 1 second, the button will flash indicating that it has been selected.
- Page 14 MANUAL MILK TEXTURING STEAM WAND MANUAL PURGE • Lift the steam wand and insert into the To reduce steam wand blockages, we milk jug with the steam wand tip 1-2cm recommend running steam through the steam (O inch) below the surface of the milk, wand after milk texturing.
- Page 15 EXTRACTION TIPS A great espresso is about achieving the perfect balance between sweetness, acidity, and bitterness. The flavour of your coffee will depend on many factors, such as the type of coffee beans, degree of roast freshness, coarseness or fineness of the grind, dose of ground coffee and tamping pressure. Experiment by adjusting these factors just one at a time to achieve the taste of your preference.
-
Page 16: Care & Cleaning
Care & Cleaning TO PERFORM A CLEAN & CLEAN & DESCALE CYCLE DESCALE CYCLE When descale cycle counter reaches 1500, 1. Empty the drip tray and re-insert firmly into the 2 Cup button will continuously flash; position on the machine. indicating machine will need cleaning and 2. - Page 17 7. Press the 2 Cup button to proceed rinse cycle. 0.5s 8. When the rinse cycle is complete, the machine will then go into ready mode. & GROUP HEAD RINSE • Press ‘2 Cup’ button to flow freshwater 9. Remove and empty the waste water flush cycle.
- Page 18 CLEANING THE OUTER HOUSING • Wipe the outer housing with a soft, damp cloth and then polish with a soft, dry cloth. NOTE Do not use any abrasive cleaners, pads or cloths which can scratch the surfaces of the machine. NOTE Do not clean any of the parts or accessories in the dishwasher.
-
Page 19: Troubleshooting
Troubleshooting PROBLEM POSSIBLE CAUSES EASY SOLUTION • • Water does not flow from Water tank is empty. Fill tank. the group head. • • Water tank is not fully inserted and Push water tank down completely to lock No hot water. locked into position. - Page 20 Allow to cool for about 30–60 minutes. If problem persists, call Breville Support. • • 2-cup coffee This indicates machine needs Perform a clean and descale cycle. Follow cleaning and descaling the steps outlined on page 16.
- Page 21 Notes...
- Page 22 Notes...
- Page 23 Notes...
- Page 24 Web: www.breville.com Breville, the Breville logo, Bambino, ThermoJet, Breville Assist and Master Every Moment are trademarks of Breville Pty Ltd (“Breville”). A.B.N. 98 000 092 928. Copyright Breville Pty. Ltd. 2020. Due to continued product improvement, the products illustrated/photographed in this booklet may vary slightly from the actual product.