Garmin Edge Remote Instructions
Hide thumbs
Also See for Edge:
- Installation instructions manual (134 pages) ,
- Instructions manual (26 pages) ,
- Instructions manual (14 pages)
Advertisement
Quick Links
Edge
Remote Instructions
®
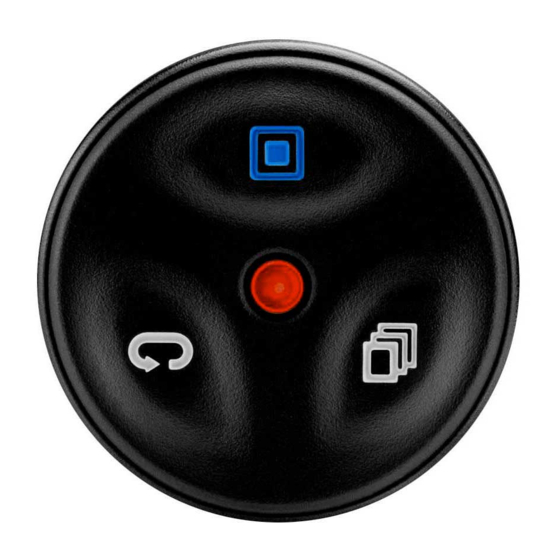
Device Overview
Lap key. Select to mark a new lap.
Action key. Select to start and stop the timer. Hold to turn on the
backlight.
NOTE: This is the default functionality of the action key. The action
key functions are programmable.
Page key. Select to scroll forward through the data pages. Hold to
scroll through the data pages in reverse.
Status LED.
Status LED
LED Activity
Status
Flashing green
Searching for a paired device.
Alternating red and green Attempting to pair with a new device.
12 rapid green flashes
Successfully paired with a device.
Four rapid green flashes
Successfully sent a command to a device.
Four rapid red flashes
Failed to send a command to a device.
Pairing the Remote with Your Edge Device
The first time you connect the Edge remote to your Edge device,
you must pair the remote with your device.
1
Bring the remote within 3 m (10 ft.) of the device.
NOTE: Stay 10 m (33 ft.) away from other ANT+
while pairing.
2
From the Sensors menu, select Add Sensor > Edge
Remote.
3
On the remote, hold two keys simultaneously until the status
LED starts alternating green and red, and release the keys.
The remote searches for your device. When the remote pairs
successfully, the status LED flashes green 12 times, and the
remote name appears on the device.
4
Select the remote, and select Add.
After the remote is paired, it connects to your device whenever
the device is in range and turned on.
Customizing the Action Key
1
From the Sensors menu, select Edge Remote > Sensor
Details.
2
Select Single Press or Press and Hold.
3
Select a function for the action key.
For example, you can set the action key to display the map or
turn on the backlight.
Installing the Mountain Bike Mount
1
Select a secure location to mount the device where it does
not interfere with the safe operation of your bike.
2
Place the rubber pad around the handlebar.
3
Use the hex key to remove the screw
connector
4
Place the handlebar connector around the rubber pad.
5
Replace and tighten the screw.
NOTE: You should check the tightness of the screw
periodically.
Installing the Road Bike Mount
1
Select a secure location to mount the device where it does
not interfere with the safe operation of your bike.
2
Place the rubber disk
The rubber tabs align with the back of the bike mount so the
mount stays in place.
3
Attach the bike mount securely using the two bands
Using the Mounts
®
sensors
Several mounts are available for your remote, either included
with the product or as an optional accessory. The mounts allow
you to attach the remote to your body, your bike, or other
objects.
• Align two of the notches
press the remote into the mount until it clicks.
• Press gently on the release tab
the mount.
Replacing the Battery
Before you can replace the battery, you must have a small
Phillips screwdriver, a small flat screwdriver, and a CR2032
lithium coin-cell battery.
.
on the back of the bike mount.
with the sides of the mount, and
, and lift the remote from
from the handlebar
.
January 2019
190-01694-91_0E
Advertisement

Related Manuals for Garmin Edge


Summary of Contents for Garmin Edge
- Page 1 Failed to send a command to a device. Pairing the Remote with Your Edge Device The first time you connect the Edge remote to your Edge device, you must pair the remote with your device. Attach the bike mount securely using the two bands Bring the remote within 3 m (10 ft.) of the device.
- Page 2 *The device withstands pressure equivalent to a depth of 50 m. For more information, go to www.garmin.com/waterrating. © 2014 Garmin Ltd. or its subsidiaries Garmin , the Garmin logo, and Edge are trademarks of Garmin Ltd. or its subsidiaries, ® ® registered in the USA and other countries. ANT+ ®...