
Related Manuals for JDS Uniphase cORL-A1


Summary of Contents for JDS Uniphase cORL-A1
- Page 1 Optical Return Loss Meter Operating Manual BN 2298/21 BN 2298/22 BN 2298/23 BN 2298/98.21 2008.11 English...
- Page 2 ITU-T and/or ETSI. © Copyright 2008 JDSU Deutschland GmbH. All rights reserverd. JDSU and JDSU logo are trademarks of JDS Uniphase Corporation. Other trademarks are the property of their respective holders.
-
Page 3: Table Of Contents
NTRODUCTION cORL-A1 Optical Return Loss Meter ..1 Operating manual update ....2 Symbols used in this operating manual . - Page 4 Accessories ......55 ......1 NDEX cORL-A1 JDSU...
-
Page 5: Introduction
The Compact Photonic Tools are stackable, so you can assemble individual test sets. Common features The cORL-A1 is available in two or three laser versions with the option to select from four key wavelengths: 1310, 1490, 1550, and 1625 nm. The single optical output found in the cORL-A1 greatly simplifies the optical connections and calibrations. -
Page 6: Operating Manual Update
(or loss) for each wavelength. Additionally, with these two units paired together, simultaneous insertion loss and return loss may be measured. Pairing the cORL-A1 with the cOPM created the functionality of the historic JDSU RM Series or singlechannel RX Series. -
Page 7: Symbols Used In This Operating Manual
This safety instruction is given if the danger is due to laser radiation. Information specifying the laser class is also given. Very important instruction Follow this instruction carefully; e.g. Make sure you protect yourself and others from exposure to laser light. JDSU cORL-A1... - Page 8 Cross references Text in blue Cross references are indicated in blue type. When using the PDF version, just click on the blue text to skip to the cross reference. Instrument keys [Store] Instrument keys are indicated within square brackets. cORL-A1 JDSU...
-
Page 9: Afety Nformation
⇒ Please make sure the device is not operated outside the permitted ambient conditions. ⇒ Observe the specified measurement range. ⇒ Always make sure that the device is in proper working order before switching it on. JDSU cORL-A1... -
Page 10: Laser Safety
Never look directly into the output of a laser source or into an optical fiber connected to it. Always cover unused ports. Observe the normal precautions for working with laser radiation and follow any local regulations. cORL-A1 JDSU... -
Page 11: Ventilation
AFETY NFORMATION Ventilation Insufficient ventilation Insufficient ventilation can damage the device or adversely affect its function CAUTION and safety. Ensure adequate ventilation when operating the device. JDSU cORL-A1... -
Page 12: Snt-121A Adapter
If condensation cannot be avoided, such as when the SNT-121A Adapter is cold and is moved to a warm room, wait until the SNT-121A Adapter Unit is dry before plugging it into the AC power line. cORL-A1 JDSU... -
Page 13: Etting Tarted
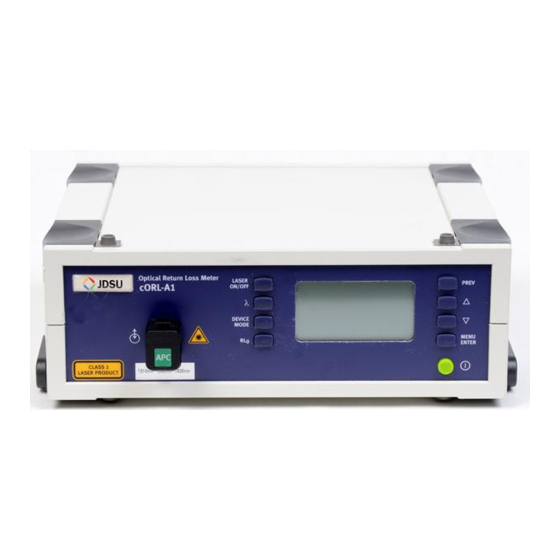
Do not operate the device until it has reached its specified temperature range and wait until it has cooled down if the device was stored at a high temperature (see „Ambient temperature” on page 52). JDSU cORL-A1... - Page 14 ETTING TARTED Device overview Fig. 1 Frontal view cORL-A1 JDSU...
- Page 15 Laser ON/OFF Press to switch laser on and off. Device Mode Toggle between modes: Power Meter → Laser Source → Return Loss Test →... Press to switch the device on and off. Press to: • scroll up/down in the menus • change values in the menus JDSU cORL-A1...
-
Page 16: Power Supply
• via the USB control interface Operation from AC power NOTICE: Only the SNT-121A Adapter must be used to operate the cORL-A1 from AC power. To fit the AC line plug adapter: 1. Select the appropriate AC line plug adapter. - Page 17 (see Fig. Fig. 4 SNT-121A: Changing the AC line plug adapter. To operate the cORL-A1 from AC power: 1. Connect the SNT-121A DC power cord to the cORL-A1 DC power socket. (The socket is located on the back panel.) 2. Plug the SNT-121A into the AC line socket.
- Page 18 Although the USB interface is primarily intended for remote control, it can also be used to power the cORL-A1. To power the cORL-A1 via the USB interface: ⇒ Just connect a standard USB cable to any USB socket of a PC or USB hub.
-
Page 19: Asic Peration
⇒ Press and hold down [ ] for more than 2 sec. to switch off the device. Display elements Laser OFF 1 wavelength Continuous wave Laser ON 2 wavelengths Auto-λ Fig. 5 Measurement display in laser source mode. JDSU cORL-A1... -
Page 20: Navigating In The Menus
ASIC PERATION External power supply The cORL-A1 is powered by the external AC adapter when this symbol is shown. Power supply via USB The device is powered via the USB interface for remote operation. Signal modulation • CW: Continuous wave Auto-λ... - Page 21 Set Factory Set the device parameters and Default settings to their default values as defined by JDSU. This does not affect any stored measurement results. Show Info Display basic device information. Edit Date Adjust date. Edit Time Adjust time. JDSU cORL-A1...
- Page 22 To edit the λ-Table: 1. Press Edit λ-Table in the CONFIGURATION menu. The EDIT λ-TABLE menu opens (displayed wavelengths may vary according to model and settings). 2. Highlight the entry to be edited and press [MENU ENTER]. A window opens: cORL-A1 JDSU...
- Page 23 Auto-λ is a special feature developed by JDSU that allows you to identify wavelengths automatically. To do this, the signal is modulated at a certain frequency (by a light source equipped with Auto-λ, such as a JDSU OLS-55/-56), which can be detected by a JDSU cORL-A1. JDSU cORL-A1...
- Page 24 Display in Auto-λ mode When Auto-λ mode is activated and different wavelengths are detected, the power levels measured at these wavelengths are displayed simultaneously. Display in Auto-λ mode showing the detected wave- Fig. 6 lengths and their power levels. cORL-A1 JDSU...
- Page 25 The FACTORY DEFAULT menu opens: 2. Press [MENU ENTER] to set the factory defaults. – or – Press any key to exit from the menu without making any changes. Note: Setting the factory default values does not affect your stored measurement results. JDSU cORL-A1...
- Page 26 1 hour. The device is without any power if • neither the SNT-121A Adapter is connected, • nor a USB connection is established and • no batteries are fitted or the batteries are discharged. cORL-A1 JDSU...
- Page 27 Optical Power Meter OLP-15 (also no longer available). You can simulate this signal modulation to make the cORL-A1 compatible with the OLS-15. 1. Select Laser-Mode in the CONFIGURATION menu.
- Page 28 4. Connect the device to the PC via the USB interface. Note: Once the update has been started it cannot be stopped by pressing any of the keys. To stop the update you must disconnect the device from all power sources (adapter/charger, batteries, USB connection). cORL-A1 JDSU...
- Page 29 ASIC PERATION Selecting a language 1. Select Select Language in the CONFIGURATION menu. The SELECT LANGUAGE menu opens: 2. Press [▲▼] to highlight the language you want and press [MENU ENTER] to select it. JDSU cORL-A1...
-
Page 30: Operation
1. Laser Source: The cORL-A1 operates as a laser source. 2. Power Meter: The cORL-A1 operates as a power meter. 3. Return Loss Test: The cORL-A1 operates as a loss test meter. The laser source and the power meter are both activated. To select modes 1 to 3: ⇒... -
Page 31: Laser Source Mode
PERATION Laser Source mode Display in Laser Source mode The display after powering up the device will differ depending on the cORL-A1 model (two or three wavelengths). Laser OFF 1 wavelength Continuous wave Laser ON 2 wavelength Auto-λ Fig. 7 Measurement display in Laser Source mode. - Page 32 All following settings refer to the SOURCE MAIN menu. Auto-Lambda Switching Auto-λ on/off ⇒ Press [MENU ENTER] to switch Auto-λ on and off (toggle function). Note: The signal is only modulated (at 270 Hz, 1 kHz, 2 kHz) when Auto-λ is deactivated. cORL-A1 JDSU...
- Page 33 PERATION Signal modulation Modulation frequencies provided by the cORL-A1: • CW (Continuous Wave): without modulation • 270 Hz modulation • 1 kHz modulation • 2 kHz modulation To select a modulation frequency: ✓ Modulation cannot be selected when Auto-λ is acti- vated.
- Page 34 – press once to change the value one step at a time, – hold down key to increase the step change rate. 3. Press [λ] to select next wavelength. 4. Press [MENU ENTER] to accept the settings and exit EDIT mode. cORL-A1 JDSU...
-
Page 35: Power Meter Mode
PERATION Power Meter mode Note: The cORL-A1 can be used to measure optical power levels on single-mode fibers. In contrast with “pure” power meters, the test port is an angled physical contact (APC) connector. An APC connector must therefore be used to connect a test signal to the cORL-A1. - Page 36 (see „Setting the reference value” on page 34). Edit Ref. Level Edit the reference level (see „Setting the reference value” on page 34). Configuration Change the basic settings (see „Configuring the device” on page 16). cORL-A1 JDSU...
-
Page 37: Selecting A Wavelength
To display the relative power level: ✓ The absolute level in dBm is displayed and dB is shown in the menu. ⇒ Highlight dB and press [MENU ENTER] . The display will show the relative level in dB. JDSU cORL-A1... - Page 38 The reference level is displayed in the top display bar. Reference power level display mode is activated. Note: The reference level must be stored for each wavelength separately and is saved even when the power is off. cORL-A1 JDSU...
-
Page 39: Return Loss Test Mode
5. Press [▲▼] to change the value 6. Press [MENU ENTER] to accept the setting. Return Loss Test mode The laser source and the receiver of the cORL-A1 are both activated in Return Loss Test mode. The power meter unit wavelengths are locked to the source wavelengths. - Page 40 Power Meter mode (see „Display in Power Meter mode” on page 31). Note: The measurement results in Return Loss Test mode are displayed in positive values. ORL MAIN menu ⇒ Press [MENU ENTER] to open the ORL MAIN menu. cORL-A1 JDSU...
- Page 41 4. Press [MENU ENTER] to open the ORL MAIN menu. 5. Select Normalize Open Port. The normalization will be performed and the display will switch to measurement mode. The display shows “High”. Note: Normalization will be performed for all wavelengths automatically. JDSU cORL-A1...
-
Page 42: Maintenance
3. Blow out the test adapter with clean compressed air (available in spray cans, e.g. Anti Dust Spray). Note: Cover the optical connections with the dust cap whenever they are not in use. This prevents them from getting dirty. cORL-A1 JDSU... -
Page 43: Cleaning The Instrument
Water and cleaning fluids The device may be damaged or destroyed if water or cleaning fluids CAUTION get inside it. Make sure that water or cleaning fluids do not get inside the instrument. JDSU cORL-A1... -
Page 44: Emote Ontrol
EMOTE ONTROL Communication interface The cORL-A1 is equipped with a USB interface for remote control via a PC. The driver files needed on the PC for this can be download from www.jdsu.com/ test_and_measurement. The following table lists the parameter types used in remote control. -
Page 45: Parameters
EMOTE ONTROL Parameters Overview Utility commands *IDN? *OPC? :SYST:PERM:POW :DISP:CONT :DISP:CONT? :SYST:LANG :SYST:LANG? :SYST:DATE :SYST:DATE? :SYST:TIME :SYST:TIME? :DEV:MODE :DEV:MODE? Laser Source commands :SYST:SOUR:NUMB? :SYST:SOUR:WAV:VAL? :SYST:SOUR:POW:MAX? :SYST:SOUR:POW:MIN? :SYST:SOUR:MODE :SYST:SOUR:MODE? :SOUR:ID :SOUR:ID? :SOUR:WAV:AUTO :SOUR:WAV:AUTO? :SOUR:MOD :SOUR:MOD? :SOUR:POW :SOUR:POW? :SOUR:STAT :SOUR:STAT? JDSU cORL-A1... - Page 46 EMOTE ONTROL Power Meter commands :POW:CAL:WAV:MAX? :POW:CAL:WAV:MIN? :POW:CAL:WAV:TAB :POW:CAL:WAV:TAB? :POW:CAL:WAV :POW:CAL:WAV? :POW:DISP:UNIT :POW:DISP:UNIT? :POW:REF:STAT :POW:REF:STAT? :POW:REF:VAL :POW:REF:VAL? :POW:WAV:AUTO :POW:WAV:AUTO? :POW:FETC:AM:AUTO:FREQ? :POW:FETC:AM:INT:FREQ? Return Loss commands :SOUR:ID :SOUR:ID? :SOUR:STAT :SOUR:STAT? :RET:LOSS:NORM :FETC:MEAS:VAL? cORL-A1 JDSU...
- Page 47 Unit / Info *IDN? Returns the unique identification of the device. Response type: <STRING_RESPONSE_DATA> e.g. JDSU Germany GmbH, cORL-A1/01,A-0106,V03.30 *OPC? Returns “1” as soon as all operations in progress have been completed. :SYST Ensures the device is switched on :PERM permanently i.e.
- Page 48 23,59,59 :DEV:MODE Sets the device operating mode. Parameter type: <MNEMONIC> Modes: • SOUR: Laser Source mode • POW: Power Meter mode • RET_LOSS: Return Loss Test mode :DEV:MODE? Returns the device operating mode: SOUR or POW or RET_LOSS cORL-A1 JDSU...
- Page 49 • 4: LASER3 (if present) 2-LASER devices only: • 3: LASER1 and LASER2 3-LASER devices only • 7: LASER1, LASER2 and LASER3 :SOUR:ID? Returns combination of LASER sources. (For IDdescriptions see :SOUR:ID) 1 or 2 or 3 or 4 or 7 JDSU cORL-A1...
- Page 50 • 2000: mod. freq. 2000 Hz • AUTO: Auto-λ modulation is ON. :SOUR Sets the power level for the specified :POW LASER source. Parameter type: <NR1,NR1> e.g. :SOUR:POW 1,-522 sets the power level for LASER1 to - 5.22 dBm cORL-A1 JDSU...
- Page 51 :WAV e.g. 1650 :MAX? :POW Returns the minimum wavelength :CAL that can be set. :WAV e.g. 780 :MIN? :POW Sets up to 30 wavelengths in the λ-Table. :CAL :WAV Parameter type: <NR1,NR1,...> :TAB e.g. :POW:CAL:WAV:TAB 820,850, 980,1280,1300,1310,1480,1510, 1550,1625 JDSU cORL-A1...
- Page 52 LIN or LOG :UNIT? :POW Determines whether the power level :REF reading is displayed as an absolute or :STAT a relative value. Parameter type: <BOOLEAN> • 0: absolute value (µW or dBm) • 1: relative value (dB) Default setting: 0 cORL-A1 JDSU...
- Page 53 Parameter type: <BOOLEAN> 0: Auto-λ recognition off 1: Auto-λ recognition on Default setting: 0 :POW Returns whether Auto-λ recognition :WAV is on or off. :AUTO? Response type: <BOOLEAN> 0: Auto-λ detection off 1: Auto-λ detection on JDSU cORL-A1...
- Page 54 - in W for :POW:DISP:UNIT LIN • Relative display (:POW:REF:STAT 1) in dB RET_LOSS: Return loss fetched Response unit: dB +9.91E37 overflow −9.91E37 underflow The number of values fetched (1...3) depends on the number of wavelengths measured on the incoming signal. cORL-A1 JDSU...
- Page 55 „:SOUR:STAT” on page :STAT :SOUR „:SOUR:STAT?” on page :STAT? :RET Triggers the “Normalizing Open Port” :LOSS function in Return Loss mode. :NORM Note: This operation takes a few seconds to complete. :FETC „:FETC :MEAS :VAL?” on :MEAS page :VAL? JDSU cORL-A1...
-
Page 56: Specifications
1) When connected to the AC power plug Ambient temperature Nominal range of use -10 to +55 °C Air humidity Humidity Non-condensing Dimensions and weight Dimensions (w x h x d) 250 x 88 x 210 mm Weight 1.6 kg cORL-A1 JDSU... -
Page 57: Orl Mode
Wavelength range 1260 to 1650 nm Power range –70 to +6 dBm Display resolution 0.01 dB/0.001 µW Uncertainity at reference condition ±0.4 dB 1) Reference condition: –20 dBm (CW), 1310 ±1 nm, 23 ±3°C, to 75% RH, 9 µm JDSU cORL-A1... -
Page 58: Snt-121A Adapter
Nominal line voltage range 100 to 240 VAC Nominal line frequency range 47 to 63 Hz Power consumption max. 8.5 W Output 12 V / 1.25 A Temperature range 0 to +40°C Condensation – even occasional – is not tolerable. cORL-A1 JDSU... -
Page 59: Rdering Nformation
BN 2298/22 1310/1550/1625 nm BN 2298/23 Calibration report BN 2298/90.01 Accessories Cleaning materials OCK-10 Optical connector cleaning kit BN 2229/90.21 Cleaning tape for optical connectors BN 2229/90.07 Spare optical cleaning tape BN 2229/90.08 Mandrel for high return loss measurements JDSU cORL-A1... -
Page 60: Index
Source Main menu 28 Information about device 22 Time 22 Lambda-Table, edit 18 Laser safety 6 Updating the firmware 23 Laser Source mode 27 Menu Meter Main 32 ORL Main 36 Source Main 28 Menu navigation 16 Meter Main menu 32 cORL-A1 JDSU... - Page 61 JDSU Environmental Management Program Superb performance and high quality have always characterized JDSU datacom and telecom measurement technology products. In this same world-class tradition, JDSU has an established, proactive program of environmental management. Environmental management is an integral part of JDSU’s business philosophy and strategy requiring the development of long-term, productive solutions to problems in the key areas of economics, technology, and ecology.
- Page 62 Environmental management partnerships JDSU encourages our customers and suppliers who take this responsibility seriously to join JDSU in establishing their own environmental management programs. Recycling used products This product complies with the European Union Waste Electrical and Electronic Equipment directive (WEEE), 2002/96/EC. This product should not be disposed of as unsorted municipal waste and should be collected separately and disposed according to your national regulations.