
Related Manuals for Hyundai MIG-160


Summary of Contents for Hyundai MIG-160
- Page 1 DC INVERTER MIG WELDER MIG- 160/200 User Manual Original Instructions For Your Safety Read and understand this manual before use. Keep this manual for future reference.
- Page 2 MIG-160/200 We are still constantly improving this welder, therefore, some parts of this welder may be changed in order to achieve the better quality, but the main functions and operations will not be alternated and changed. Your understanding would be greatly appreciated.
-
Page 3: Table Of Contents
MIG-160/200 Table of Contents Safety ................................General Description ............................. Main Parameters ............................Electric Block Diagram ..........................Operation Control and Description ......................Installation Debugging and Operation ......................Caution ................................. Maintenance ..............................Troubleshooting ............................Exploded Drawing ............................HYUNDAI... -
Page 4: Safety
MIG-160/200 1. Safety Welding is dangerous, and may cause damage to you and others, so take good protection when welding. For details, please refer to the operator safety guidelines in conformity with the accident prevention requirements of the manufacturer. Professional training is needed before operating the machine. - Page 5 MIG-160/200 Hot work piece may cause severe scalding. Do not contact hot work piece with bare hands. ● Cooling is needed during continuous use of the welding torch. ● Magnetic fields affect cardiac pacemaker. Pacemaker users should be away from the welding spot before medical consultation.
-
Page 6: General Description
MIG-160/200 2. General Description This is an easy-to-use MIG welding machine suitable for both hobby and professional use. Before using or doing any maintenance work on the machine, please read the operating manual and keep it for further reference. This machine has the functions of MIG and MMA. -
Page 7: Electric Block Diagram
MIG-160/200 4. Electric Block Diagram HYUNDAI... -
Page 8: Operation Control And Description
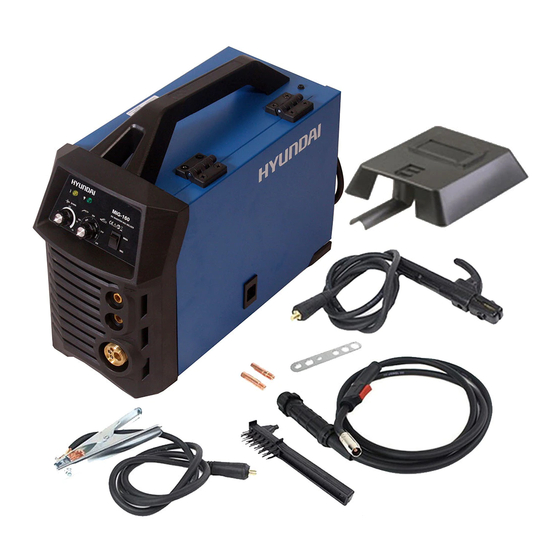
MIG-160/200 5. Operation Control and Description Front panel ● a) Overheating LED b) Power LED c) Feed wire adjust d) MMA current / MIG voltage adjust knob e) MMA/MIG shift switch f) Quick socket (-) g) Quick socket (+) h) European connector of the welding torch in MIG Back panel ●... -
Page 9: Installation Debugging And Operation
MIG-160/200 6. Installation Debugging and Operation Warning Please install the machine strictly according to the following steps. The protection class of this machine is IP21S, so avoid using it in rain. Before using, please make sure the input voltage is in voltage range (200-240V). Otherwise, the machine will be damaged. - Page 10 MIG-160/200 6.4 MIG installation 1) Insert the welding torch into the “ ” output socket on the front panel of the machine, and tighten it. Meanwhile, manually thread the welding wire into the torch body. en it clockwise. 3) Insert the quick plug of the wire feeder into the “ +”,“g” (“GAS”) on the mid-clapboard of the welding ma- chine, and tighten it clockwise.
-
Page 11: Caution
MIG-160/200 6.4.2 Operation method 1) After being installed according to the above method, and with the power switch on, the machine starts with the power LED on and the fan working. Open the cylinder valve and adjust the flow regulator to get the proper gas flow. -
Page 12: Maintenance
MIG-160/200 (4) Make sure earth connected before operation There is a grounding screw on the back of machine with a grounding sign beside. Before using, make sure earth connected well to prevent the operator from getting electric shock or electricity leak. Please use 10mm cable to connect the case of the machine to earth. -
Page 13: Troubleshooting
MIG-160/200 9. Troubleshooting Warning Experimentation and careless maintenance may lead to more problems to the machine. This will make pro- fessional diagnosis and repair more difficult. When the machine is open, there may be exposed connections containing life-threatening voltages. Any direct or indirect touch will cause electric shock, and severe electric shock will lead to death. - Page 14 MIG-160/200 Malfunction Cause and Solution 1. Check the pressure arm on the wire feeder for proper pressure. 2. Check if the drive roll matches the wire size being used. 3. Check the contact tip of the welding torch for wear. Replace it and Welding current is unstable.
-
Page 15: Exploded Drawing
MIG-160/200 10. Exploded Drawing MIG-160/200 1. Handle 13. Indicator 25. On/Off switch 2. Plastic hinge 14. Reactor 26. Power cable 3. Control PCB board 15. MMA/MIG switch 27. Magnetic valve 4. Plate 16. Potentiometer 28. Main control PCB board 5. Wire feeder inching button 17. - Page 17 HYUNDAI Corporation 25, Yulgok-ro 2-gil, Jongno-gu, Seoul 03143, Korea, Post Code : 03143 82 2 390 1114 www.hyundaicorp.com Copyright HYUNDAI Corporation All rights reserved. Made in P.R.C...