Table of Contents
Advertisement
Available languages
Available languages
Installation Manual
Wall Mounting
Bracket
Please read the Safety Precautions carefully before using this product.
After reading this manual, keep it in an easily accessible location for future
reference.
OLW480B
*MFL68484553*
(2009-REV01)
Copyright © 2017 LG Electronics Inc. All Rights Reserved.
www.lg.com
Advertisement
Table of Contents

Related Manuals for LG OLW480B


Summary of Contents for LG OLW480B
- Page 1 Wall Mounting Bracket Please read the Safety Precautions carefully before using this product. After reading this manual, keep it in an easily accessible location for future reference. OLW480B *MFL68484553* www.lg.com Copyright © 2017 LG Electronics Inc. All Rights Reserved. (2009-REV01)
-
Page 2: Safety Precautions
Accessories Wall Mounting Anchor Wall Mounting Screw Installation Manual 6 EA 10 EA Guide Spacer A Guide Spacer B Lock Spring 4 EA 4 EA Guide Spacer Screw A Guide Spacer Screw B Wall mounting supporter screw Set Protection Cushion 4 EA 4 EA 8 EA (M5 x L8) -
Page 3: Before Installation
Caution Follow the instructions in this Installation Manual to To install the product or adjust its height after properly install the product. installation, four or more people are needed. If you do not follow the instructions in the Installation If you try to handle the product alone, it may fall and cause Manual the product may be installed incorrectly and cause injury or damage to the product. -
Page 4: Installation Instructions
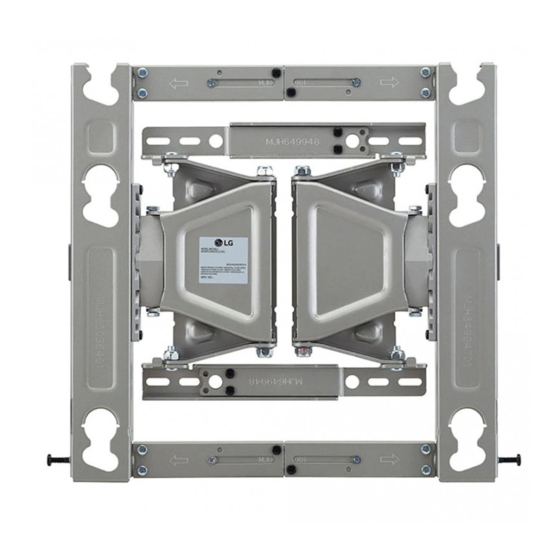
Installation Instructions - The images may differ from the actual product. - Please consult a professional when installing the wall mount. Attaching the Guide Spacers - If the screws cannot be fully tightened on the guide spacers, check the length of the screws. VESA Size 300x300 Model VESA Size 400x200, 300x200 Models Guide Spacer... - Page 5 Adjusting the Length of the Wall Mounting Bracket (VESA Size 400x200 Models Only) 1. Unfasten the screws (at 8 points). 2. Hold the wall mounting bracket and pull on both sides. Screw (8 EA) 3. Once lengthened, refasten the screws to their parts(at 8 points).
- Page 6 Fixing the Anchors and Screws in Place Please follow the instructions below. - Check the wall material and the thickness of the finish. - You can use the included anchors and screws only when the wall is made of concrete that will not crack. - Do not install the device on wood studs, plaster boards, or walls made with medium-density fiberboard (MDF).
- Page 7 How to install the wall mounting bracket (North America, Japan) 1. Check the wall type before mounting. - When mounting on a wooden wall, check the screw fixing spots on the wall according to the Wall Mounting Supporter Point. 2. Mark the wall mounting location using the VESA guide paper provided. 3.
- Page 8 Wood stud Drywall 76 mm /2.9 Inches Wood stud Drywall Wall mounting screw Wall mounting supporter screw a. Locate and mark the centers of the wall studs using a stud finder. b. After aligning the wall mounting bracket on the wall where the center of the wood stud is marked, mark the location of the screws and then remove the wall mounting bracket.
- Page 9 How to install the wall mounting bracket (Australia) 1. Check the wall type before mounting. - When mounting on a wooden wall, check the screw fixing spots on the wall according to the Wall Mounting Supporter Point. 2. Mark the wall mounting location using the VESA guide paper provided. 3.
- Page 10 Wood stud Drywall Drywall 76 mm /2.9 Inches Wood stud Wall mounting screw Wall mounting supporter screw a. Locate and mark the centers of the wall studs using a stud finder. b. After aligning the wall mounting bracket on the wall where the center of the wood stud is marked, mark the location of the screws and then remove the wall mounting bracket.
-
Page 11: Installing The Wall Mounting Bracket
Installing the Wall Mounting Bracket - It is recommended that you install this product only on concrete walls. Issues that may arise due to installation on other materials (walls made of wood, plywood, bricks, etc.) will not be covered. → Position the wall mounting bracket in the desired spot, mark the screw holes, and remove the bracket. -
Page 12: Leveling The Product
Fixing the Lock Spring * Caution: If it is not fixed securely, the set may fall off, resulting in damage or injury. Lock Spring Leveling the Product - If the product is not level after installation, adjust it using the screws. (The product goes up or down depending on the direction the screws are turned.) ±... - Page 13 Organizing the Cables and Attaching the Set Protection Cushion - Organize the cables as shown in the image. You should use cable organizer bands purchased separately or use those provided with your TV. - Attach the set protection cushion to reduce the shock received by the set as it bumps into the wall when tilting. Attach it to the desired location as shown in the image.
-
Page 14: Product Specifications
Product Specifications 15±2° 13±2° 177.6 177.6 82.5 107.3 162.5 118.3 82.5 107.3 162.5 118.3... - Page 15 <With the wall mounting supporter removed.> [Unit: mm(Inches)] [300 X 300] 23(0.9) 223(8.7) 168(6.6) 113.5(4.4) ▼ ▼ ▼ ▼ 300(11.8) 166(6.5) 350(13.7) [400 X 200] 323(12.7) 268(10.5) 213.5(8.4) ▼ 400(15.7) 450(17.7)
- Page 16 North America, Japan [ Unit: mm(Inches)] <With the wall mounting supporter attached.> [300 X 300] 460(18.1) 350(13.7) 172(6.7) [400 X 200] 460(18.1) 400(15.7)
- Page 17 Australia <With the wall mounting supporter attached.> [Unit: mm(Inches)] [300 X 300] 700(27.5) 300(11.8) [400 X 200] 700(27.5) 400(15.7) 172(6.7)
- Page 18 <With the wall mounting supporter removed.> Model name OLW480B Width (mm/Inches) 350/13.7 (standard) / 450/17.7 (lengthened) Height (mm/Inches) 345/13.5 Depth (mm/Inches) 23/0.9 Product weight (kg/lbs) 3.7/8.1 Wall mounting bracket Standard : 300x300 /11.8X11.8, VESA specifications 300x200 /11.8X7.8 (mm/Inches) Lengthened: 400x200 /15.7X7.8 Max.
- Page 20 Supported Displays The model and serial number of the product is located on the back or one side (Please contact the retailers or refer to the TV owner’s manual for applicable models.) of the product. Record it below should you ever need service.
- Page 21 벽걸이 지지대 사용 전에 '안전을 위한 주의 사항'을 반드시 읽고 정확하게 사용하세요. 설치설명서를 읽고 난 후 사용하는 사람이 언제라도 볼 수 있는 장소에 보관하세요. 제품보증서는 본 설명서에 포함되어 있습니다. OLW480B www.lge.co.kr Copyright © 2017 LG Electronics Inc. All Rights Reserved.
- Page 22 부속품 벽걸이 고정 앵커 벽걸이 고정 나사 설치설명서 6개 10개 가이드 스페이서 A 가이드 스페이서 B Lock Spring 4개 4개 2개 가이드 스페이서 가이드 스페이서 벽면 지지대 고정 나사 세트 보호 쿠션 고정 나사 A 고정 나사 B 8개 (M5 x L8) 4개...
- Page 23 주 의 반드시 설치설명서의 지시에 따라 제품을 설치하세요. 제품을 설치할 때나 제품 설치 후에 높이를 조절할 때에는 설치설명서의 지시를 따르지 않을 경우 잘못된 설치로 인해 반드시 네 사람 이상이 함께 하세요. 심한 부상 및 제품 피해의 원인이 될 수 있습니다. 혼자서...
- Page 24 설치 방법 - 그림은 실물과 차이가 날 수 있습니다. - 벽걸이를 설치할 때 반드시 전문가와 상의하세요. TV에 가이드 스페이서 고정하기 - 가이드 스페이서를 고정할 때 나사가 덜 조여질 경우 나사의 체결 깊이를 다시 확인하세요. VESA 사이즈 300X300 모델 VESA 사이즈 400X200,300X200 모델 가이드...
- Page 25 벽걸이 지지대 길이 변경 방법(VESA 사이즈 400x200 모델만 해당) 1. 해당 검정색 나사를 풀어주세요. (8곳) 2. 벽걸이 지지대를 잡고 좌/우로 당기세요. 고정 나사 (8개) 3. 늘어나면 해당 부위에 다시 검정색 나사를 체결 하세요. (8곳)
- Page 26 앵커 및 나사의 고정 방법 반드시 지켜주세요. - 벽체의 재질 및 마감재의 두께를 확인하세요. - 벽체의 재질이 금가지 않는 콘크리트벽일 때에만 동봉된 앵커 및 나사를 사용할 수 있습니다. - 우드 스터드, 석고보드 또는 종이/나무가루를 압축한 재질 (MDF) 로 만들어진 벽체에는 절대 설치하지 마세요. 만약 설치할 경우, 마감재...
- Page 27 벽걸이 지지대 설치 방법 (북미,일본) 1. 설치할 곳의 벽체 종류를 확인하세요. - 목재 벽면에 설치 시, Wall Mounting Supporter Point 지점에 맞춰 위치를 확인해 주세요. 2. 부속품으로 제공된 VESA 안내 종이를 이용하여 벽걸이를 설치하고자 하는 벽에 위치를 표시해 주세요. 3. VESA 안내 종이를 이용하여 벽에 스크류 고정 위치 확인해 주세요. 목재...
- Page 28 우드 스터드 석고판 76 mm 우드 스터드 석고판 벽면 지지대 고정 나사 벽걸이 고정 나사 a. 406 mm 간격으로 시공되어 있는 우드 스터드의 위치를 찾아 스터드 파인더를 이용하여 우드 스터드 중심부를 알아볼 수 있도록 표시를 합니다. b. 우드 스터드의 중심이 표시된 벽면에 벽걸이 지지대를 설치하고자 하는 높이를 맞춘 후 벽걸이 고정 나사 고정부를 표시하고 벽걸이 지지대를...
- Page 29 벽걸이 지지대 설치 방법 (호주) 1. 설치할 곳의 벽체 종류를 확인하세요. - 목재 벽면에 설치 시, Wall Mounting Supporter Point 지점에 맞춰 위치를 확인해 주세요. 2. 부속품으로 제공된 VESA 안내 종이를 이용하여 벽걸이를 설치하고자 하는 벽에 위치를 표시해 주세요. 3. VESA 안내 종이를 이용하여 벽에 스크류 고정 위치 확인해 주세요. 목재...
- Page 30 우드 스터드 석고판 76 mm 우드 스터드 석고판 벽면 지지대 고정 나사 벽걸이 고정 나사 a. 600 mm 간격으로 시공되어 있는 우드 스터드의 위치를 찾아 스터드 파인더를 이용하여 우드 스터드 중심부를 알아볼 수 있도록 표시를 합니다. b. 우드 스터드의 중심이 표시된 벽면에 벽걸이 지지대를 설치하고자 하는 높이를 맞춘 후 벽걸이 고정 나사 고정부를 표시하고 벽걸이 지지대를...
- Page 31 벽걸이 지지대 설치 방법 - 본 제품은 콘크리트 벽면에만 설치할 것을 권장합니다. 그 외의 곳 (목재나 합판, 벽돌 등으로 된 벽면) 에 설치하는 것은 권장하지 않으며, 제품 추락의 원인이 될 수 있습니다. → 벽걸이 지지대를 설치하고자 하는 위치의 벽면에 벽걸이 지지대를 맞춘 후 벽면 나사 고정부를 표시하고...
- Page 32 Lock Spring 고정하기 * 주의 : 고정하지 않을 경우, 제품이 분리되어 위험할 수 있습니다. Lock Spring 제품 수평(기울기) 조정 방법 - 제품 설치 후 좌우 수평이 맞지 않을 경우 나사로 수평을 조절하세요. (나사의 회전 방향에 따라 제품이 올라가거나 내려옵니다.) ± 10 mm (수평 조절)
- Page 33 케이블 정리와 세트 보호 쿠션 부착 방법 - 그림과 같이 케이블을 정리하세요. 케이블 정리용 밴드는 구입하거나, TV에 제공된 것을 사용하세요. - 세트 보호 쿠션은 각도 조절 시 벽과 세트가 부딪히는 충격을 완화하기 위해 부착합니다. 그림과 같이 원하는 위치에 부착하세요. 세트 보호 쿠션 * 주의...
- Page 34 제품 규격 15±2° 13±2° 177.6 177.6 82.5 107.3 162.5 118.3 82.5 107.3 162.5 118.3...
- Page 35 <벽면 지지대 제거 시> [단위: mm] [300 X 300] 113.5 ▼ ▼ ▼ ▼ [400 X 200] 213.5 ▼...
- Page 36 북미, 일본 [ 단위 : mm ] <벽면 지지대 미제거 시> [300 X 300] [400 X 200]...
- Page 37 호주 <벽면 지지대 미제거 시> [단위: mm] [300 X 300] [400 X 200]...
- Page 38 <벽면 지지대 제거 시> 모델명 OLW480B 폭 (mm) 350(기본) / 450(가변시) 높이 (mm) 깊이 (mm) 제품 무게 (kg) 벽걸이 VESA 규격 300x300, 300x200(기본) (mm) / 400x200(가변시) 최대 인장 하중 (kg) 북미, 일본 호주 <벽면 지지대 미제거 시> <벽면 지지대 미제거 시>...
- Page 40 이 제품의 모델명과 일련 번호는 제품의 뒤쪽과 옆쪽에 있습니다. 적용 모델 아래에 기록하세요. (자세한 적용 모델은 판매점에 문의하거나 TV 사용설명서를 확인하세요.) 모델명 일련 번호...
- Page 41 Veuillez lire attentivement les consignes de sécurité avant d’utiliser ce produit. Après avoir lu ce manuel, conservez-le dans un endroit facile d’accès pour le consulter au besoin. OLW480B www.lg.com Copyright © 2017 LG Electronics inc. Tous droits réservés.
-
Page 42: Consignes De Sécurité
ACCESSOIRES Ancrage de fixation murale Vis de fixation murale Manuel d’installation 6 unités 10 unités Entretoise du guide A Entretoise du guide B Ressort de blocage 4 unités 4 unités 2 unités Vis d’ e ntretoise du guide A Vis d’ e ntretoise du guide B Vis du soutien de la fixation murale Coussinet de protection du 4 unités (M6 x L45) -
Page 43: Avant L'installation
Mises en garde Suivez les instructions du guide d’installation pour installer le produit Au moins quatre personnes sont requises pour installer le produit ou correctement. pour le mettre de niveau après l’installation. Si vous ne suivez pas les instructions du guide d’installation, vous Si vous tentez de déplacer le produit seul, vous risquez de le faire risquez d’installer incorrectement le produit et de vous exposer à... -
Page 44: Instructions D'installation
Instructions d’installation - Les images peuvent différer de votre produit. - Veuillez consulter un professionnel lors de l’installation du support de fixation murale. Fixation des entretoises - Si les vis ne sont pas bien serrées sur les entretoises du guide, vérifiez de nouveau la longueur des vis. Modèle VESA taille 300 x 300 Modèles VESA taille 400 x 200, 300 x 200 Vis d’... - Page 45 Ajustement de la longueur du support de fixation murale (modèles VESA taille 400 x 200 uniquement) 1. Dévissez les vis (aux 8 points). 2. Tenez le support de fixation murale et tirez de chaque côté. (8 unités) 3. Une fois allongé, resserrez les vis dans leurs pièces (aux 8 points).
- Page 46 Installation des ancrages et des vis Veuillez suivre les instructions ci-dessous. - Vérifiez la composition du mur et l’ é paisseur de la couche de finition. - Vous pouvez utiliser les vis et les ancrages compris uniquement lorsque le mur est fabriqué de béton qui ne craquera pas. - N’installez pas le dispositif sur des montants en bois, des panneaux de plâtre ou des panneaux de fibres de densité...
- Page 47 Installation du support de fixation murale (Amérique du Nord, Japon) 1. Vérifiez le type de mur avant d’y installer l’appareil. - Si vous fixez l’appareil à un mur en bois, marquez l’ e mplacement des vis sur le mur conformément au guide Wall Mounting Supporter Point. 2.
- Page 48 Montant en bois Cloison sèche 76 mm Montant en bois Cloison sèche Vis du soutien de la fixation murale Vis de fixation murale a. À l’aide d’un détecteur de montant, repérez et marquez le centre des montants. b. Après avoir aligné le support de fixation murale sur le mur, au niveau du point identifiant le centre du montant en bois, marquez l’ e mplacement des vis, puis retirez le support de fixation murale.
- Page 49 Installation du support de fixation murale (Australie) 1. Vérifiez le type de mur avant d’y installer l’appareil. - Si vous fixez l’appareil à un mur en bois, marquez l’ e mplacement des vis sur le mur conformément au guide Wall Mounting Supporter Point. 2.
- Page 50 Montant en bois Cloison sèche Cloison sèche 76 mm Montant en bois Vis de fixation murale Vis du soutien de la fixation murale a. À l’aide d’un détecteur de montant, repérez et marquez le centre des montants. b. Après avoir aligné le support de fixation murale sur le mur, au niveau du point identifiant le centre du montant en bois, marquez l’ e mplacement des vis, puis retirez le support de fixation murale.
- Page 51 Installation du support de fixation murale - Nous vous recommandons d’installer ce produit sur un mur en béton. Les problèmes pouvant survenir à la suite d’une installation sur d’autres matériaux (murs en bois, contreplaqué, briques, etc.) ne seront pas couverts. →...
- Page 52 Réglage des ressorts de blocage * Mise en garde : Si le support de fixation murale n’ e st pas correctement installé, le téléviseur pourrait tomber, ce qui pourrait l’ e ndommager ou provoquer des blessures. Ressort de blocage Mise à niveau du produit - Si le produit n’...
- Page 53 Organisation des câbles et fixation du coussinet de protection du téléviseur - Disposez les câbles comme sur l’illustration. Vous devriez utiliser des bandes de rangement de câbles achetées séparément ou utiliser celles fournies avec votre téléviseur. - Installez le coussinet de protection du téléviseur pour réduire les chocs que celui-ci peut recevoir lorsqu’il est incliné. Fixez-le à l’ e ndroit voulu comme sur l’illustration.
-
Page 54: Caractéristiques Du Produit
Caractéristiques du produit 15±2° 13±2° 177.6 177.6 82.5 107.3 162.5 118.3 82.5 107.3 162.5 118.3... - Page 55 <Sans soutien de fixation murale.> [Unité : mm] [300 X 300] 113,5 113.5 ▼ ▼ ▼ ▼ [400 X 200] 213,5 213.5 ▼...
- Page 56 Amérique du Nord, Japon [ Unité : mm ] <Avec soutien de fixation murale.> [300 X 300] [400 X 200]...
- Page 57 Australie : mm] <Avec soutien de fixation murale.> Unité [300 X 300] [400 X 200]...
- Page 58 <Sans plaque de fixation.> Modèle OLW480B Largeur (mm) 350 (standard)/ 450 (allongé) Hauteur (mm) Profondeur (mm) Poids du produit (kg) Caractéristiques VESA du support 300 x 300, 300 x 200 (standard) de fixation murale / 400 x 200 (allongé) (mm) Charge de traction maximale (kg) Amérique du Nord, Japon...
- Page 60 Écrans compatibles Le modèle et le numéro de série du produit sont situés à l’arrière ou sur un des côtés (Veuillez consulter le détaillant ou vous reporter au manuel d’utilisation du téléviseur de l’appareil. Inscrivez-les ci-dessous au pour connaître les modèles applicables.) cas où...
- Page 61 取扱説明書 壁掛け ブラケッ ト ご使用前にこの取扱説明書をよくお読みになり、 ご理解のうえ正しくお使いください。 お読みになったあとは、大切に保管してください。 OLW480B www.lg.com Copyright © 2017 LG Electronics Inc. All Rights Reserved.
- Page 62 付属品 壁掛け用アンカー 壁掛け用ネジ 取扱説明書 6 個 10 個 ガイドスペーサーA ガイドスペーサーB 固定スプリング 2個 4 個 4 個 ガイドスペーサー用 ガイドスペーサー用 木壁スタッド用ネジ テレビ保護クッション ネジA ネジB 8個 4 個 4 個 4 個 (M5 x L8) (M6 x L45) (M6 x L18) 木壁スタッド VESAガイドペーパー VESAガイドペーパー...
- Page 63 注意 設置時は、壁の材質の種類を確認し、条件を満たす場合は付属 製品を設置したり、設置後に製品の高さを調整したりする場合 しているアンカーおよびネジを使用してください。 は、4人以上で作業してください。 指定されたアンカーやネジを使用しないと、取り付け具が製品 単独で作業すると、製品が落下して、けがを負ったり製品が破損 の重量に耐えられず、安全上の問題が発生するおそれがありま したりするおそれがあります。 す。 取扱説明書の指示に従って製品を設置してください。 壁に穴を開ける場合は必ず、指定された直径のドリルビットおよ 取扱説明書の指示に従わずに製品を設置すると、大けがを負っ びドリルを使用してください。また、穴の深さは、指定された指示 たり製品が破損したりするおそれがあります。 に従ってください。 指定された方法に従わずに製品を設置すると、製品が安定せ ず、安全上の問題が発生するおそれがあります。 製品を濡れた布で拭いたり、製品の設置場所の下や近くで暖房 振動が発生する可能性のある物の近くに や加湿器を使用したりしないでください。 製品を設置しないでください。 製品に水がかかったり、湿気や熱が加わったりすると、火災や感 高圧線や高電圧の近くに製品を設置しないでください。 電の原因となったり、製品に問題が生じたりすることがありま 製品が破損するおそれがあります。 す。 コンセントから電源コードを抜いてから製品を設置してくださ 素手で製品を設置しないでください。 必ず適切な作業用手袋を い。 着用してください。 コンセントに電源コードを接続したまま製品を設置すると、感 けがをするおそれがあります。 電や火災の原因になることがあります。 テレビに接続したビデオコネクタが壁に押し付けられない ようにしてください。 必要に応じて付属している適切なアングル アダプタを使用してください。 製造業者によって指定されている付属品のみを使用してくださ い。(付属品は、モデルによって異なります。) 設置する前に...
- Page 64 設置方法 - 実際の製品は画像と異なる場合があります。 - テレビを壁にに取り付ける前に専門の設置業者に相談してください。 テレビ本体の背面にガイドスペーサーを取り付ける - ガイドスペーサーにネジを完全に締め付けることができない場合は、ネジの長さを確認してください。 VESAサイズ300x300モデル VESAサイズ400x200、300x200モデル ガイドスペーサー ガイドスペーサー 用ネジA 用ネジB ガイドスペーサーA ガイドスペーサーB 作業手順 1. ディスプレイの取り付け穴にネジが取り付けられているかどうかを確認します。 取り付けられている場合は、取り外します。 2. 図に示すように、ガイドスペーサーおよびガイド スペーサー用ネジを取り付けます。 - 画面を下に向けてテレビをテーブルに置きます。 テレビに傷が付かないように、柔らかい布で覆った平らな面またはクッションの上に 置くようにしてください。 - ネジを締め付けて、ガイドスペーサーをテレビに取り付けます。テレビ、ガイドスペーサー、およびネジが互いにしっかり押しつけ合う ようになるまで、ネジを締め付けます。 - ネジを締め付けるときは、プラスドライバー(手動または電動)を使用してください。...
- Page 65 壁掛け用ブラケットの長さの調節 (VESAサイズ400x200モデルのみ) 1. ネジを緩めます(8箇所)。 2. 壁掛け用ブラケットを持ち、両側を引っ 張ります。 ネジ (8 個) 3. 伸ばしたら、緩めたネジを締めます。 (8箇所)。...
- Page 66 付属のアンカーとネジの固定 次の指示に従ってください。 - 壁の材質と仕上げの厚みを確認してください。 - 壁の材質がコンクリート、軽量コンクリート、硬い自然石、柔らかい自然石によるれんが、ひび割れのない空洞ブロックの場合は、アンカーを 使用してください。 - 石こうボードまたはMDF(中質繊維板)の壁に取り付けないでください。 この場合、アンカーとネジは、仕上げ材表面の裏のコンクリートに挿 入する必要があります。コンクリートがない場合は、ンカーとネジを安全に固定するハンガー(市販品)を取り付ける必要があります。 - 上記以外のない材質の壁に製品を取り付ける場合は、固定される場所のそれぞれが引張負荷70 kgf(686 N)および剪断負荷 100 kgf(980 N)以上に耐えられるように製品を取り付けてください。 壁掛け用アンカー 壁掛け用ネジ - コンクリート用Ø 8 mmドリルビットと、ハンマー(インパクト)ドリルを使用します。 a. Ø 8 mmドリル ビットを使用して、アンカー位置に深さ80~100 mmの穴を開けます。 b. 開けた穴をきれいにします。 c. 付属しているアンカーを穴に取り付けます (アンカーを取り付けるときはハンマーを使用してください)。 d. 壁掛けを、穴の位置に揃えて壁にセットします。 角度調整部品が上向きになるようにします。 e. 壁掛け用ボルトを穴に合わせて締めます。 次に、45~60 kgf/cmのトルクでネジを締め付けます。...
- Page 67 壁掛けブラケットを設置する (北アメリカ、日本) 1. 壁掛けを取り付ける前に壁の材質を確認してください。 - 木製の壁に取り付ける場合は、Wall Mounting Supporter Pointに従って、ネジを取り付ける壁面上の位置を確認してください。 2. 付属のVESAガイドペーパーを使用して、壁掛けの位置に印を付けます。 3. VESAガイドペーパーを使用してネジを取り付ける壁面上の位置を確認する。 木製壁や間柱に設置する場合(VESAサイズ 300x300, 300 X 200) 木製壁や間柱に設置する場合(VESAサイズ 400 x 200)
- Page 68 木製間柱 石膏ボード 76 mm 木製間柱 石膏ボード 壁掛け用ネジ 木壁スタッド用ネジ a. スタッドファインダーを使用して、壁の間柱の中央を特定し、印を付けます。 b. 木の間柱の中央位置に印を付けた壁の場所に壁掛けブラケットを合わせたら、ネジの位置に印を付けて、壁掛けブラケットを外します。(レ ベラーを使用して、ネジの印が水平になるようにします。) c. 木用Ø 4 mmドリルビットを使用して、壁に印を付けた壁掛け用ネジの位置に76 mm以上の深さの穴を開けます。(開けた穴をきれいにしま す。) d. 開けた穴に壁掛けブラケットの壁掛け用ネジを締めます。 → このとき、ネジを締めて、壁、壁掛けブラケットおよび壁掛け用ネジが押し付け合うようにします。 (締め付け過ぎると、石膏ボードを破損する場合があるので、注意してください)。 → ネジを締めるときは、プラスドライバー(手動または電動)または8 mmレンチを使用してください。...
- Page 69 壁掛けブラケットを設置する (オーストラリア) 1. 壁掛けを取り付ける前に壁の材質を確認してください。 - 木製の壁に取り付ける場合は、Wall Mounting Supporter Pointに従って、ネジを取り付ける壁面上の位置を確認してください。 2. 付属のVESAガイドペーパーを使用して、壁掛けの位置に印を付けます。 3. VESAガイドペーパーを使用してネジを取り付ける壁面上の位置を確認する。 木製壁や間柱に設置する場合(VESAサイズ 300x300, 300 X 200) 木製壁や間柱に設置する場合(VESAサイズ 400 x 200)
- Page 70 木の間柱用スタッド 乾式壁 乾式壁 76 mm 木の間柱用スタッド 壁掛け用ネジ 木壁スタッド用ネジ a. スタッドファインダーを使用して、壁の間柱の中央を特定し、印を付けます。 b. 木の間柱の中央位置に印を付けた壁の場所に壁掛けブラケットを合わせたら、ネジの位置に印を付けて、壁掛けブラケットを外します。(レ ベラーを使用して、ネジの印が水平になるようにします。) c. 木用Ø 4 mmドリルビットを使用して、壁に印を付けた壁掛け用ネジの位置に76 mm以上の深さの穴を開けます。(開けた穴をきれいにし ます。) d. 開けた穴に壁掛けブラケットの壁掛け用ネジを締めます。 → このとき、ネジを締めて、壁、壁掛けブラケットおよび壁掛け用ネジが押し付け合うようにします。 (過度の力で締めると乾式壁を破損する場合があるので、注意してください)。 → ネジを締めるときは、プラスドライバー(手動または電動)または8 mmレンチを使用してください。...
- Page 71 壁掛けブラケットの取り付け - この製品は、コンクリート製の壁への設置をお勧めします。他の材質(木製、合板、レンガなど)に設置したために発生した問題 については、責任を負いかねます。 → 壁掛けブラケットを目的の位置に合わせたら、ネジ位置 に印を付け、ブラケットを外します。 → 壁掛けブラケットの取り付け方法については、図を参照 してください。 → 水準器を使用して、壁掛けが水平であるかどうかを確認 します。 壁掛け用ネジ → 指定された位置にネジを締め付けることができない場 合は、他の隣接する位置にネジを締め付けることができ ます。ただし、2箇所以上の変更はしないでください。 → 左上と右上に、それぞれ2つの壁掛け用ネジを固定しま す。左下と右下に、それぞれ1つのネジを固定します。 → プラスドライバー(手動または電動)、または8 mmスパ ナを使用してネジを締め付け、壁掛けブラケットを壁に ぴったりと取り付けます。 テレビの壁掛けブラケットへの取り付け - テレビを取り付けるときは必ず2人以上で行ってください。 * 注意:取り付けるときに、電源コードが壁掛けブラケットとテレビの間に挟まれたりし ないように気をつけてください。 (電源コードが挟まると製品が損傷する場合があります)。 → テレビを壁に取り付け、矢印の方向が壁掛け用ブラケットのガイドスペースの位置になるように合わせます。まず下部を取り付け、次に テレビを少しずつ持ち上げながら上部を取り付けます。 - テレビの下部を引っ張り、製品がしっかりと固定されていることを確認します。 - テレビにスピーカーが搭載されている場合は、スピーカーではなく本体を持ち上げるようにします。...
- Page 72 固定スプリングを取り付ける * 注意: 壁掛けブラケットがしっかり固定されていないと、落下による製品の破損や怪我の原因となるおそれがあります。 固定スプリング テレビの水平調整 - 設置後に製品が水平になっていない場合は、ネジを使用して調整してください。(ネジの回転方向に応じてテレビが上下に移動します)。 ± 10 mm(水平調整)...
- Page 73 配線と製品保護クッションの取り付け - 壁掛けの設置の終了後に、下図のようにケーブルをまとめて整理します。別途購入した配線バンドを使用するか、テレビに付属しているバン ドを使用する必要があります。 - 傾けたとき壁にぶつかった場合に製品が受けるショックを軽減するために、製品保護クッションを取り付けます。図のようにテレビ保護クッ ションを貼り付けます。 テレビ保護クッション * 注意:電源コードやテレビに接続したケーブルを、壁掛けブラケットと壁の間に挟まないようご注意ください。 (電源コードやケーブルが損傷、断線し、火災や感電の原因になるおそれがあります。) 傾斜移動の強度の調節 - テレビが上下方向に動く場合には、左右調整ネジを"+"の方向に¼回転させます(6回カチッと音がします)。(壁掛けに固定されます。) - 反対に、テレビが上下方向に固定されている場合には、調整ネジを"-"の方向に回し、¼回転させます(6回カチッと音がします)。(壁掛けが簡 単に動きます。) 上 下 * 調整ネジの初期状態の設定方法 a. 調整ネジを"+"方向に最後まで回します。 b. 両側のの調整ネジを"-"の方向に1/2回転させます(12回カ チッと音がします)。 c. 手順'a'と'b'が完了したら、調整ネジは初期の状態に戻りま す。 * 注意: 調整ネジを"+"または"-"方向に回しすぎると、テレビや壁掛けが破損する可能性があります。...
- Page 74 仕様 15 ± 2° 13 ± 2° 177.6 177.6 82.5 107.3 162.5 118.3 82.5 107.3 162.5 118.3...
- Page 75 <木壁スタッドを取り付けていない場合。> [単位:mm] 最小 113.5 ▼ ▼ ▼ ▼ 最大 213.5 ▼...
- Page 76 北アメリカ、日本 [ 単位 : mm ] <木壁スタッドを取り付けた場合> 最小 最大...
- Page 77 オーストラリア < > : mm] 木壁スタッドを取り付けた場合 単位 最小 最大...
- Page 78 <木壁スタッドを取り付けていない場合> モデル OLW480B 幅 (mm) 350(最小)/ 450(最大) 高さ(mm) 奥行(mm) 製品重量(kg) 壁掛けブラケットVESA仕様 300x300、300x200(最小) (mm) /400x200(最大) 最大 引張荷重(kg) 北アメリカ、日本 オーストラリア <木壁スタッドを取り付けた場合> <木壁スタッドを取り付けた場合> モデル OLW480B モデル OLW480B 幅 (mm) 幅 (mm) 高さ(mm) 高さ(mm) 奥行(mm) 奥行(mm) 製品重量(kg) 製品重量(kg) 壁掛けブラケットVESA仕様 300x300、300x200(最小) 壁掛けブラケットVESA仕様 300x300、300x200(最小) (mm) /400x200(最大)...
- Page 80 対応モデル 製品のモデルおよびシリアル番号は、製品 の背面または側面に記載されています。保 (該当するモデルについては、販売店にお 問い合わせいただくか、テレビのマニュア 守が必要になった場合に備えて、下記にご ルを参照してください。) 記入ください。 モデル シリアル番号...
- Page 81 Lea las precauciones de seguridad atentamente antes de usar este producto. Después de leer este manual, guárdelo en un lugar de fácil acceso para consultarlo en el futuro OLW480B www.lg.com Copyright © 2017 LG Electronics Inc. Todos los derechos reservados.
-
Page 82: Precauciones De Seguridad
ACCESORIOS Anclaje para soporte de pared Tornillo para soporte de pared Manual de instalación 6 EA 10 EA Separador de guía A Separador de guía B Resorte de bloqueo 2 EA 4 EA 4 EA Tornillo para separador de Tornillo para separador Tornillo para poste de madera Cojín de protección para el producto guía A... -
Page 83: Antes De La Instalación
Precaución Siga las instrucciones de este manual de instalación para Para instalar el producto o nivelar su altura después de esta, se instalar correctamente el producto. necesitan cuatro o más personas. Si no sigue las instrucciones del manual de instalación, el producto Si intenta manipular el producto usted solo, este podría caerse y podría instalarse de manera incorrecta, lo que podría causar provocar lesiones o daños al producto. -
Page 84: Instrucciones De Instalación
Instrucciones de instalación - Las imágenes pueden ser diferentes del producto real. - Consulte a un profesional cuando realice la instalación del soporte de pared. Instalación de los espaciadores de alineación - Si los tornillos no se pueden apretar completamente en los separadores de guía, revise la longitud de los tornillos. Modelo VESA de tamaño 300 x 300 Modelos VESA de tamaño 400 x 200, 300 x 200 Tornillo para... - Page 85 Ajuste de la longitud del soporte de pared (solo modelos VESA de tamaño 400 x 200) 1. Afloje los tornillos (en 8 puntos). 2. Sujete el soporte de pared y tire de ambos lados. Tornillo (8 EA) 3. Una vez extendido, reajuste los tornillos en sus piezas.(en 8 puntos).
- Page 86 Fijación de los anclajes y tornillos en su lugar Siga las instrucciones que aparecen a continuación. - Compruebe el material de la pared y el grosor del material de acabado. - Puede utilizar los anclajes y tornillos incluidos solo si la pared está hecha de hormigón que no se agrietará. - No instale el dispositivo en vigas de madera, paneles de yeso o paredes hechas con tableros de fibra de densidad media (MDF).
- Page 87 Cómo instalar el soporte de pared (América del Norte, Japón) 1. Revise el tipo de pared antes de montar. - Cuando se monte en una pared de madera, revise los puntos de fijación de tornillos en el muro según Wall Mounting Supporter Point. 2.
- Page 88 Poste de madera Panel de yeso 76 mm Poste de madera Panel de yeso Tornillo para soporte de pared Tornillo para poste de madera a. Ubique y marque los centros de las vigas de la pared con un detector de vigas. b.
- Page 89 Cómo instalar el soporte de pared (Australia) 1. Revise el tipo de pared antes de montar. - Cuando se monte en una pared de madera, revise los puntos de fijación de tornillos en el muro según Wall Mounting Supporter Point. 2.
- Page 90 Poste de madera Panel de yeso Panel de yeso 76 mm Poste de madera Tornillo para soporte de pared Tornillo para poste de madera a. Ubique y marque los centros de las vigas de la pared con un detector de vigas. b.
- Page 91 Instalación del soporte de pared - Se recomienda instalar este producto solo en paredes de hormigón. Los problemas que pueden surgir debido a la instalación en otros materiales (paredes de madera, madera contrachapada, ladrillos, etc.) no están cubiertos. → Coloque el soporte de pared en el lugar deseado, marque los orificios para los tornillos y retire el soporte.
- Page 92 Ajuste de los resortes de bloqueo * Precaución: Si el soporte no se fija correctamente, el equipo podría caerse y producir daños o lesiones. Resorte de bloqueo Nivelación del producto - Si el producto no se encuentra nivelado después de la instalación, ajústelo con los tornillos. (Se puede subir o bajar el producto según la dirección de giro de los tornillos.) ±...
- Page 93 Organización de los cables e instalación del cojín de protección para el producto - Organice los cables como se muestra en la imagen. Debe utilizar bandas para organizar cables que se compran por separado o aquellas que se incluyen con su TV. - Instale el cojín de protección para el producto a fin de reducir el impacto que recibe cuando se golpea con la pared durante la inclinación.
- Page 94 ESPECIFICACIONES 15±2° 13±2° 177.6 177.6 82.5 107.3 162.5 118.3 82.5 107.3 162.5 118.3...
- Page 95 <Sin el soporte de pared> [Unidad: mm ] [300 X 300] 113,5 113.5 ▼ ▼ ▼ ▼ [400 X 200] 213,5 213.5 ▼...
- Page 96 América del Norte, Japón [ Unidad : mm ] <Con el soporte de pared> [300 X 300] [400 X 200]...
- Page 97 Australia < > Con el soporte de pared Unidad : [300 X 300] [400 X 200]...
- Page 98 <Sin el soporte de pared> Nombre del modelo OLW480B Ancho (mm) 350 (estándar) / 450 (extendido) Altura (mm) Grosor (mm) Peso del producto (kg) Especificaciones VESA del soporte 300 x 300, 300 x 200 (estándar) de pared / 400 x 200 (extendido) (mm) Carga de tensión máxima (kg) América del Norte, Japón...
- Page 100 El modelo y el número de serie del Pantallas compatibles producto se encuentran en la parte (Comuníquese con la tienda minorista o consulte el manual del propietario de la TV posterior o en uno de los laterales del para conocer los modelos compatibles). producto.