Nayax VPOS Touch User Manual
All-in-one card reader with touch screen and telemetry device
Hide thumbs
Also See for VPOS Touch:
- Manual (15 pages) ,
- User manual (7 pages) ,
- Installation manual (12 pages)

Related Manuals for Nayax VPOS Touch


Summary of Contents for Nayax VPOS Touch
- Page 1 VPOS Touch All-in-one Card Reader with Touch Screen and Telemetry Device VPOS Touch User Manual © Property of Nayax All rights reserved For more information contact us at support@nayax.com...
-
Page 2: Table Of Contents
Installation ............................12 Device Dismantling ......................... 12 Operating and Testing ........................12 Configure VPOS Touch Settings in NayaxVend ................13 Technician Mode ..........................14 Appendix 1 – Tests Prior to Repair ..................... 15 Appendix 2 - FCC & IC Regulations ..................... 17 Safety and Handling Instructions ....................... -
Page 3: General Information
Appendix 1 – Tests Prior to Repair section describes how to resolve the most frequent issues experienced prior to sending the device to the Nayax Laboratory. Appendix 2 – FCC & ICC Regulations lists all the production regulations and guidelines. -
Page 4: Device Overview
▪ Monitoring and alert of Power Down ▪ Decorative LED for Contact Smart Card slot Pro Tip The VPOS Touch has no battery and receives power via its connection to the vending machine. Strong shock or vibrations to the device may cause failure. Revision 1.6.4... -
Page 5: Device Specifications
12-42V DC, 12-24V AC; 5 Watts Power Consumption Recommended External Power Supply: 24V DC / 2Amp. Internal shock/tilt detector, anti-vandal Dragontrail glass, Glass anti-fingerprint coating Power-loss protection Super capacitors with safe shutdown mechanism Revision 1.6.4 VPOS Touch User Manual Page 5... - Page 6 Level 2: Visa payWave, MasterCard PayPass, Interac Flash, Contactless UnionPay qPBOC, AMEX ExpressPay, JCB J/Speedy, FeliCa, Interac Flash, , Discover D-PAS, CUP QuickPass, SuiCa ISO 7811 and JIS I Tracks 1,2,3 Magnetic Stripe JIS II Revision 1.6.4 VPOS Touch User Manual Page 6...
-
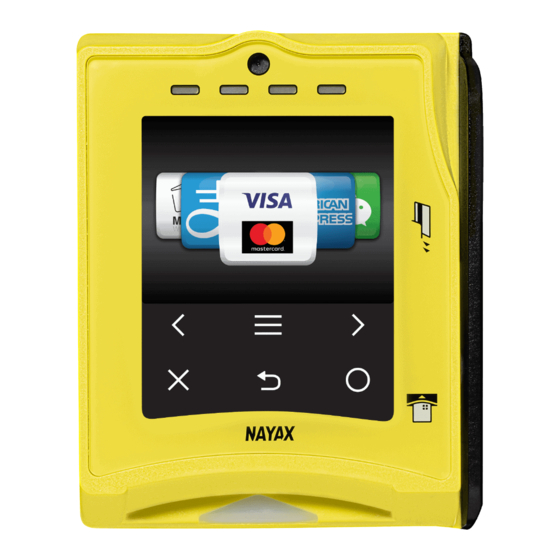
Page 7: Device Components
Front Panel Color - Yellow / Black Status display LED Magnetic stripe Contactless display touch screen Contact slot stripe Touch buttons Rear Side Cable Connector M4 x 5 mm Typical Hole SD Card Connect Speaker Connector Antenna Revision 1.6.4 VPOS Touch User Manual Page 7... -
Page 8: Device Serial Number
Device 2D Scheme Device Serial Number Serial number logic: PPMAPOWWYYSSSSSS Characters Description Product Type (E.g. For VPOS Touch - Main HW Version POS HW Version Week Number Year SSSSSSS Serial Revision 1.6.4 VPOS Touch User Manual Page 8... -
Page 9: Device Cables
Device Cables Nayax provides different configuration cables to suit different machines. The below table refers to each cable and its configuration Image Connector Connect to MDB in vending machines JVMA JVMA in vending machines (Japan) RS232 DB9 Female Serial Nayax VPOS Touch... -
Page 10: Device Connector Scheme (40-Pin)
Device Connector Scheme (40-Pin) Additional Accessories (Included in Box) Rear Plate & Drilling Template Stencil Revision 1.6.4 VPOS Touch User Manual Page 10... - Page 11 Additional Accessories (Optional) Reclining Spacer Protective Box (Angle = 7.5 degrees) Revision 1.6.4 VPOS Touch User Manual Page 11...
-
Page 12: Getting Started
The VPOS Touch Quick Guide has been included in your box for your quick reference. Device Dismantling To unplug the VPOS Touch connector, you must press both sides of the releasing bridge at the same time to avoid damaging the releasing bridge. -
Page 13: Configure Vpos Touch Settings In Nayaxvend
Configure VPOS Touch Settings in NayaxVend ▪ Refer to the below attributes used to configure the VPOS Touch device in the NayaxVend system. ▪ Payment Methods - Controls the type of payments that are displayed on the Welcome screen (VISA, Mastercard, Apple Pay, Samsung Pay, etc.) ▪... -
Page 14: Technician Mode
Reset Restarts the VPOS Touch firmware Initiates DEX read from the machine and sends it to Read Audit File the server Configure additional Nayax / Felica (JP) device Advanced Settings parameters Displays modem details, version info, reception level, Modem Info... -
Page 15: Appendix 1 - Tests Prior To Repair
The below procedure needs to be carried out by the Operator before sending the device to be fixed at the Nayax laboratory. 1. Connect the VPOS Touch Cable Connector to get power from the machine – Refer to below Image 1. - Page 16 3. Test the following payment cards: Magnetic Card – In case of an error, check the Magnetic Head connection to the board – Refer to Image 4. Contact Card & Contactless Card - In case of an error, send it to the Nayax Laboratory III.
-
Page 17: Appendix 2 - Fcc & Ic Regulations
(1) il ne doit pas produire de brouillage et (2) l’ utilisateur du dispositif doit étre prêt à accepter tout brouillage radioélectrique reçu, même si ce brouillage est susceptible de compromettre le fomctionnement du dispositif. Revision 1.6.4 VPOS Touch User Manual Page 17... - Page 18 The VPOS Touch IDs are: ▪ FCC ID: 2AK6L-VPOST ▪ IC: 10840A-VPOST The VPOS Touch device is available with two cellular modules. These are the two options: ▪ Contain FCC ID: RI7LE910NAV2, Contains IC: 5131A-LE910SNAV2 ▪ Contain FCC ID: RI7LE910SVL, Contains IC: 5131A-LE910SVL Revision 1.6.4...
-
Page 19: Safety And Handling Instructions
Warranty and Liability Thank you for choosing Nayax. Read the Nayax 24 months Limited Warranty Terms and Limitations included in your contract. In the unlikely event that your device needs repair service or for additional information, please contact us at support@nayax.com.