Advertisement
Quick Links
Panasonic
KX-UDT 111
efore you start
B
he IP telephone package that you have
T
received from us contains the following:
wireless receiver, power supply station, power
supply adaptors, and batteries. In another
package from us you have one or more base
stations with separately supplied power
adaptor. Installation of the telephone set and
the base station will take only a few minutes.
Insert both batteries into the portable
receiver. Connect the power supply adapter
to the receiver power supply station and to
the wall socket. Plug the Ethernet cable to the
socket on the rear side of the base station.
Plug the other end of the cable to the IP
phone socket of the modem, router or switch.
If the switch does not support power supply
via Ethernet cable, connect the power supply
adapter to the base station and to the wall
socket. Check the IP phone base station and
turn the antennas on its sides
1. Making a call
Gradually press the respective digits to dial
the telephone number. To confirm, press
"Answer call". To end the call, press "End
call". During the call, you can switch
between
speaker
"Answer
connecting a "Headset", or putting the
receiver to your ear.
2. General controls
The navigation buttons are used for browsing
through menu. Selection is confirmed by OK.
Menu can be browsed using the navigation
buttons. You can access the menu by
pressing OK.
3. Telephone directory
Virtual PBX uses the telephone directories of
the platform. The directory always includes
contacts of all active users within the
company. You can add, edit or delete items in
your personal directory via the portal-
uc.gtsce.com portal.
4. Searching in the directory
After pressing Directory – Search, start
searching for the contact by pressing up and
down buttons. For quick search (by a
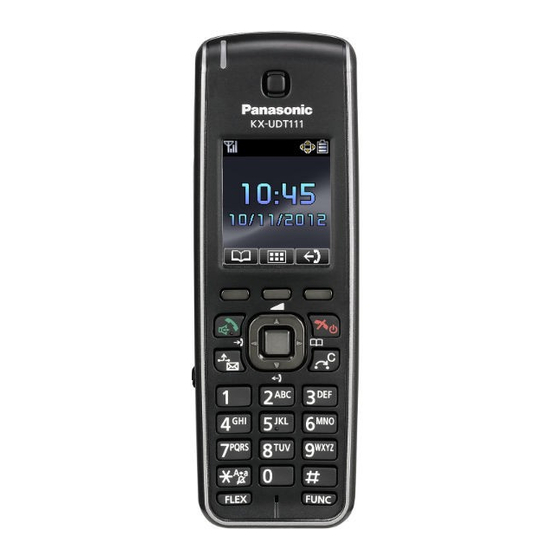
LED indicator
Directional antennas
Belt clip hole
Power
determining LED
upward. An indicator in the centre front
should be on. As soon as it is on, you can turn
on the wireless receiver by holding down the
"end call" button. Now check the phone's
LCD. When your short telephone number,
date and time are shown after a few minutes,
everything is ready and you can use your
phone. We have implemented the telephone
person's first or last name) press the keys
until the required symbol appears on the
screen; to delete the symbol, press C (clear);
to move through the text, use the left and
call",
by
right navigation buttons.
5. Call list
Press the Menu context button. This will
display the buttons: Inbound journal, Ring
volume, new tel. directory, receiver setting,
reminder. To call numbers from the directory,
press the "Answer call" button. To delete call
lists: Select the entry you wish. Press:
Inbound journal - options – delete. If you wish
to delete the entire history, press Inbound
journal - options – delete all.
6. Redial
Dialing the last dialed number. Press the
down button. This will display the list of
recently dialed numbers.
7. Forwarding calls
Forwarding a call with consulting: During the
call, press the "blank" button, dial the
telephone number and confirm by "Answer
call". You can talk to the other party and then
Navigation keys
directory of your company directly in the
phone. Enter the password you have received
during a handover for logging to portal-
uc.gtsce.com. The name is your telephone
number. Here you can customize the Virtual
PBX
service
to
suit
your
forward the call by pressing "Answer call"
again.
8. Call hold
Call hold: During the call, press the "blank"
button. To restore the call with the party,
press the "Answer call" context button.
9. Conference call
Conference call for 3 participants: during the
call, press the "func" "Conference"
buttons. This will put the active call with the
first person on hold and you will hear the
dialling tone. Call another participant, i.e. dial
a number. When the call has been
established, connect all participants by
pressing the "func" "Conference" buttons.
10. Volume of receiver and speaker (Hands
Free), ring volume
Changing the ring volume: Set the required
volume using up and down arrows and
confirm changes by pressing OK or back.
Receiver
LCD
Soft keys
needs
.
Advertisement

Related Manuals for Panasonic KX-UDT 111


Summary of Contents for Panasonic KX-UDT 111
- Page 1 Panasonic KX-UDT 111 efore you start he IP telephone package that you have Receiver LED indicator received from us contains the following: wireless receiver, power supply station, power supply adaptors, and batteries. In another Directional antennas package from us you have one or more base stations with separately supplied power adaptor.
- Page 2 Panasonic KX-UDT 111 11. Czech language options 12. Limits of Panasonic system The telephone set allows you to choose from You can connect up to 255 SIP DECT several languages: English, Czech, etc. receivers KX-UDT to 128 base stations KX Czech language is set in the factory setting.