Table of Contents
Advertisement
Quick Links
Advertisement
Table of Contents

Summary of Contents for Pulse PLS00572
- Page 1 Double-face LED Moving Wash/Beam Light Model: PLS00572...
-
Page 2: Important Safety Information
Please read these instructions carefully before use and retain for future reference. IMPORTANT SAFETY INFORMATION • When using electrical appliances basic safety precautions should always be followed. • Check the product before use for any damage. Should you notice any damage on the cable or casing, do not use. -
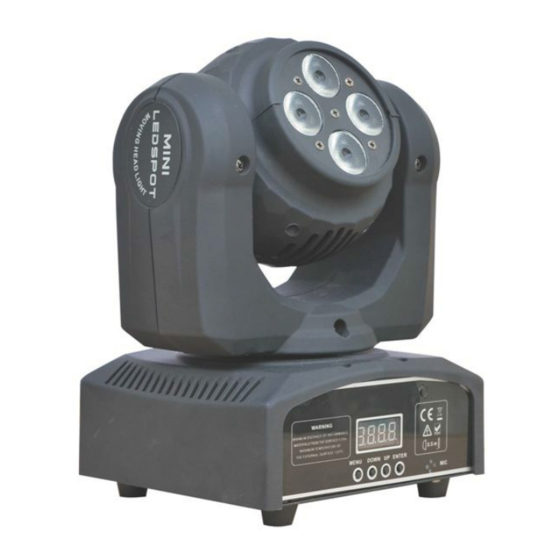
Page 3: Product Overview
PRODUCT OVERVIEW MENU ENTER DOWN SETUP Fuse Replacement • With a flat head screwdriver, prise the fuse holder out of its housing. • Remove the defective fuse from its holder and replace with the same fuse specification. • Put the fuse holder back in its place and reconnect the power. Fixture Linking •... -
Page 4: Cable Connections
SETUP DMX Data Cable • Use a Belden 9841 or equivalent cable that meets the specifications for EIA RS- 485 applications. The cable will have the following characteristics: - 2-conductor trwitsed pair plus a shield - Maximum capacitance between conductors - 30pF/ft - Maximum capacitance between conductor and shield - 55pF/ft - Maximum resistance of 20Ω... -
Page 5: Setting Up A Dmx Serial Data Link
SETTING UP A DMX SERIAL DATA LINK • Connect the (male) 3-pin connector side of the DMX cable to the output (female) 3-pin connector of the controller. • Connect the end of the cable coming from the controller, which will have a (female) 3-pin connector, to the input connecotr of the next fixture consisting of (male) 3-pin connector. -
Page 6: Photometric Diagram
OPERATING INSTRUCTIONS Navigating the Control Panel • Access the control panel functions using the four panel buttons located directly beneath the LCD. Used to access the menu or to go to MODE/ESC a previous menu option. Scrolls through the menu options in ascending order Scrolls through the menu options in DOWN... - Page 7 SHnd SH 0 SH 1 SH 2 SH 3 SEnS 0-99 bLAnd bLAc Auto Soun HoLd dISP rPAN rTiL REST...
-
Page 8: User Configuration
USER CONFIGURATION To set the PAN to inverting or non-inverting • Press the MODE button until it shows “Pan Inverse”, then press ENTER and the LCD will show “OFF” or “ON”. Use the UP/DOWN buttons to set the desired inversion and press ENTER to •... -
Page 9: Dmx Mode
• Choose a unit to function as the Master, then select one mode as auto running programme. • Finally, chain the units together using DMX cable, Fast Mode or Slow mode can be the Master one’s programming. • The other units are set to the same DMX Address (001 or 017). DMX MODE •... -
Page 10: Cleaning And Maintenance
DMX CHANNEL VALUES (21 CHANNELS) Channel Range Function 0~255 X motor 0~255 X motor fine 0~255 Y motor 0~255 Y motor fine 0~255 XY motor speed 0~255 Y axis infinite rotation 0~255 Dimmer total 0~255 Strobe 0~255 Red 1 dimmer total 0~255 Green 1 dimmer total 0~255... -
Page 11: Specification
SPECIFICATION Voltage AC 100-240V 50-60Hz Power Consumption Light source 1pcs x 10W RGBW CREE LED + 4pcs x RGBW 10W DMX mode 17/23 Channel Control DMX 512, Master-slave, Auto run, Sound Display Digital display Rotating angle X axis: 540°, Y axis: infinite rotation Function 8 internal program, sound controlled by DMX 512 Work environment... - Page 12 INFORMATION ON WASTE DISPOSAL FOR CONSUMERS OF ELECTRICAL & ELECTRONIC EQUIPMENT. When this product has reached the end of its life it must be treated as Waste Electrical & Electronic Equipment (WEEE). Any WEEE marked products must not be mixed with general household waste, but kept separate for the treatment, recovery and recycling of the materials used.