Braun TributeCollection FP 3020 Instructions Manual
Hide thumbs
Also See for TributeCollection FP 3020:
- Owner's manual (17 pages) ,
- Manual (103 pages) ,
- Manual (27 pages)

Related Manuals for Braun TributeCollection FP 3020


Summary of Contents for Braun TributeCollection FP 3020
- Page 1 TributeCollection Food processor Instructions FP 3020 Type 3205 www.braunhousehold.com...
- Page 2 1 YEAR WARRANTY Manufacturer warrants, subject to the conditions stated below, that from the date of purchase, this product will be free from mechanical defects for a period of ONE (1) year. Manufacturer, at its option, will repair or replace this product found to be defective during the warranty period.
- Page 3 Customer Service to the following address: RELIABLE CARE SERVICE CENTER 2 Alpine Ct STE 102 Chestnut Ridge, NY 10977 855.927.4383 | service@braunpartsusa.com © Copyright 2021. All rights reserved De’Longhi Braun Household GmbH Carl-Ulrich-Straße 4 63263 Neu-Isenburg/Germany 5722010244/1.21 – FP 3020 US...
-
Page 4: Important Safeguards
5. The use of attachments, including canning or ordinary jars, not recommended or sold by Braun may cause fi re, electrical shock, or risk of injury to persons. 6. Regularly inspect the power cord, power plug and actual appliance for any damage. - Page 5 9. Do not use outdoors or for anything other than its intended purpose. 10. Keep hands and utensils away from moving blades or discs while processing food to prevent the possibility of severe injury to persons or damage to the unit. A scraper may be used, but must be used only when the unit is not running.
- Page 6 Optional Optional...
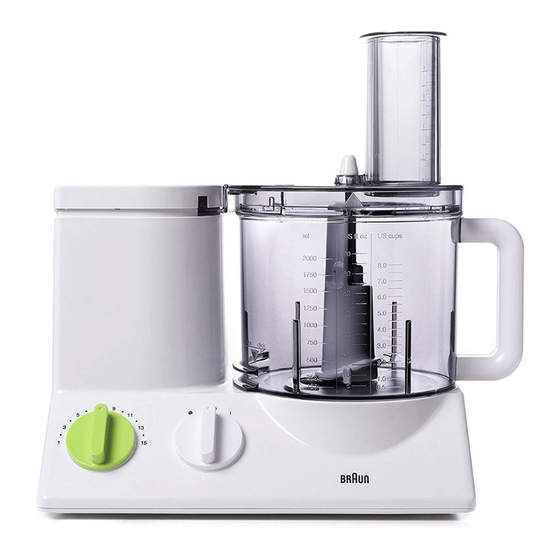
- Page 7 PARTS & ATTACHMENTS Motor Block Cord Storage Motor Switch (On/I Off /O) Pulse Mode ( ) Variable Speed Regulator (1-15) Food Processor Bowl Lid for Food Processor Bowl Pusher For Lid Blade With Protective Cover 10 Insert Carrier 11 Fine Slicing Insert - a 12 Coarse Slicing Insert - b (Optional) 13 Fine Shredding Insert - c 14 Coarse Shredding Insert - d...
- Page 8 2. Put desired attachment onto drive shaft of the bowl and push it down as far as it will go. 3. Put the lid onto the bowl matching the arrow on the lid with the arrow on the bowl. Turn the lid clockwise guiding its nose rim into the safety lock opening of the motor block until it audibly snaps into place.
-
Page 9: Pulse Function
Note: If you continue turning the food processor bowl in the «click» direction as far as it will go, beyond the stop position, you can lock the food processor bowl on the motor part. In this position, however, you cannot switch on the motor. -
Page 10: Yeast Dough
Yeast Dough (Breads & Cakes) 1. Pour flour into the food processor bowl, then add other ingredients except liquids. 2. Put on the lid and lock into place. Set the food processor to speed 7 and switch the appliance on. 3. -
Page 11: Sponge Cake
Cake Mixtures Method One: 1. Cream butter, sugar, and eggs on speed 6 for 1 minute. 2. Pour in milk on speed 6 for 15 seconds. 3. Set the food processor to speed 15, using the «pulse» function, carefully fold in flour; pulse 10-15 times. Method Two: 1. - Page 12 Chopping Use the mini chopper bowl to process small amounts of food.Remove the regular blade from the bowl in order to fit in the mini bowl. Use the mini S blade with the mini bowl and use the regular cover. 1.
- Page 13 4. Fill the food processor bowl with ingredients. (See fi gure d) Note: In order to avoid damages caused by overload, this appliance is equipped with an automatic security switch which shuts off the current supply if necessary. In such case, turn the motor switch back to off...
- Page 14 Chopping With The Blade Processing times in the chart on the next page are approximate and depend on the quality, the amount of food to be processed and the required degree of fineness. Product Preparation Speed Mode Time/Pulse Amount Hard Bread Quartered 45 secs Rolls...
- Page 15 SLICING, SHREDDING, GRATING Insert Speed Processing Examples 11. a - Fine Cucumbers, Cabbage, Raw Slicing Potatoes, Carrots, Onions, Radishes 12. b - Coarse Cucumbers, Kohlrabi, Raw Slicing Potatoes, Onions, Bananas, (optional) Tomatoes, Mushrooms, Celery 13. c - Fine Cheese (soft to medium), Shredding Cucumbers, Carrots, Raw Potatoes, Apples...
- Page 16 4. Never reach into the filling tube when the motor is running. Always use the pusher (see figure E). Note: When processing juicy or soft food, you will obtain better results at a lower speed. Hard food should be processed at a higher speed. Do not overload the processor bowl.
- Page 17 JUICING Use the citrus juicer to make fresh squeezed juice. Use caution when pressing juice, do not press too hard. 19 - Citrus Press 1. Remove lid from food processor bowl (see figure a). 2. Attach citrus press to food processor bowl by aligning the arrow on the citrus press with the arrow on the food processor bowl, then rotate the citrus...
-
Page 18: Cleaning And Maintenance
5. Hold citrus press in place and pour freshly squeezed juice into a clean glass (see figure e). 6. To remove citrus press from food processor bowl rotate the citrus press to align the arrows on the citrus press and the food processor bowl and lift (see figure f). - Page 20 RELIABLE CARE SERVICE CENTER 2 Alpine Ct STE 102 Chestnut Ridge, NY 10977 855.927.4383 / service@braunpartsusa.com...